Connection Options
Connector SDK connection options define how a connection is established between your source and Fivetran. For example, a connection to a PostgreSQL database might use an SSH tunnel as the connection method, while another connection to the same database might use a private link.
We support the following methods for connecting your source database to Fivetran:
- Directly by safelisting Fivetran's IP
- Using an SSH tunnel
- Using a reverse SSH tunnel
- Using a VPN tunnel
- Using private networking - AWS PrivateLink, Azure Private Link, or Google Cloud Private Service Connect
See our Deployment Models documentation to learn more about the deployment models we support.
Safelist Fivetran IPs
The fastest and easiest way to connect is to allow Fivetran's IP direct access to your source.
If you have restricted inbound access to your source (for example, a database behind a firewall), you can safelist Fivetran's IP addresses to grant access. This involves adding the relevant IPs to the inbound rules of your firewall or security group.
Example
We provide example code to connect to an Apache HBase database using the Connector SDK. If your Apache HBase database allows connections only from specific IP addresses, add Fivetran's IP ranges to the allowlist. This enables your code running in the Fivetran environment to connect securely without exposing your source to the public internet.
SSH tunnel
If it's not possible to provide direct access to your source, you can connect to it from your code running in Fivetran using an SSH tunnel. You can also choose this connection method for an added layer of security.
To connect using an SSH tunnel, you need to set up an SSH tunnel server (bastion host) that has network access to your target source (for example, a database). The tunnel server must expose its SSH port (typically port 22) to the Fivetran's IP addresses, allowing Fivetran to establish a secure session to the tunnel server.
In addition, you’ll need to create an SSH user account on the tunnel server specifically for your connector code. This user can be configured to use any supported SSH authentication method, such as key-based authentication or username/password, depending on your security requirements. If using key-based authentication, you’ll provide the private key as part of your connector’s configuration.
We provide a complete example of how to connect using an SSH tunnel within the connector_sdk examples repository. This includes sample code for setting up the SSH client, configuring port forwarding, and managing authentication securely.
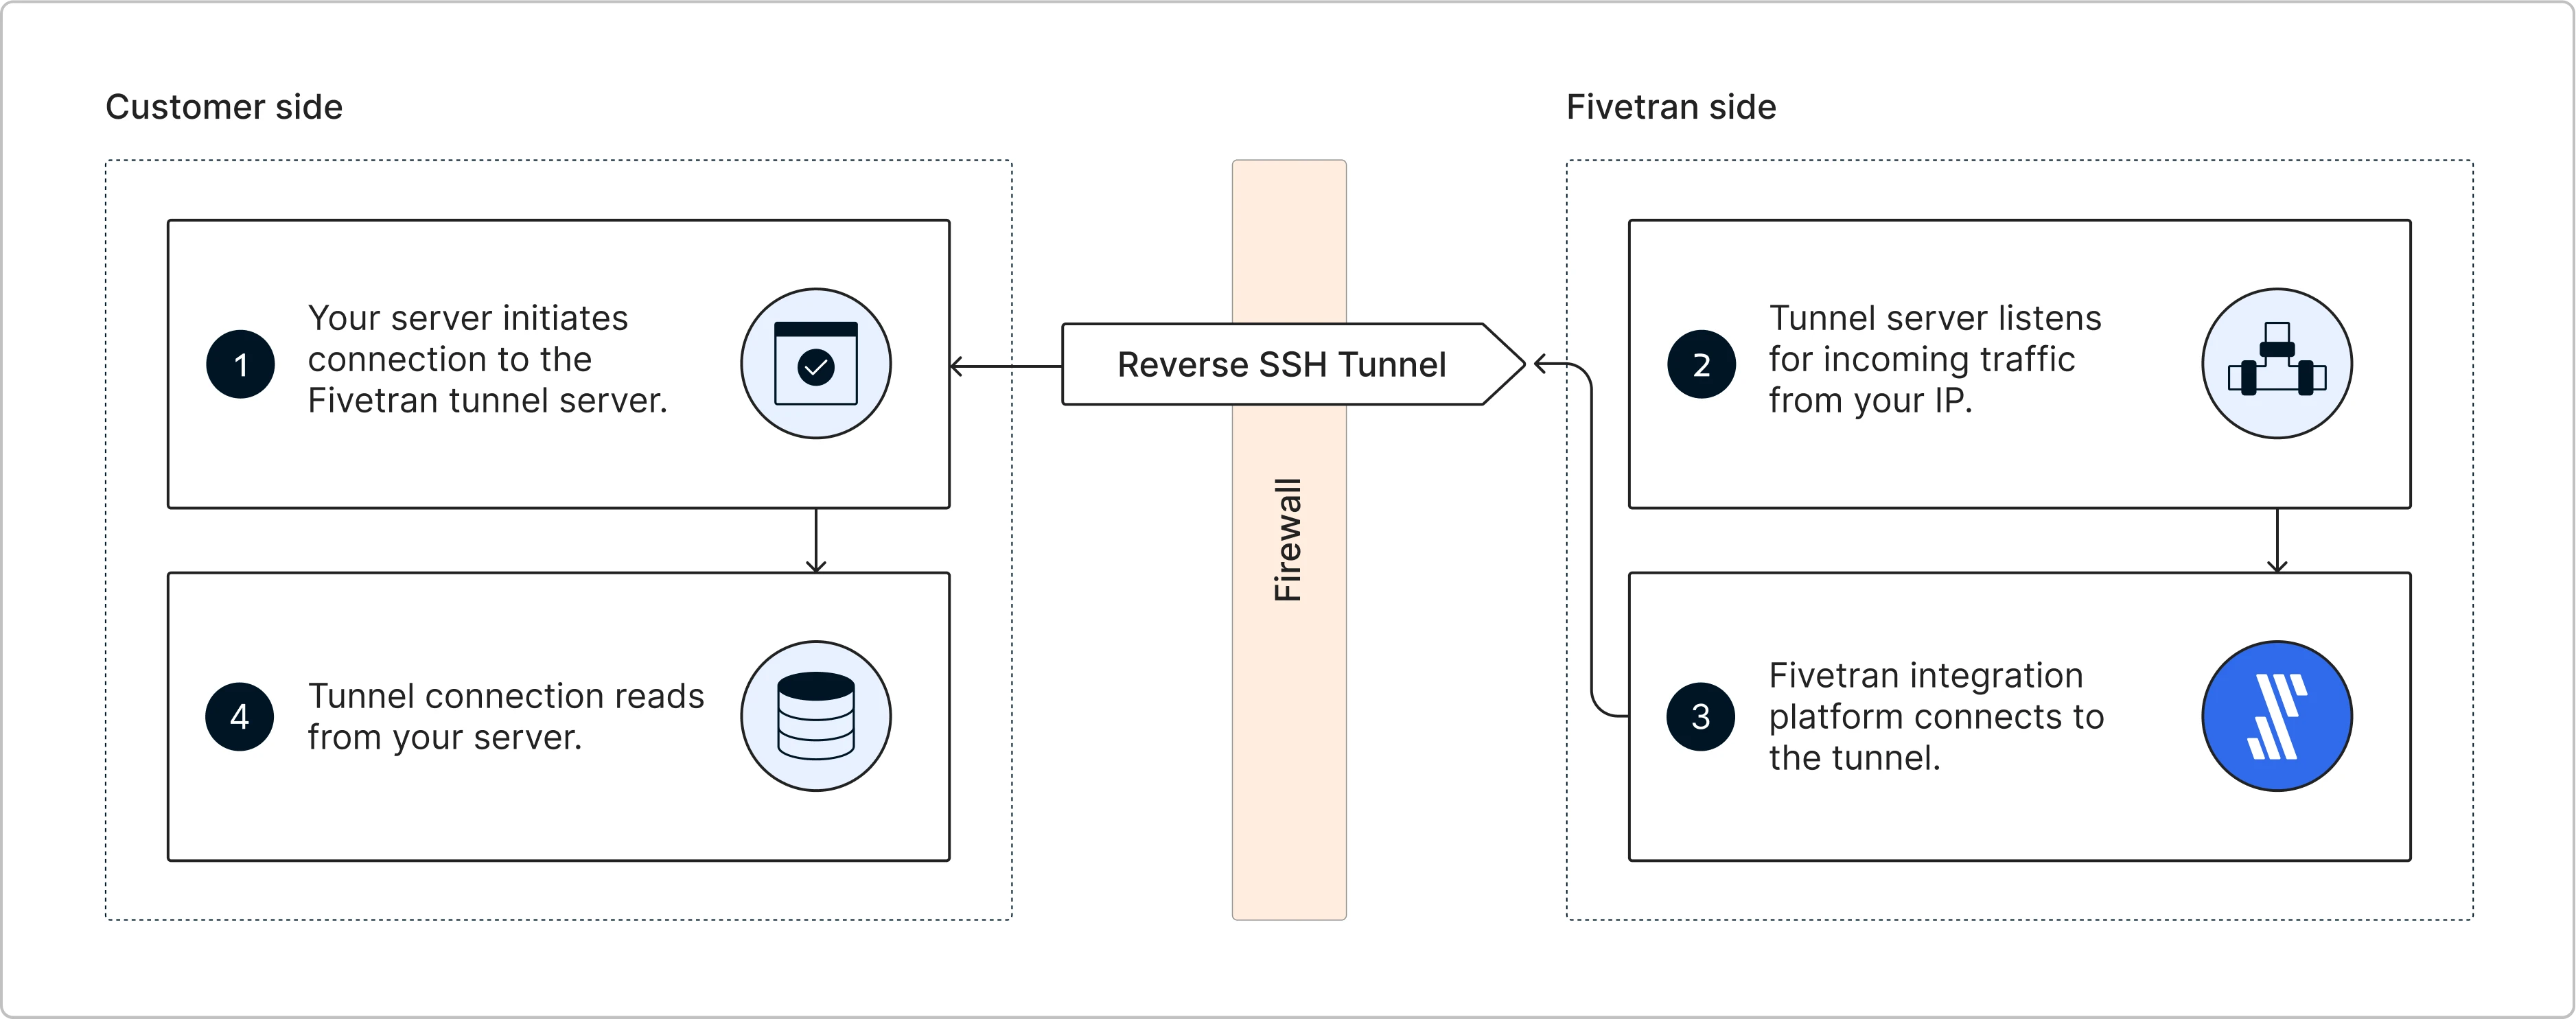
Reverse SSH tunnel
You can connect Fivetran to your source using a reverse SSH tunnel if you are unable to provide direct port access to your instance. Reverse SSH tunneling allows you to securely connect to a device located behind a firewall or NAT (Network Address Translation) remotely. With this method, the remote machine initiates the connection to the local machine, enabling remote access to services on the local machine.
For reverse SSH, you cannot directly initiate a connection from your server to your code running in the Fivetran environment. In such cases, you can set up a reverse SSH tunnel using an intermediate bastion virtual machine (VM) hosted in Fivetran-managed environment that acts as a relay between your private network and your code in Fivetran.
The sections below walk you through the process of setting up a reverse SSH tunnel so that your connector code in the Fivetran environment can securely access your data source.
How it works
- You initiate a reverse SSH tunnel by connecting from your private network to an intermediate VM that is publicly accessible.
- Access to this VM is restricted and limited only to allowed private IP ranges, including your private network and the Fivetran network, to ensure secure connectivity.
- This connection opens a reverse SSH tunnel, exposing a port on the intermediate VM that forwards traffic to your internal data source.
- Your code running in Fivetran connects to the intermediate VM and accesses your source via the SSH tunnel.
Getting started
To set up a VM for a reverse SSH tunnel to connect to Fivetran, create a Fivetran support ticket and provide the following details:
- The name of the Fivetran destination(s) where you want your reverse SSH tunnel to be set up
- Your SSH public keys (see instructions below to learn how to generate)
- The public IP address (CIDR notation) of your internal SSH server.
SSH key setup
You will need to generate SSH key pairs for two purposes:
- Server-side key pair: Managed by Fivetran on the bastion VM to authenticate incoming SSH tunnel connections from your server.
- Client-side key pair: Used by your connector code running in the Fivetran environment to authenticate when connecting to the bastion VM.
Generating SSH keys
For instructions on how to create an SSH user and generate key pairs, refer to:
SSH keys created for server-side authentication shouldn't have passphrases, while SSH keys created for client-side authentication can have passphrases for added security.
Initiate connection from your server
To initiate the reverse SSH tunnel from your server, you can refer this:
Connecting to intermediate VM
Once the reverse SSH tunnel connection is set up, you need to write code that runs in Fivetran to connect to the intermediate VM and securely access your data source.
We provide an example in the fivetran_connector_sdk repo, which demonstrates the following key points in the SSH tunnel workflow:
- Setting up the SSH client to connect to the intermediate VM
- Configuring port forwarding
- Managing authentication securely
The server credentials to be provided in this example configuration are for creating the SSH tunnel connection to the intermediate VM, not to the source itself.
VPN tunnel
You must have an Enterprise or Business Critical plan to use VPN tunnel.
A VPN (Virtual Private Network) tunnel provides a secure, encrypted connection between networks. You can use a VPN tunnel to enable your Connector SDK code running in Fivetran to securely access your source for instance a database over a private network when other connection methods are not viable or when you require site-to-site VPN connectivity for complex network setups.
Fivetran provisions a VPN gateway in its network and establishes a secure site-to-site VPN tunnel to your VPN gateway. Within Fivetran's network, we also provision a bastion server that has network access to your private resources through the VPN tunnel. Your Connector SDK code connects to this bastion server to route traffic securely to your source.
Key difference from Fivetran-native connectors: With regular connectors, you simply provide bastion details in a setup form and connectors automatically handle the connection. With Connector SDK, you write the connector code yourself, so you must write code that programmatically establishes the SSH connection to the bastion server, sets up port forwarding, and routes traffic to your source.
Fivetran provides your bastion credentials once the VPN tunnel is set up. Your code must use them to establish the connection. See the Using the bastion server in your code section for implementation details.
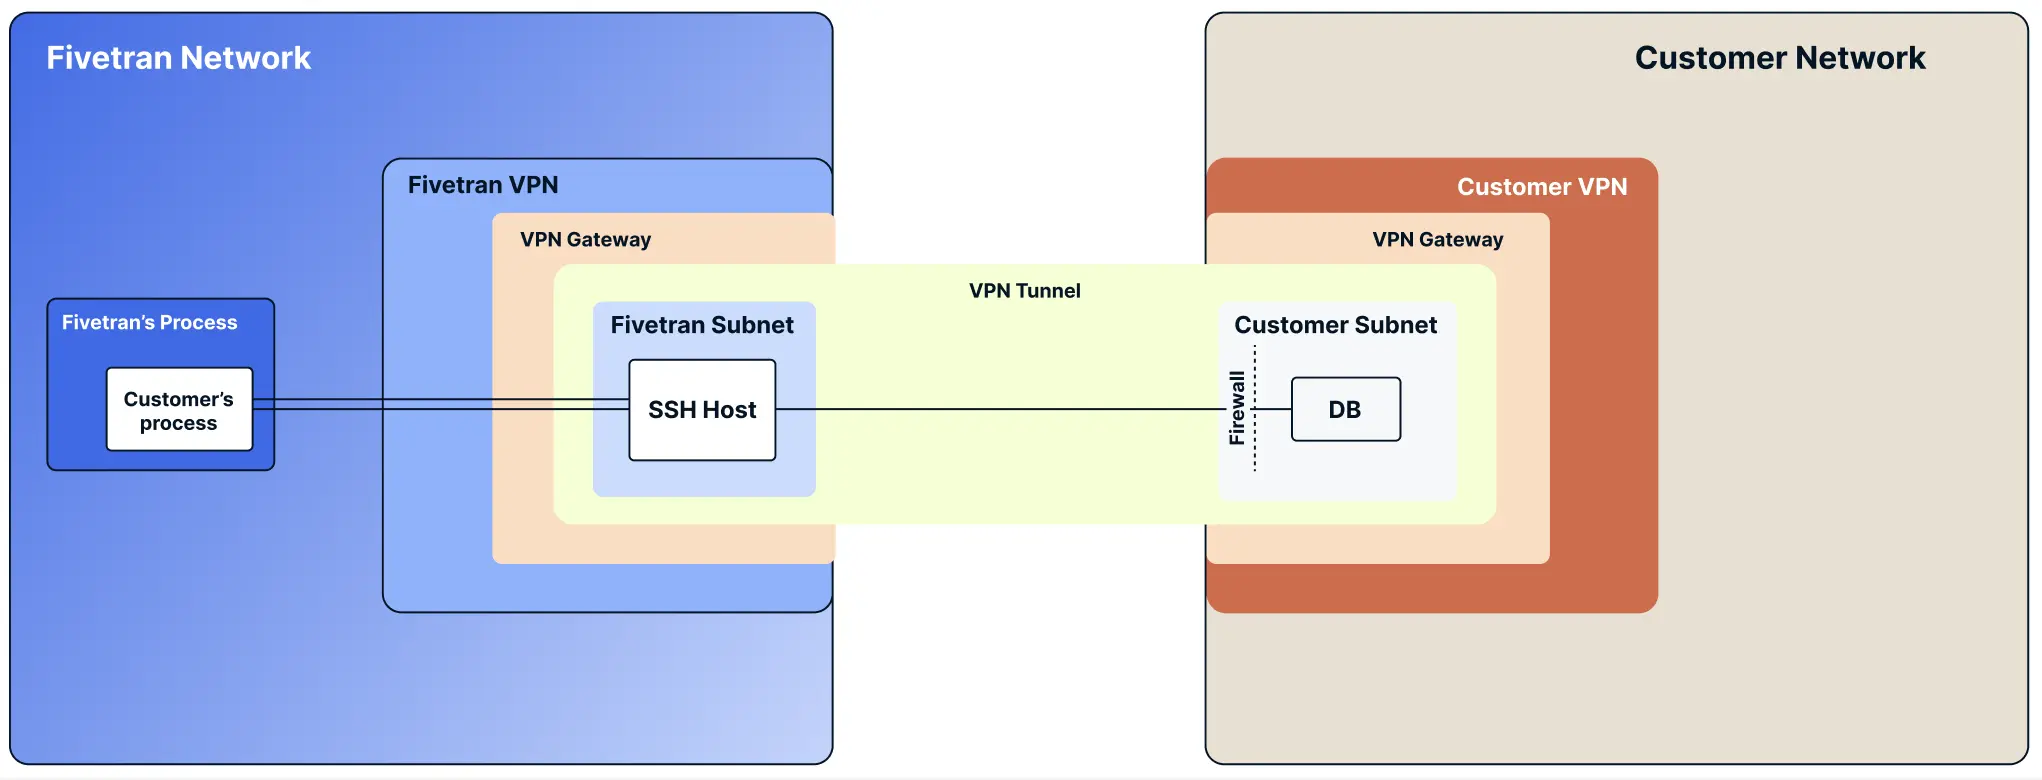
How it works
- Fivetran provisions a VPN gateway in its VPC.
- We establish a site-to-site VPN tunnel between our VPN gateway and your VPN gateway.
- The VPN tunnel provides encrypted connectivity between the two networks.
- We provision a bastion server within our network. It can reach your internal network over private IP addresses through the VPN tunnel. Fivetran provides you with the server credentials after setup is complete.
- Your Connector SDK code (running in the Fivetran environment) connects to the bastion server using SSH.
- The bastion server connects to your source over its private IP address through the VPN tunnel.
Getting started
To set up a VPN tunnel connection for your Connector SDK connector, follow these steps:
Request VPN tunnel setup
Create a Fivetran support ticket requesting VPN tunnel setup and provide the following information:
- The name of the Fivetran destination(s) where you want VPN tunnel to be set up
- Customer-side VPN gateway configuration details
- Source details (source type, internal hostname/IP, port, SSH public keys)
- Any specific network requirements or constraints
- Mention if you are interested in testing the setup (the support team can help validate it on your behalf)
Receive bastion server credentials
Fivetran will set up the VPN tunnel and bastion server on our side. Once the setup is complete, you will receive:
- SSH host (bastion server hostname/IP)
- SSH port
- SSH username
- Connection details for routing to your source
Configure your VPN gateway
Configure your VPN gateway to establish a site-to-site VPN tunnel with Fivetran’s VPN gateway.
Using the bastion server in your code
Your Connector SDK code must use the bastion server credentials provided by Fivetran to establish connectivity to your source. The bastion server acts as an intermediary that routes traffic through the VPN tunnel.
Refer to this bastion server example for guidance on using a bastion server to connect to the source.
The implementation pattern is similar to SSH tunnel connections. Your code should:
- Establish a connection to the bastion server using the provided credentials
- Configure port forwarding or tunneling to route traffic to your source
- Connect to your source through the established tunnel
The server credentials we provide you with are for connecting to the bastion server, not directly to your source. Your code uses the bastion as a gateway to reach your source through the VPN tunnel.
AWS private link
You must have a Business Critical plan to use AWS PrivateLink.
AWS PrivateLink allows VPCs and AWS-hosted or on-premises services to communicate with one another without exposing traffic to the public internet. PrivateLink is the most secure connection method. Learn more in AWS’ PrivateLink documentation.
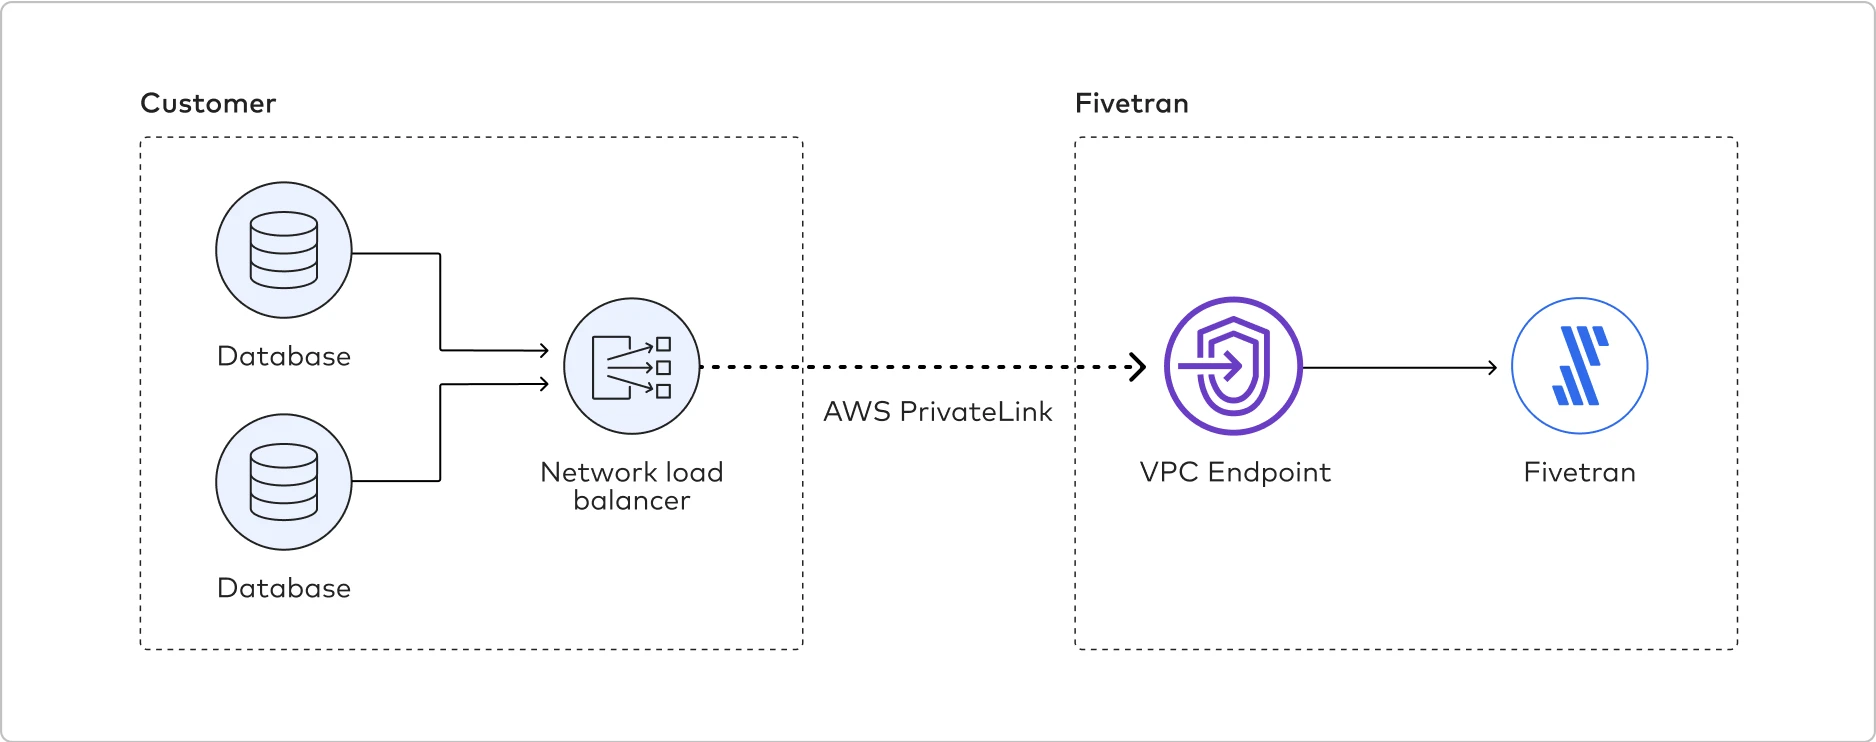
Fivetran uses PrivateLink to move your data securely between our system and your AWS-hosted or on-premises source. PrivateLink works differently depending on your source type:
- If your data source is hosted in AWS, Fivetran can connect to your source using a PrivateLink connection. Your code running in Fivetran query and process the data from the source into our system.
- If your data source is hosted on-premises, Fivetran can use AWS Direct Connect to access your source data. AWS Direct Connect establishes a private network connection between your premises and an AWS VPC. Your code should connect to that AWS VPC using a PrivateLink connection, then query and process the data from the source into our system. Learn more in AWS’ Direct Connect documentation.
You can also use AWS Private Link with multiple destinations. See a complete list in our Supported destinations documentation.
Prerequisites
To set up AWS PrivateLink, you need an AWS-hosted (EC2, RDS, or S3 only) or on-premises source in one of our supported regions.
Your on-premises source must be one of our supported databases. See a complete list in our Databases documentation.
How you connect AWS PrivateLink to your source depends on whether your source is hosted in AWS or on-premises.
Postrequisites
To use AWS PrivateLink, you must select AWS as a Cloud service provider in the Finish Fivetran configuration step of the relevant destination setup guide.
Setup instructions for AWS-hosted source
Expand for instructions
We support connecting to the following AWS-hosted sources using PrivateLink.
You must have an AWS endpoint service configured for your source before you set up a PrivateLink connection with Fivetran. AWS endpoint services only work with network load balancers (NLB), so you must create an NLB inside your VPC if you do not already have one. The NLB receives requests from Fivetran and routes it to your source.
The following graphic illustrates how Fivetran connects to the customer database using AWS Private Link:
Since endpoint service configurations are out of Fivetran’s control, we recommend that you contact your AWS representatives for help setting up PrivateLink. However, we do provide the following high-level instructions based on how customers typically configure their data sources:
In your VPC, create an NLB for your data source and configure it for each subnet (availability zone) in which the service should be available. For help, see the Create an NLB section.
Skip this step if your data source is already running behind an NLB.
If you chose to use security groups with your NLB, you must allow the following Fivetran's internal CIDR range on the security groups:
10.0.0.0/8.Create a VPC endpoint service configuration and specify your NLB.
Make sure that you are familiar with the endpoint service considerations and have met its prerequisites.
Safelist Fivetran’s AWS VPC Account ID (
arn:aws:iam::834469178297:root) to allow access to your VPC endpoint service.To learn how to safelist the Fivetran account ID, see AWS’ endpoint service permission documentation.
Create a Fivetran support ticket and provide the service name (VPCe) (for example,
com.amazonaws.vpce.<region_id>.vpce-svc-xxxxxxxxxxxxxxxxx) along with the hostname of the service/source. Fivetran will then finish the setup on our side.To activate the connection, accept the interface endpoint connection request from Fivetran. By default, connection requests must be manually accepted. However, you can configure the acceptance settings for your endpoint service so that any connection requests are automatically accepted.
As the PrivateLink setup is complete, you can now write your connector code to connect to the source using the hostname provided in Step 4. The code will run within Fivetran and securely access your source through the PrivateLink connection.
Setup instructions for on-premises source
Expand for instructions
To set up PrivateLink for an on-premises source, please create a Fivetran support ticket requesting assistance. Our team will help you set up AWS Direct Connect to establish a private connection between your on-premises environment and an AWS VPC. Once the connection is in place, your Connector SDK code can use AWS PrivateLink to securely access your source through the VPC.
Setting up using the PrivateLink API (self-service)
To set up PrivateLink connection using the API, refer to the privatelink api documentation.
Azure private link
You must have a Business Critical plan to use Azure Private Link.
Azure Private Link allows Virtual Networks (VNets) and Azure-hosted or on-premises services to communicate with one another without exposing traffic to the public internet. Learn more in Microsoft's Azure Private Link documentation.
Fivetran uses Private Link to move your data securely between our system and your Azure-hosted, Azure Virtual Machine-hosted, or on-premises source. Private Link works differently depending on your source type:
- If your data source is hosted in Azure, Fivetran can connect to your source using a Private Link connection. Your code running in Fivetran will query and process the data from the source into our system.
- If your data source is hosted in an Azure Virtual Machine or on-premises, you can use Azure Private Link Service to connect Fivetran to your source. To use Azure Private Link Service, you must create an Azure Private Link Service with port forwarding VMs. The VMs relay the network traffic into your Azure VNet, which then connects to your source through Azure ExpressRoute or Azure VPN Gateway.
You can also use Azure Private Link with multiple destinations. See a complete list in our Supported destinations documentation.
Prerequisites
To set up Azure Private Link, you need an Azure-hosted, Azure Virtual Machine-hosted, or on-premises source in one of our supported regions.
Your on-premises source must be one of our supported databases. See a complete list in our Databases documentation.
How you connect Azure Private Link to your source depends on whether your source is hosted in Azure, in an Azure Virtual Machine, or on-premises.
Postrequisites
To use Azure Private Link, you must select Azure as a Cloud service provider in the Finish Fivetran configuration step of the relevant destination setup guide.
Setup instructions for Azure-hosted sources
Expand for instructions
We support connecting to the following Azure-hosted sources using Private Link.
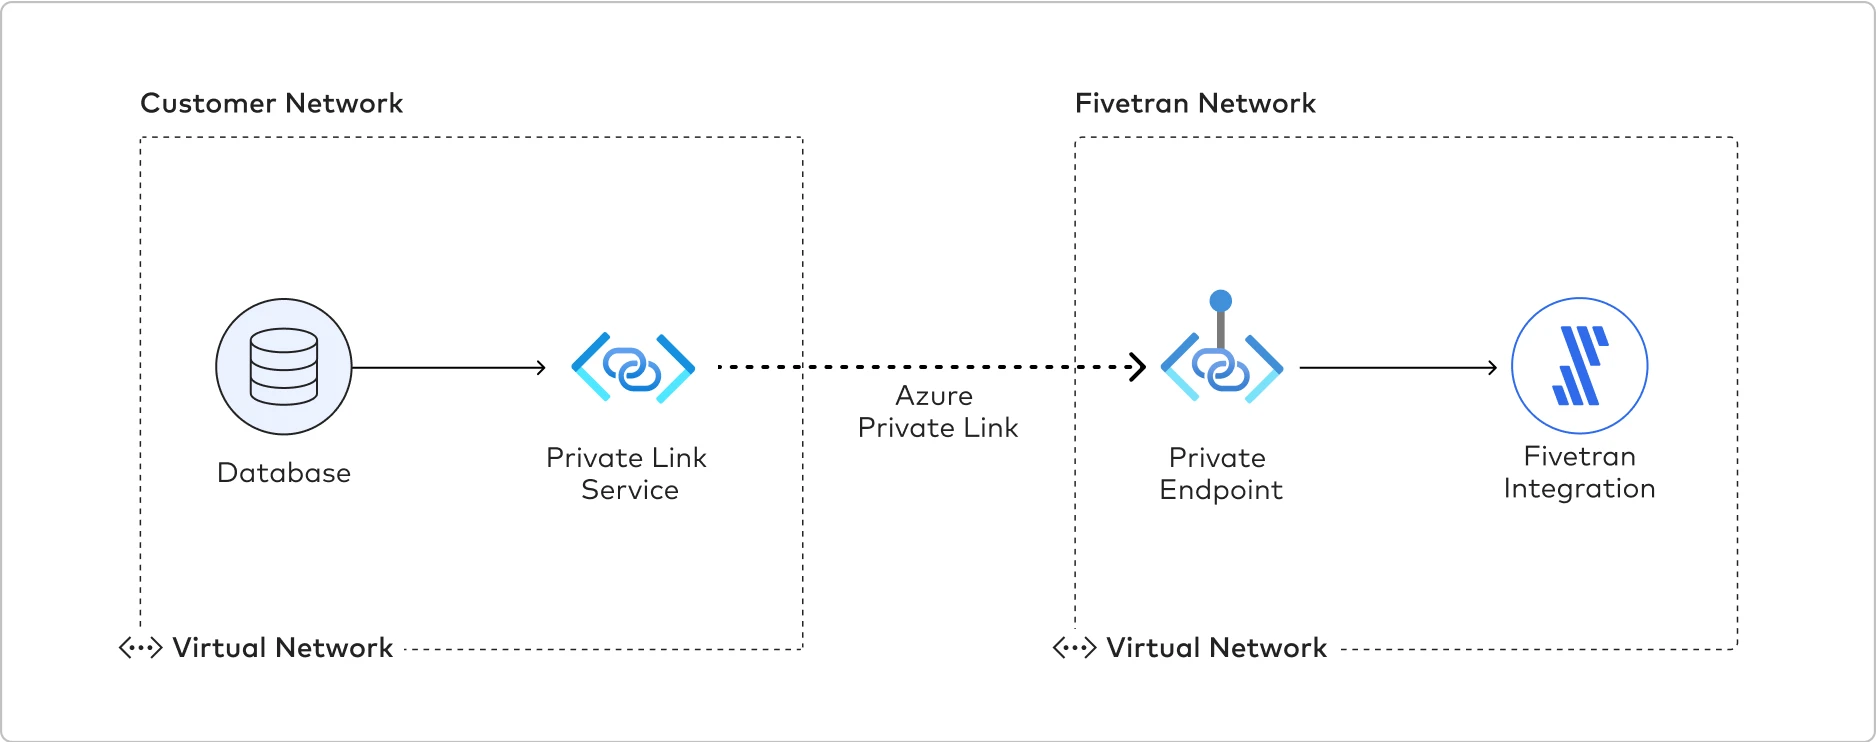
The following graphic illustrates how Azure Private Link establishes a connection between the Fivetran network and the customer network. Fivetran uses Private Endpoints to establish a Private Link with the Azure Database for MySQL and Snowflake.

To establish a Private Link connection, do the following:
- Verify that your Azure-hosted source supports Private Endpoint in Microsoft’s Private Endpoint documentation.
- Create a Fivetran support ticket and provide your Azure-hosted service’s fully-qualified resource ID, including the resource name and resource type of your Azure-hosted source.
- Wait to receive Private Endpoint request details from Fivetran. We create a Private Endpoint using your resource ID, type, and subresource. We then initiate a Private Link connection request as part of the Private Endpoint setup and share the details of that request with you.
- In the Azure Portal or CLI, verify and approve the Private Link connection request from Fivetran. Fivetran then finishes setting up Private Link for your Azure-hosted service on our side.
- As the PrivateLink setup is complete, you can now write your connector code to connect to the source. The code will run within Fivetran and securely access your source through the PrivateLink connection.
Setup instructions for Azure Virtual Machine-hosted or on-premises sources
Expand for instructions
How you set up Private Link for your Azure Virtual Machine-hosted or on-premises source depends on whether or not your source already has an Azure Private Link Service.
If your source is already configured with a Private Link Service, follow the setup instructions for Azure-hosted sources to complete your Fivetran setup.
If you do not have a Private Link Service yet, you will need to configure one before establishing a Private Link connection by following the steps below:
- You must have a VNet with access to your sources.
- If you are configuring your on-premises sources and they aren't connected to Azure yet, either follow the instructions in the Azure ExpressRoute documentation (recommended) or Azure VPN Gateway documentation to connect them to Azure.
- Azure ExpressRoute provides a dedicated, high-bandwidth connection between the on-premise network and Azure, bypassing the public internet.
- Azure VPN Gateway establishes a secure, encrypted VPN tunnel over the public internet between the on-premise network and Azure.
- If you are configuring your Azure Virtual Machine-based sources, ensure that they are accessible from the VNet where the Private Link Service Load Balancer will be running.
- A single Azure Private Link Service can support one or multiple sources simultaneously, with different ports mapped to their respective data source IP addresses. You must enter these ports in Fivetran's connection setup form.
- Inside the VNet, create a Standard Load Balancer with a NIC-based backend pool that has access to your data sources. Configure a health probe and a load balancer rule with the ports that your connections will use. Learn how in Azure's Create a load balancer guide.
- Create a Private Link Service associated with the load balancer that you created in step 1. Learn how in Azure's Create a private link service guide.
- Create one or more Virtual Machines and place them in the backend pool of the load balancer you created in step 1.
- Enable IP forwarding on each of the backend Virtual Machine network interfaces. Learn how to enable IP forwarding in Azure's Enable IP forwarding documentation.
- For security purposes, ensure that no public IP addresses are configured for the Virtual Machines. Private Link connections use only private IP addresses.
- (Optional) Log in to each Load Balancer-backend Virtual Machine and run the script below. The script configures Network Address Translation (NAT), which forwards network packets from SLB-backend Virtual Machines to your data sources. The script below configures a single port forwarding, but feel free to add additional sets of iptables
PREROUTINGandPOSTROUTINGrules for additional ports:
#!/bin/bash

# This script configures Network Address Translation to forward incoming packets
# from the Azure Standard Load Balancer to IP-based destinations and route them
# back. In this script, "destination" means a data source server that Fivetran connects to.

# local port where Load Balancer sends traffic to
SOURCE_PORT=<local_port>
# destination server inside internal network
DESTINATION_IP=<destination_server_ip_address>
DESTINATION_PORT=<destination_server_port>

# enable IP forwarding on host
echo 1 > /proc/sys/net/ipv4/ip_forward

# clear existing iptables rules and chains
iptables -F
iptables -t nat -F
iptables -X

# change the packet recipient from local to destination socket (host & port)
iptables -t nat -A PREROUTING -p tcp --dport ${SOURCE_PORT} -j DNAT --to-destination ${DESTINATION_IP}:${DESTINATION_PORT}

# change the source IP address from the LB NAT IP address to the IP of this LB-backend host
iptables -t nat -A POSTROUTING -p tcp -d ${DESTINATION_IP} --dport ${DESTINATION_PORT} -j SNAT --to-source $(hostname -i)
For additional help, read Microsoft’s Private Link Service documentation or create a Fivetran support ticket.
Setting up using the PrivateLink API (self-service)
To set up PrivateLink connection using the API, refer to the privatelink api documentation.
Google Cloud Private Service Connect
You must have a Business Critical plan to use Google Cloud Private Service Connect.
Google Cloud Private Service Connect allows VPCs and Google-hosted or on-premises services to communicate with one another without exposing traffic to the public internet. Learn more in Google Cloud's Private Service Connect documentation.
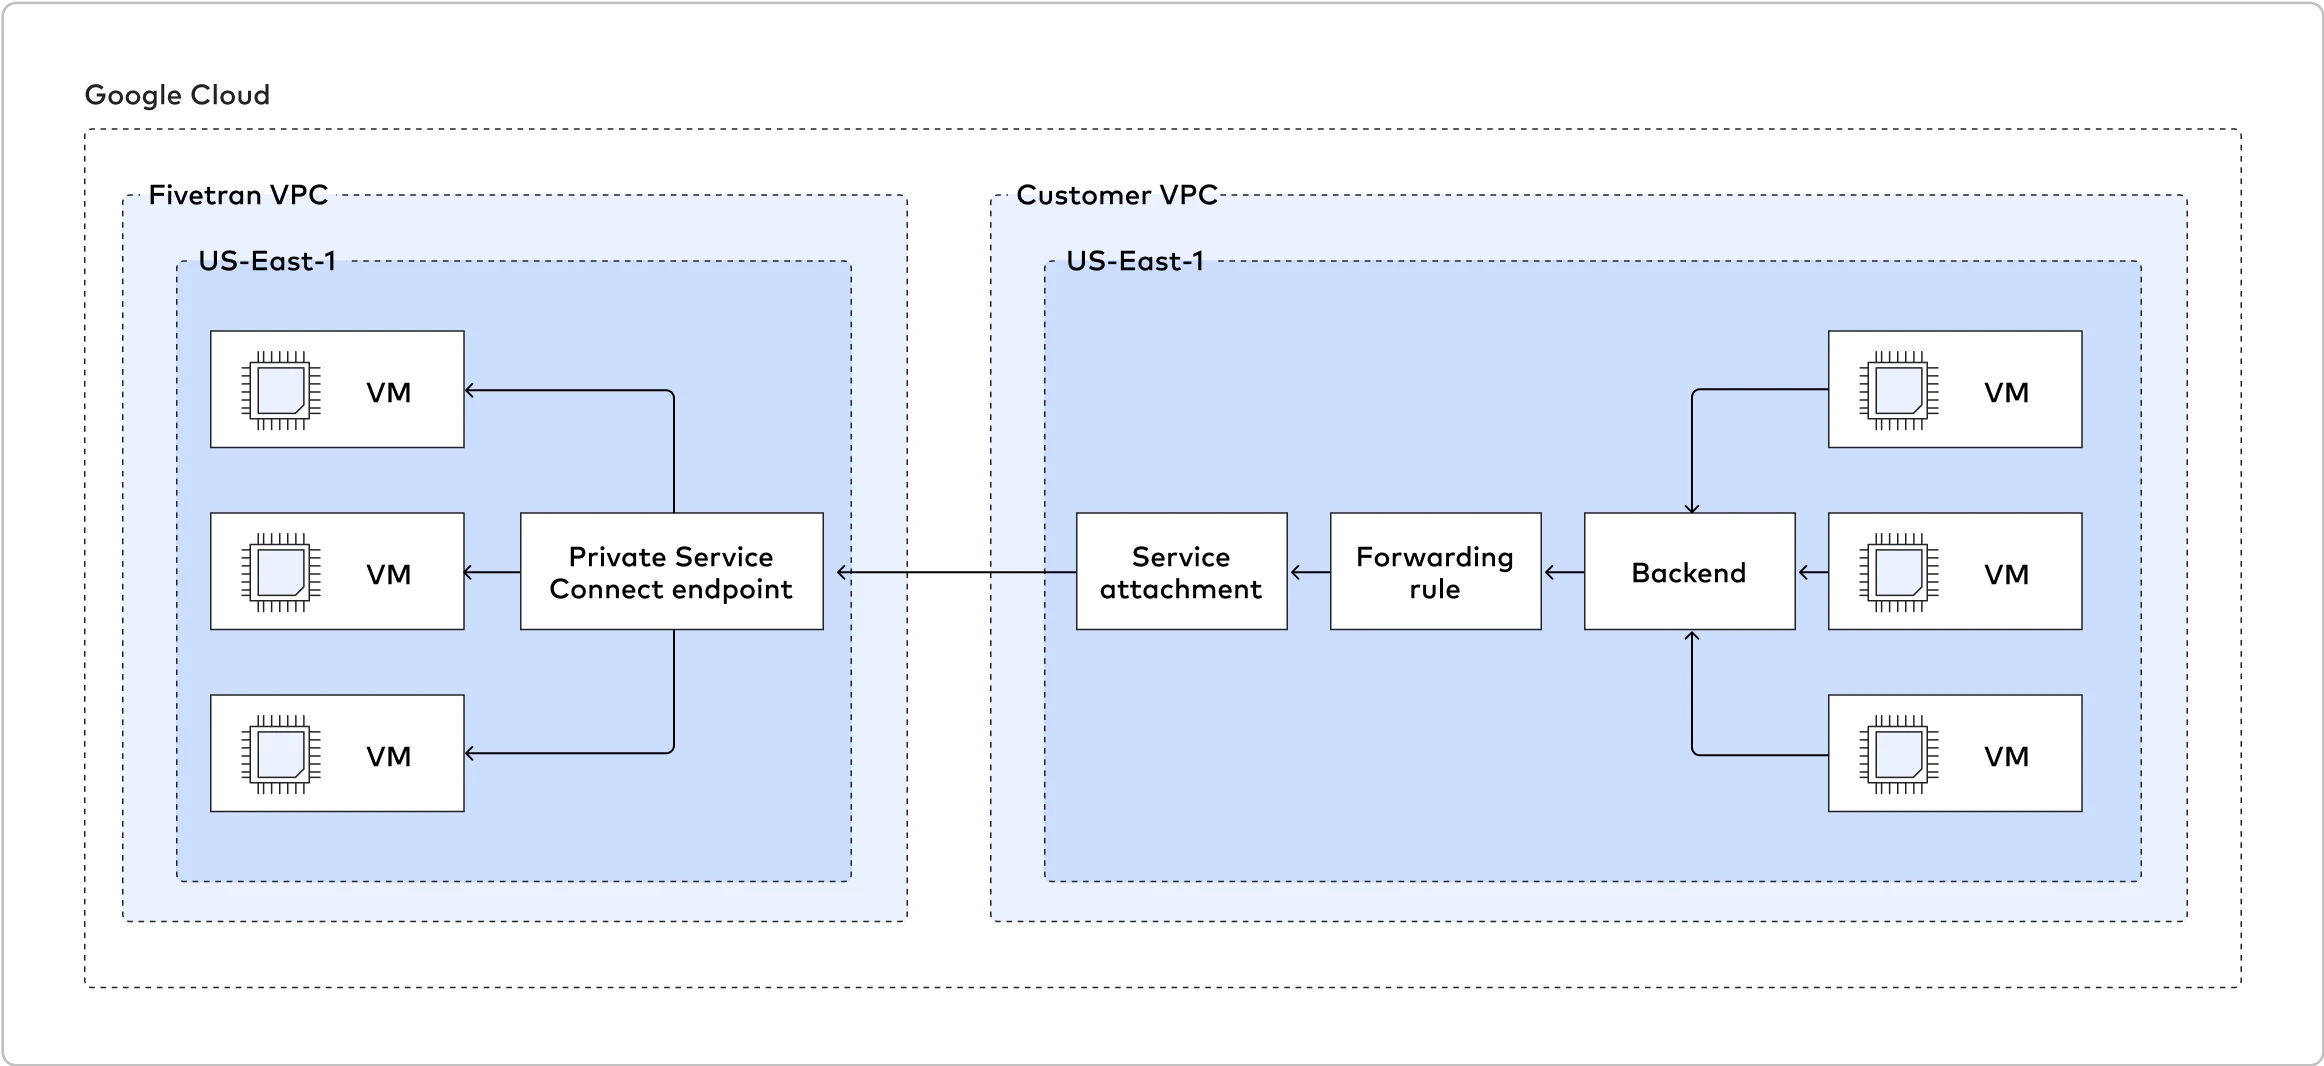
Fivetran uses Private Service Connect to move your data securely between our system and your Google Cloud-hosted sources.
You can also use Private Service Connect with multiple destinations. See a complete list in our Supported destinations documentation.
Prerequisites
To set up Google Cloud Private Service Connect, you need an GCP-hosted source* and Fivetran instance running in the same supported regions.
* Your source must be one of our supported databases. See a complete list in our Databases documentation.
Postrequisites
To use Google Cloud Private Service Connect, you must select GCP as a Cloud service provider in the Finish Fivetran configuration step of the relevant destination setup guide.
Setup instructions for Google Cloud Private Service Connect
Expand for instructions
We support connecting to any GCP-hosted resource as long as it's supported by Fivetran and exposed through a Private Service Connect producer.
In the following example, we publish a service that runs on a specific instance. However, there are several other ways to expose your service. To learn more, ask your administrators for help or read Google's Publish managed services using Private Service Connect documentation.
You'll need the following in Inputs for commands used in steps below:
<NETWORK>- the VPC network in which the exposed resource exists<SUBNET>- the subnetwork where the exposed resource exists<ILB_SUBNET>- the subnetwork used for allocation of internal load balancers addresses (forwarding rules)<PSC_NAT_SUBNET>- the subnetwork used for allocation IPs for each customer endpoint address<REGION>- the region where the exposed resource exists<ZONE>- the zone where the exposed resource exists<VM_NAME>- the VM on which the exposed resource runs<VM_IP>- the private IP on which the exposed resource is available<RESOURCE_PORT>- the port on which the exposed resource is available in a VM<NETWORK_ENDPOINT_GROUP>- the network endpoint group<HEALTH_CHECKS>- the port health checks<BACKEND_SERVICES>- the backend services<FORWARDING_RULE>- the forwarding rule<SERVICE_ATTACHMENT>- the service attachment
If you already have a regional internal load balancer for your resource, proceed to step 8 of this section.
Create a network endpoint group.
gcloud compute network-endpoint-groups create --network <NETWORK> --subnet <SUBNET> \
 --network-endpoint-type gce-vm-ip --zone <ZONE> <NETWORK_ENDPOINT_GROUP>
Add an instance with the running resource as an endpoint to the network endpoint group.
gcloud compute network-endpoint-groups update --zone <ZONE> <NETWORK_ENDPOINT_GROUP> \
 --add-endpoint='instance=<VM_NAME>
Create health checks to automatically enable and disable the instance. In this example, we use port checks.
gcloud compute health-checks create tcp --region <REGION> --check-interval=60s
 --port=<RESOURCE_PORT> <HEALTH_CHECKS>
Create backend services.
gcloud compute backend-services create --region=<REGION> --health-checks=<HEALTH_CHECKS> \
    --health-checks-region=<REGION> --load-balancing-scheme=INTERNAL <BACKEND_SERVICES>
Assign the network endpoint group you created as a backend.
gcloud compute backend-services add-backend <BACKEND_SERVICES> --network-endpoint-group=<NETWORK_ENDPOINT_GROUP> \
    --network-endpoint-group-zone=<ZONE>
(Optional) Allocate a subnetwork dedicated to forwarding rules.
cloud compute networks subnets create --network <_NETWORK_> --region <REGION>
    --range=10.0.X.0/24 <ILB_SUBNET>
Create a forwarding rule for the internal load balancer. It points to
<BACKEND_SERVICES>and allocates the IP address from<ILB_SUBNET>in<NETWORK>.gcloud compute forwarding-rules create --backend-service=<BACKEND_SERVICES> --region <REGION> \ --load-balancing-scheme=INTERNAL --ports=ALL --subnet=<ILB_SUBNET> --network=<NETWORK> <FORWARDING_RULE>Allocate a NAT subnetwork dedicated to creating endpoints for each connected customer.
cloud compute networks subnets create --network <NETWORK> --region <REGION> --range=10.0.X.0/24  \
 --purpose=PRIVATE_SERVICE_CONNECT <_PSC_NAT_SUBNET_>
Open traffic from the ILB and NAT networks to a VM or port using the corresponding ranges specified in previous steps.
gcloud compute firewall-rules create --direction=INGRESS --priority=1000 --network=<_NETWORK_> --action=ALLOW \
    --rules=tcp:_RESOURCE_PORT_ --source-ranges=10.0.X.0/24 --destination-ranges=<_VM_IP_>/32 db-demo-allow-psc-nats

gcloud compute firewall-rules create --direction=INGRESS --priority=1000 --network=<_NETWORK_> --action=ALLOW \
    --rules=tcp:_RESOURCE_PORT_ --source-ranges=10.0.X.0/24 --destination-ranges=<_VM_IP_>/32 db-demo-allow-ilb-nats
Create a service attachment and point it to the internal load balancer you created above (
FORWARDING_RULE) with manual accepting mode.gcloud compute service-attachments create --producer-forwarding-rule=<FORWARDING_RULE> --connection-preference=ACCEPT_MANUAL \ --region=<REGION> --description='Producer for my resource in region' --nat-subnets <_PSC_NAT_SUBNET_> <SERVICE_ATTACHMENT>Create a Fivetran support ticket to set up a Private Service Connect link on the Fivetran side. Fivetran will provide a
PSC_CONNECTION_ID, which allows you to identify which connections come from Fivetran before you approve them.
- If you want to auto-approve the Fivetran project, use the
--consumer-accept-list=fivetran_donkeys=2parameter for gcloud. - The instructions above use network endpoint groups, since it's easy to attach them to existing VMs. However, if a VM is already a part of the instance groups, you can use it directly as a backend services target.
- You can test a newly-created producer in another VPC by allocating an IP and creating a forwarding rule, as described in Google Cloud's Configure Private Service Connect Services documentation.
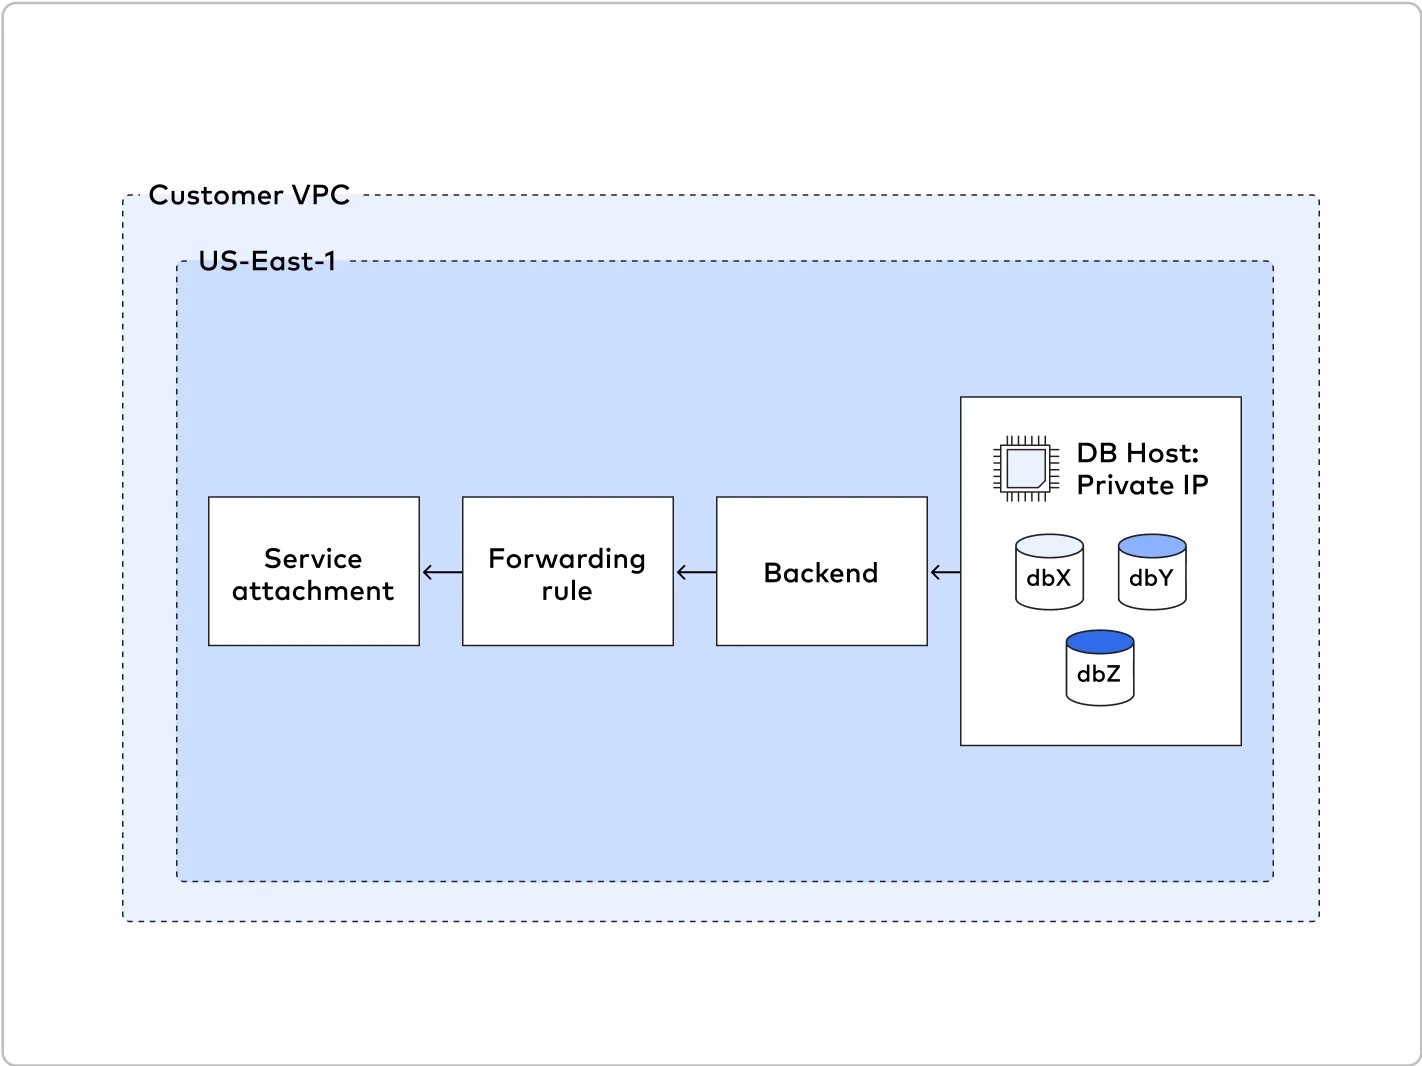
Setup instructions for CloudSQL resources exposed using private service access
You can refer this documentation for set up instructions.
Setup instructions for on-premises source
Expand for instructions
To connect your on-premises source to Fivetran, you must first use Dedicated Interconnect to connect a VPC to your on-premises source, then use Private Service Connect to connect that VPC to Fivetran.
Follow the instructions in Google's Dedicated Interconnect provisioning overview to set up Dedicated Interconnect and use it to connect a VPC to your on-premises source.
When setting up access for on-premises databases using private IP, you need an additional VM to act as a forwarding proxy. You can use your solution like HAProxy or iptables.
If you use the following vm script, make sure to persist iptables rules and consider using instance groups instead of standalone VMs.
#!/bin/bash

# This script configures Network Address Translation to forward incoming packets
# from the Load Balancer to IP-based destinations and route them
# back. In this script, "destination" means a data source server that Fivetran connects to.

# local port where the Load Balancer sends traffic to
SOURCE_PORT=<local_port>
# destination server inside internal network
DESTINATION_IP=<destination_server_ip_address>
DESTINATION_PORT=<destination_server_port>

# enable IP forwarding on host
echo 1 > /proc/sys/net/ipv4/ip_forward

# clear existing iptables rules and chains
iptables -F
iptables -t nat -F
iptables -X

# change the packet recipient from local to destination socket (host & port)
iptables -t nat -A PREROUTING -p tcp --dport ${SOURCE_PORT} -j DNAT --to-destination ${DESTINATION_IP}:${DESTINATION_PORT}

# change the source IP address from the LB NAT IP address to the IP of this LB-backend host
iptables -t nat -A POSTROUTING -p tcp -d ${DESTINATION_IP} --dport ${DESTINATION_PORT} -j SNAT --to-source $(hostname -i)
Once you have the VMs properly set up, follow the standard setup instructions for Google Cloud Private Service Connect.
Setting up using the PrivateLink API (self-service)
To set up PrivateLink connection using the API, refer to the privatelink api documentation.