Generic SQL Server Setup Guide
Follow the instructions listed here to replicate your generic SQL Server database to your destination using Fivetran.
We do not support single-user mode.
More information about the setup form in the Fivetran dashboard
The Fivetran connection setup form is organized into the following tabs: Prerequisites, Connection name, Networking or Hybrid Deployment, Database access, and Replication. In each tab, you need to specify the required parameters to complete the connection configuration successfully. This involves performing the following actions:
Depending on how your destination is configured, the setup form displays either the Networking or Hybrid Deployment tab. If your destination is configured for Hybrid Deployment, the Hybrid Deployment tab is displayed instead of the Networking tab.
In the Networking tab, specify the networking information required to establish the connection between your database and Fivetran. For this, you may need to configure certain networking settings based on the connection method you select. You must have network administrative access or assistance from a network administrator to configure these settings.
In the Hybrid Deployment tab, you can select the Hybrid Deployment Agent.
In the Database access tab, specify the database connection parameters. For this, you may need to create a database user and grant the necessary permissions. You must have database administrative access or assistance from a database administrator to configure these settings.
In the Replication tab, select the replication method (also known as incremental sync). For this, you may need to configure certain database settings based on the replication method you select. You must have database administrative access or assistance from a database administrator to configure these settings.
The Add collaborator button lets you invite a network or database administrator to assist in configuring and providing the necessary information. A collaborator can view and edit a connection's configuration.
The Save for Later button lets you save the information you've entered so far, enabling you to exit the screen and return later to resume the setup process. This feature is helpful if you need to pause to gather additional information or finalize the setup at a later time.
Setup instructions
Prerequisites
Before setting up your connection, ensure you have the following information and access rights to connect your generic SQL Server database to Fivetran.
Networking requirements:
Network administrative access
Access to the host machine
Database server's IP (for example,
1.2.3.4) or domain (for example,database.server.com)Database server's port (usually
1433)Additional requirements depending on the connection method you choose (for example, SSH, Private Link, Proxy Agent)
Additional requirements for connecting to AlwaysOn Availability Groups (AG) secondary node:
Expand for requirements
Secondary node's or the AG Listener's IP address or domain
Secondary node’s or the AG Listener’s port (usually
1433)
Database requirements:
SQL Server version 2012 - 2025
- For Binary Log Reader: SQL Server version 2016 - 2025 on Windows with .NET Framework 4.8. See Microsoft's documentation to check installed .NET Framework versions.
TLS 1.2 or higher is required. SQL Server 2016 and later versions support TLS 1.2 natively. If your SQL Server instance is version 2012 or 2014, ensure it has the required Microsoft updates to support TLS 1.2. Your host operating system and client/server TLS configuration must also support TLS 1.2 or higher.
Access to the database server
Database administrative access (to provision a database user for Fivetran)
Additional requirements for Binary Log Reader:
Expand for requirements
Fivetran DLL for Binary Log Reader (required only for reading from online transaction logs)
Administrative rights on the database host machine to install the Fivetran DLL
A SQL Server account with
sysadminprivileges to set up the Binary Log Reader method (required to run the PowerShell script and install stored procedures)Access to a supported storage location (local disk, Azure Blob Storage, or Amazon S3) if you configure Binary Log Reader to read from backup transaction logs
Additional requirements for connecting to AlwaysOn Availability Groups (AG) secondary node:
Expand for requirements
For Change Data Capture (CDC) and Fivetran Teleport Sync:
- If you want Fivetran to connect via the AG Listener and read only from the secondary node, you must configure the AG Listener to route traffic to the secondary node and then contact our support team to enable the
ApplicationIntent=Readonlymode for the connection.
- If you want Fivetran to connect via the AG Listener and read only from the secondary node, you must configure the AG Listener to route traffic to the secondary node and then contact our support team to enable the
For Binary Log Reader:
- The database must be set to Full Recovery mode.
- A full database backup must be performed on the primary node after enabling Full Recovery mode.
Change Tracking (CT) method is not supported for AlwaysOn Availability Groups.
Click Next to proceed to the Connection name tab.
Connection name
In the Destination schema prefix field, enter a name for the connection. This name is prefixed to each replicated schema on the destination and cannot be changed once your connection is created.
To invite collaborators (for example, network/database administrator), you must save the connection name first.
(Optional) In the Destination schema names field, select Fivetran naming or Source naming to determine how the schema names appear in your destination. For more information about the schema naming option, see the Schema information section.
Click Save and continue to proceed to the Networking or Hybrid Deployment tab.
Networking or Hybrid Deployment
Depending on how your destination is configured, the setup form displays either the Networking or Hybrid Deployment tab. The Hybrid Deployment tab is displayed only if your destination is configured for Hybrid Deployment; otherwise, the Networking tab is displayed in its place.
Expand the section below that applies to your setup and follow the instructions.
Networking
Expand for instructions
Specify the networking-related information required to establish the connection between your database server and Fivetran. You may need to configure certain networking settings based on the connection method you select. You must have network administrative access or assistance from a network administrator to configure these settings.
Choose and configure the connection method
Decide on the connection method you want to use to connect Fivetran to your database, and set up the required network configurations. The connection methods are:
Connect directly
Connect directly
Fivetran connects directly to your database instance. This is the simplest connection method to set up, requiring minimal configuration.
To connect directly to Fivetran, you must enable TLS on your database. Follow Microsoft's TLS setup instructions to enable TLS on your SQL Server database.
We require TLS 1.2 or higher. We do not support TLS 1.0 or TLS 1.1, and enabling them will result in connection failure. TLS 1.0 and 1.1 have been deprecated by the IETF. SQL Server 2016 and later versions support TLS 1.2 natively. If your SQL Server instance is version 2012 or 2014, ensure it has the required Microsoft updates to support TLS 1.2. Your host operating system and client/server TLS configuration must also support TLS 1.2 or higher.
Steps to check your TLS version
If you're unsure of your TLS version, you can check it in the following way:
- Navigate to the
runmenu. - Run
regedit. - Check the following registry path and values:
- for TLS 1.2:
HKEY_LOCAL_MACHINE\SYSTEM\CurrentControlSet\Control\SecurityProviders\SCHANNEL\Protocols\TLS 1.2\Client\ DisabledByDefault=0Enabled=1
To connect directly, configure your firewall and/or other access control systems to allow incoming connections to your SQL Server host and port (usually 1433) from Fivetran's IPs for your database's region. How you do this will vary based on how your SQL Server database is hosted (cloud platform, on-premises, etc.)
When connecting to a named instance, provide your SQL Server host and instance name as the Database Host value (in the format <host>\<instance_name>) in your connection setup form. If the SQL Server Browser service is active on your database, you can use port 1433 as the Database Port value if you want Fivetran to dynamically retrieve the port number of your named instance using this service. Otherwise, use the named instance port as the Database Port value.
Connect using SSH
Connect using SSH
Fivetran connects to a separate server in your network that provides an SSH tunnel to your database. You must connect through SSH if your database is in inaccessible subnet.
To connect using SSH, configure the security group of your SSH tunnel server to allow access from Fivetran and update your database's security settings permit connections through the SSH tunnel.
You can only connect to named instances through an SSH tunnel if you specify your SQL Server host as the Host value and the named instance port as the Port value in your connection setup form.
To connect using SSH, do the following:
In the Fivetran setup form's Networking tab,
- Select Connect via an SSH tunnel.
- Copy Fivetran's Public Key for SSH connections.
You need to add Fivetran's public key to the
authorized_keysfile on your SSH server during the SSH tunnel setup.Set up an SSH tunnel connection for Fivetran to access your database. For more information, follow our SSH connection setup instructions.
(Optional) If you want Fivetran to tunnel SSH over TLS, you must enable TLS on your database. Follow Microsoft's TLS setup instructions for SQL Server to enable TLS on your database.
We require TLS 1.2 or higher. We do not support TLS 1.0 or TLS 1.1, and enabling them will result in connection failure. TLS 1.0 and 1.1 have been deprecated by the IETF. SQL Server 2016 and later versions support TLS 1.2 natively. If your SQL Server instance is version 2012 or 2014, ensure it has the required Microsoft updates to support TLS 1.2. Your host operating system and client/server TLS configuration must also support TLS 1.2 or higher.
Connect using private networking
Connect using private networking
Private networking enables communication between private networks and services without exposing traffic to the public internet. Private networking is the most secure connection method.
You must have a Business Critical plan to use private networking.
We support the following private networking providers:
AWS PrivateLink – used for VPCs and AWS-hosted or on-premises services. See our AWS PrivateLink setup guide for details.
Azure PrivateLink – used for Virtual Networks (VNets) and Azure-hosted or on-premises services. See our Azure PrivateLink setup guide for details.
Google Cloud Private Service Connect – used for VPCs and Google-hosted or on-premises services. See our Google Cloud Private Service Connect setup guide for details.
Connect using Proxy Agent
Connect using Proxy Agent
Fivetran connects to your database through the Proxy Agent, providing secure communication between Fivetran processes and your database host. The Proxy Agent is installed in your network and creates an outbound network connection to the Fivetran-managed SaaS.
To learn more about the Proxy Agent, how to install it, and how to configure it, see our Proxy Agent documentation.
Specify Networking parameters
In the Fivetran setup form's Networking tab,
Select your Connection method.
Provide the details required for your selected Connection method.
Connect Directly
- Copy the Fivetran's IP addresses (or CIDR) that you must safelist in your firewall.
- In the Database Host field, enter your database host's IP (for example,
1.2.3.4) or domain (for example,your.server.com). - In the Database Port field, enter your database instance's port number (usually
1433).
Connect via SSH Tunnel
- In the SSH Hostname field, enter the hostname of your SSH server (do not use a load balancer's IP address or hostname).
- In the SSH Port field, enter the port number for the SSH connection.
- In the SSH User field, enter the username for the SSH connection.
- (Optional) If you want Fivetran to tunnel SSH over TLS, set the Require TLS through Tunnel toggle to ON. To use this feature, you must enable TLS on your database.
- Copy the Fivetran's IP addresses (or CIDR) that you must safelist in your firewall.
- In the Database Host field, enter your database host's IP (for example,
1.2.3.4) or domain (for example,your.server.com). - In the Database Port field, enter your database instance's port number (usually
1433).
Connect via Private Networking
Select an existing private networking connection from the <private networking service> drop-down menu or click Configure a new <private networking> connection to create and use a new connection.
The private networking service (PrivateLink connections, Private Link connections, Private Service Connect connections) displayed here depends on the Cloud service provider (AWS, Azure, GCP) you had selected in the destination's setup respectively.
(Optional) If you want Fivetran to tunnel private networking over TLS, set the Require TLS through Tunnel toggle to ON. To use this feature, you must enable TLS on your database.
Copy the Fivetran's IP addresses (or CIDR) that you must safelist in your firewall.
In the Database Port field, enter your database instance's port number (usually
1433).
Connect via Proxy Agent
- Select an existing agent from the Proxy agents drop-down menu or click Configure a new proxy agent to create and use a new agent.
- (Optional) If you want Fivetran to tunnel private networking over TLS, set the Require TLS through Tunnel toggle to ON. To use this feature, you must enable TLS on your database.
- Copy the Fivetran's IP addresses (or CIDR) that you must safelist in your firewall.
- In the Database Host field, enter your database host's IP (for example,
1.2.3.4) or domain (for example,your.server.com). - In the Database Port field, enter your database instance's port number (usually
1433).
Click Test network. Fivetran runs the following tests:
Connecting to host: This test validates the database credentials you provided in the setup form. It then verifies that the database host is not private and then checks the connectivity to the host.
Connecting to SSH tunnel: This test validates the SSH tunnel details you provided in the setup form. It then checks that we can connect to your database using the SSH Tunnel. (This test is performed only when using an SSH connection.)
Validating certificate: This test generates a pop-up window where you must choose which certificate you want Fivetran to use. It then validates that certificate and checks that we can connect to your database using TLS. (This test is performed only when using an SSH, AWS PrivateLink, or Proxy Agent connection with TLS disabled.)
If a test fails, refer to the error message in the setup form to troubleshoot and resolve the issue, then click Test network again.
Once the tests pass, click Next to proceed to the Database access tab.
Hybrid Deployment
Expand for instructions
Specify Hybrid Deployment connection parameters
In the Fivetran setup form's Hybrid Deployment tab,
The Hybrid Deployment Agent associated with your destination is pre-selected. To use a different agent, click Replace agent, and then select the agent of your choice.
(Optional) If you want to use a TLS connection to the SQL Server database, set the Require TLS toggle to ON. To use this feature, you must enable TLS on your database. Follow Microsoft's TLS setup instructions to enable TLS on your SQL Server database.
We require TLS 1.2 or higher. We do not support TLS 1.0 or TLS 1.1, and enabling them will result in connection failure. TLS 1.0 and 1.1 have been deprecated by the IETF. SQL Server 2016 and later versions support TLS 1.2 natively. If your SQL Server instance is version 2012 or 2014, ensure it has the required Microsoft updates to support TLS 1.2. Your host operating system and client/server TLS configuration must also support TLS 1.2 or higher.
In the Database Host field, enter your database host's IP (for example,
1.2.3.4) or domain (for example,your.server.com).In the Database Port field, enter your database instance's port number (usually
1433).Click Next to proceed to the Database access tab.
Database access
Specify the database-related information required to establish the connection between your database and Fivetran. Also, create a database user and grant the user the required permissions. You must have database administrative access or assistance from a database administrator to configure these settings.
Configure database
In your database, configure the following:
Create a database user for Fivetran's exclusive use.
Expand for instructions
Create database user
The Fivetran user must be an SQL database user, not an Active Directory user.
Connect to your SQL Server database as an Admin user.
Create a user for Fivetran by executing the following SQL commands. Replace
<database>with the name of your database,<username>with the username of your choice, and<password>with a password of your choice.USE [<database>]; CREATE LOGIN <username> WITH PASSWORD = '<password>'; CREATE USER <username> FOR LOGIN <username>;
Grant the Fivetran database user the permissions required to capture changes from the SQL Server database. Follow the instructions for your chosen incremental sync method.
Expand for instructions
Grant user permissions
To grant the necessary permissions to the Fivetran user, do the following. These permissions apply to all incremental sync methods (Change Tracking, Change Data Capture, Binary Log Reader, and Fivetran Teleport Sync):
Grant
SELECTpermission for the databases, schemas, tables, or specific columns you want Fivetran to sync.For CT, CDC, and Fivetran Teleport Sync, grant
SELECTto the Fivetran user.For Binary Log Reader:
- If you use
fivetran_datareader, you must explicitly grantSELECTon the database, schema, or table you want Fivetran to sync. - If you use
db_datareader, no separateSELECTgrant step is required.
To grant
SELECTto the Fivetran user or tofivetran_datareader, use one of the following:GRANT SELECT on DATABASE::<database> to <username>;or all tables in a given schema:
GRANT SELECT on SCHEMA::<schema> to <username>;or a specific table:
GRANT SELECT ON [<schema>].[<table>] TO <username>;or a set of specific columns in a table:
GRANT SELECT ON [<schema>].[<table>] ([<column 1>], [<column 2>], ...) TO <username>;If you use
fivetran_datareader, replace<username>with[fivetran_datareader]. For example:GRANT SELECT ON DATABASE::<database> TO [fivetran_datareader]; -- or GRANT SELECT ON SCHEMA::<schema> TO [fivetran_datareader]; -- or GRANT SELECT ON [<schema>].[<table>] TO [fivetran_datareader];Recommendation for large databases: If your SQL Server instance contains many schemas or tables, prefer schema-level or table-level
SELECTgrants over a database-level grant. Fivetran scans all schemas and tables the Fivetran user can access during schema discovery. A broad database-level grant on a large instance can cause schema fetch to time out. Also avoid column-level grants on large tables where possible, as they significantly increase the metadata scan cost. For more information, see Schema Fetch Times Out on Large Databases.- If you use
Grant
VIEW DEFINITIONpermission to the same principal that hasSELECTaccess so we can read column default definitions during schema changes. We need this access to detect and backfill new columns with deterministic default values. If the Fivetran user already has equivalent access through other permissions, you do not need an additionalVIEW DEFINITIONgrant.GRANT VIEW DEFINITION ON DATABASE::<database> TO <username>; -- or GRANT VIEW DEFINITION ON SCHEMA::<schema> TO <username>; -- or GRANT VIEW DEFINITION ON OBJECT::[<schema>].[<table>] TO <username>;If you use
fivetran_datareader, replace<username>with[fivetran_datareader].(Optional) For SQL Server for Linux, if you are using Change Tracking with history mode enabled, to improve performance and reduce delays, you may want to grant the necessary permissions to the Fivetran user by running the following command:
USE [master];
GRANT VIEW SERVER STATE TO <username>;
This grants the Fivetran user access to server state information, minimizing the dependency on checkpoint timing and reducing update delays. See the Sync Delays with SQL Server for Linux Using Change Tracking with History Mode Enabled troubleshooting page for details.
For help choosing the right sync method for your use case, see our CT vs CDC vs Binary Log Reader vs Fivetran Teleport Sync section.
Enable TCP/IP protocol.
Expand for instructions
Allow TCP/IP protocol
Your SQL Server database server must allow TCP/IP connections. For this, you must enable the TCP/IP protocol for both the SQL Server instance and the SQL Server Native Client. Follow the steps below to verify and configure these settings.
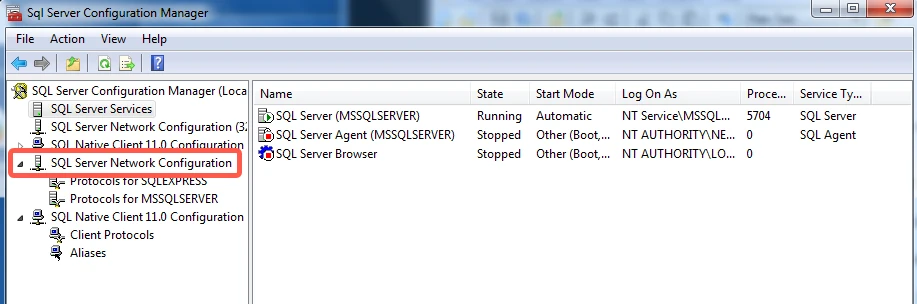
Open SQL Server Configuration Manager.
Enable TCP/IP protocol for your SQL Server instance:
In the tree pane, click SQL Server Network Configuration to expand it.
Click Protocols for <yourinstancename>. If you had specified the default instance during installation, the instance name would be MSSQLSERVER.
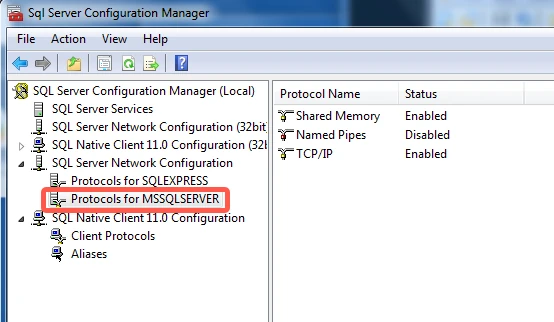
In the right pane, verify that TCP/IP is Enabled.
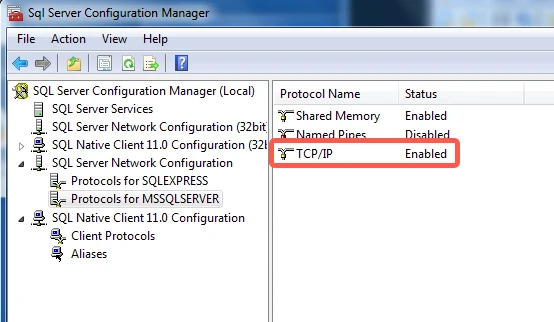
If the Status is Disabled, right-click TCP/IP and select Enable.
Right-click TCP/IP and select Properties.
Go to the IP Addresses tab and scroll all the way down.
In the IPAll section, enter your database's port number (usually
1433) for the TCP Port and click Apply.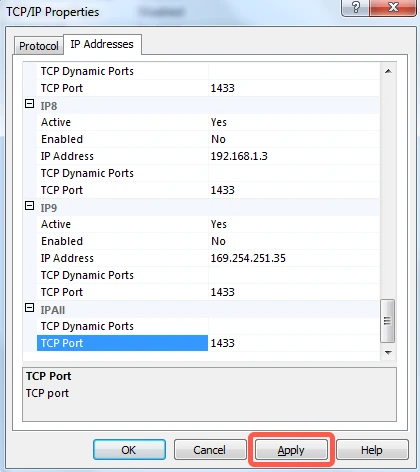
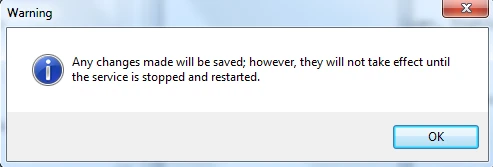
Click OK in the warning dialog box that pops up.
Click OK in the TCP/IP Properties dialog box.
Enable TCP/IP protocol for the SQL Server Native Client:
In the tree pane, click SQL Native Client Configuration to expand it.
Click Client Protocols.
In the right pane, verify that TCP/IP is Enabled.
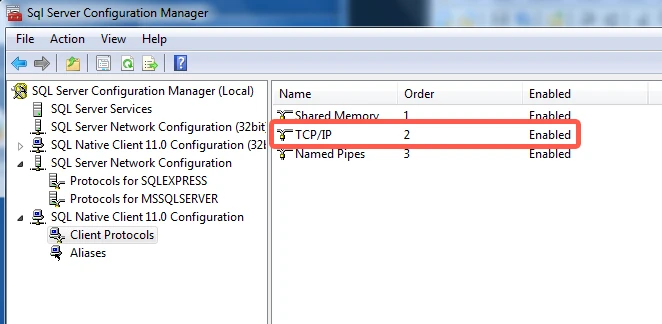
If the Status is Disabled, right-click TCP/IP and select Enable.
Right-click TCP/IP and select Properties.
Verify that the Default Port is
1433and the Enabled is Yes.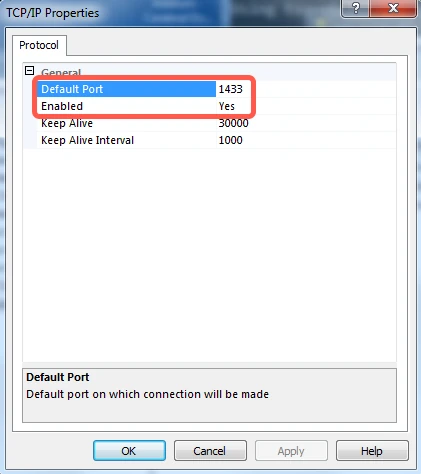
Click OK to exit the TCP/IP Properties dialog box.
Restart the SQL Server service to apply the TCP/IP protocol settings changes:
In the tree pane, click SQL Server Services.
In the right pane, right-click SQL Server <yourinstancename> and select Restart.
Specify database connection parameters
In the Fivetran setup form's Database access tab,
(Optional, Private Preview only) If you want to manage your credentials outside of Fivetran, enable the Use External Secrets Manager toggle. For some connectors and destinations, this toggle only appears after you select a credential-based authentication method. See the External Secret Managers documentation for more information.
- If you have already configured External Secret Managers for your account, select one from the drop-down menu. Note that the list is filtered by the deployment model of the destination: if the destination uses SaaS Deployment, External Secret Managers configured for Hybrid Deployment won't be available, and vice versa.
- To edit the details of the selected External Secret Manager, click Edit manager details in Account Settings.
- To set up a new External Secret Manager, click Configure a new secrets manager. See the Create New External Secret Manager documentation for prerequisites and setup instructions.
- You can manage all your External Secret Managers at any time under Account Settings. See the External Secret Managers documentation for more information.
- When ESM is enabled, credential fields are replaced by ESM key fields. In each ESM key field, enter the name of the secret stored in your external secrets manager that corresponds to that credential — not the credential value itself. For more information, see External Secret Managers.
In the User field, enter the Fivetran-specific database user that you created in the previous step.
In the Password field, enter the password for the Fivetran-specific database user that you created in Step 3.
In the Database field, enter the name of your database (for example,
your_database).Click Test database access. Fivetran runs the following tests:
- Connecting to database: This test checks that we can access your database.
If a test fails, refer to the error message in the setup form to troubleshoot and resolve the issue, then click Test database access again.
Once the tests pass, click Next to proceed to the Replication tab.
Replication
Choose and configure the replication method that you want to use for incremental updates. The replication method (also known as incremental sync) lets Fivetran copy only the rows that have changed since the last data sync so we don't have to copy the whole table every time. For more information, see our Updating data documentation.
Each incremental sync method has different setup requirements and is suited for different SQL Server configurations and workloads. For help choosing the right sync method for your use case, see our CT vs CDC vs Binary Log Reader vs Fivetran Teleport Sync section.
For CT, CDC, and Binary Log Reader methods, you must have database administrative access or assistance from a database administrator to configure the settings.
Configure incremental sync in database
In your database, configure the following:
Enable the incremental sync method you want to use for this connection.
Change tracking (CT)
CT is SQL Server’s lightweight built-in feature that records which rows have changed. It does not capture the content of changes or support delete tracking, and it cannot be used when connecting to a replica. For more information about this method, see our Change Tracking documentation.
You can enable both CT and CDC on a table at the same time. When both are enabled, we use CDC as the incremental sync method.
Enable change tracking at the database level:
ALTER DATABASE [<database>]
SET CHANGE_TRACKING = ON
(CHANGE_RETENTION = 7 DAYS, AUTO_CLEANUP = ON);
While we recommend seven days of change retention, you can set your retention period as low as one day. However, a shorter retention period increases the risk that your logs will expire in between syncs, triggering an automatic full source re-sync.
Enable CT for each table you want to integrate:
ALTER TABLE [<schema>].[<table>] ENABLE CHANGE_TRACKING;Grant the Fivetran user
VIEW CHANGE TRACKINGpermission for each of the tables that have CT enabled:GRANT VIEW CHANGE TRACKING ON [<schema>].[<table>] TO <username>;
Change data capture (CDC)
CDC is SQL Server’s built-in tracking mechanism that captures all changes made to tracked tables. It stores changes in shadow history tables, which lets you track how many times a row changed and view past values. Unlike CT, CDC supports both primary and replica databases. For more information about this method, see our CDC documentation.
You can enable both CT and CDC on a table at the same time. When both are enabled, we use CDC as the incremental sync method.
Enable change data capture at the database level:
USE [<database>];
EXEC sys.sp_cdc_enable_db;
Enable CDC for each table you want to integrate:
EXEC sys.sp_cdc_enable_table
@source_schema = [<schema>],
@source_name   = [<table>],
@role_name     = [<username>];
Fivetran only supports tables with a single CDC capture instance. Our syncs only include tables and columns that are present in a CDC instance. If you add new tables or columns, you must create a new CDC instance that includes them and delete the old instance.
Set your CDC retention period:
EXEC sys.sp_cdc_change_job
@job_type = N'cleanup',
@retention = 10080; -- Sets the retention period to 7 days
While we recommend seven days of change retention, you can set your retention period as low as one day. However, a shorter retention period increases the risk that your logs will expire in between syncs, triggering an automatic full source re-sync.
Fivetran Teleport Sync
Teleport Sync is Fivetran’s proprietary method that requires only read-only SQL access. It supports both change and delete tracking with no additional setup, making it easy to enable. For more information about this method, see our Fivetran Teleport Sync documentation.
You don't need to perform any additional configuration to enable the Fivetran Teleport Sync method.
Binary Log Reader
Binary Log Reader is Fivetran’s proprietary method that reads SQL Server’s transaction log and captures row-level changes, including what changed and when. It is well-suited for high-throughput environments and for use cases that require delete tracking. For more information about this method, see our Binary Log Reader documentation.
Perform the following steps to set up the Binary Log Reader method for SQL Server.
Set up the Binary Log Reader.
Choose one of the following methods to set up Binary Log Reader:
This method uses a PowerShell script that automatically configures all required components for the Binary Log Reader, including CLR, the DLL, required permissions, and the related stored procedures. We recommend using this method if PowerShell is available and you want a fast, reliable setup that configures all prerequisites for you.
Download the PowerShell script (BinLogInstall.ps1).
Open the PowerShell terminal as an Administrator.
Configure the Binary Log Reader to read either from the online transaction logs or backup transaction logs.
(Optional) Download the Fivetran SQL Server Binary Log Reader DLL. When running the script in the next step, specify the DLL path using the
-DLLPathparameter. If you omit this parameter, the script automatically downloads the latest DLL from Fivetran.Instructions to download the DLL
- In the Fivetran dashboard, go to the Downloads page under Account Settings.
- Scroll down to the Fivetran SQL Server Binary Log Reader section and download the latest Fivetran SQL Server Binary Log Reader DLL.
- Place the Binary Log Reader DLL file on your SQL Server host machine.
- Make a note of the directory path to the DLL file (for example,
C:\MSSQL-CLR\Fivetran_Log_Reader.dll). You'll need it in the next steps.
Run the
BinLogInstall.ps1script using the following command to install the the Binary Log Reader assembly (from the DLL file) and create the related CLR stored procedures required for reading online transaction logs:If you have existing connections that use the SQL Server Binary Log Reader, pause them before running this script. Otherwise, the script might temporarily interrupt those connections. You can resume them once the script completes.
.\BinLogInstall.ps1 -SqlInstance <localhost> -SourceDatabase <database> -SqlAdminUser <sqlAdminUser> -SqlPassword <password> -MinimalPermissionsUser <username> [-DLLPath <path_to_Fivetran_DLL>] [-UseDBDatareaderRole]Replace the placeholders with actual values:
<localhost>: the SQL Server instance name.<database>: the source database for which you are configuring the Binary Log Reader.<sqlAdminUser>and<password>: credentials for a user with thesysadminrole. The script uses this user to apply all required permissions and create the Binary Log Reader objects (assembly and stored procedures).<username>: the database user you created for Fivetran’s exclusive use. The script does not require this user’s password.<path_to_Fivetran_DLL>: the path to the DLL file you downloaded manually.-UseDBDatareaderRole: optional. Adds the Fivetran user todb_datareaderinstead of using the defaultfivetran_datareaderrole, so you do not need to grant separateSELECTpermissions on the database, schemas, or tables.Without this flag, the script creates the
fivetran_datareaderrole in the source database, adds the Fivetran user to it, and grantsSELECTon thesysandcdcschemas to that role. After the script completes, you must manually grantSELECTtofivetran_datareaderon the database, schemas, or tables you want Fivetran to discover and sync.
If the target database is on a read-only AOAG secondary, the script installs the
msdbhelper procedures that are required on that secondary and skips the target-database objects, because the target-database assembly and procedures replicate from the primary.
Binary Log Reader requires supplemental logging, which is activated by enabling CDC on the database and on each table selected for sync. By default, Fivetran handles this automatically using helper stored procedures (
sp_fivetran_cdc_*) installed by the PowerShell script (BinLogInstall.ps1). If you prefer to manage supplemental logging yourself, you can remove these procedures after installation, but you must then enable CDC manually on every table before syncing it. For more information, see our Self-managed supplemental logging documentation.Run the
BinLogInstall.ps1script using the following command:This command does not download or install the DLL or CLR stored procedures, because they are required only for reading online transaction logs.
.\BinLogInstall.ps1 -SqlInstance <localhost> -SourceDatabase <database> -SqlAdminUser <sqlAdminUser> -SqlPassword <password> -MinimalPermissionsUser <username> -BackupLogMode [-UseDBDatareaderRole]Replace the placeholders with actual values:
<localhost>: the SQL Server instance name.<database>: the source database for which you are configuring the Binary Log Reader.<sqlAdminUser>and<password>: credentials for a user with thesysadminrole. The script uses this user to apply all required permissions and create the Binary Log Reader objects (assembly and stored procedures).<username>: the database user you created for Fivetran’s exclusive use. The script does not require this user’s password.-UseDBDatareaderRole: optional. Adds the Fivetran user todb_datareaderinstead of using the defaultfivetran_datareaderrole, so you do not need to grant separateSELECTpermissions on the database, schemas, or tables.Without this flag, the script creates the
fivetran_datareaderrole in the source database, adds the Fivetran user to it, and grantsSELECTon thesysandcdcschemas to that role. After the script completes, you must manually grantSELECTtofivetran_datareaderon the database, schemas, or tables you want Fivetran to discover and sync.
If the target database is on a read-only AOAG secondary, the script installs only the required
msdbhelper procedures on that secondary.
This method lets you run each configuration step yourself by executing SQL commands, registering the DLL manually, and explicitly applying permissions and wrapper stored procedures. Use this method if PowerShell is restricted in your environment or you need granular control over permissions and database objects.
This approach uses the minimal permissions model, which enables you to define precisely which stored procedures are created and what the Fivetran user can execute. It leverages wrapper stored procedures to safely delegate essential tasks from high-privileged roles to the Fivetran user, ensuring secure, limited access while maintaining the functionality required for log-based capture.
You can configure the Binary Log Reader to read from either the online transaction logs or the backup transaction logs. The configuration steps depend on the log source you choose:
- For online transaction logs, you must perform the steps in both the Configure minimal permissions and wrapper procedures and Register DLL and configure CLR access sections.
- For backup transaction logs, you must perform the steps only in the Configure minimal permissions and wrapper procedures section.
Configure minimal permissions and wrapper procedures
The configuration steps in this section include:
- Granting essential privileges for log-based sync: metadata access, table reads, and stored procedure execution.
- Creating wrapper procedures that safely expose the required system functions for CDC, replication, and log access.
- Granting execution rights that allow the Fivetran user to run the wrapper procedures.
Expand for instructions
Replace the placeholders
<database>and<username>with the actual values.Connect to your SQL Server instance using a login with the
sysadminrole.Grant server-level permissions to view metadata, such as table and index structures, needed for log parsing and performance optimization:
USE [master];
GO
DECLARE @sql NVARCHAR(MAX);
IF CAST(SERVERPROPERTY('ProductMajorVersion') AS INT) >= 16
SET @sql = 'GRANT VIEW SERVER PERFORMANCE STATE TO <username>;';
ELSE
SET @sql = 'GRANT VIEW SERVER STATE TO <username>;';
EXEC sp_executesql @sql;
GO
Grant database-level permissions to identify which tables have CDC enabled:
USE [<database>];
GRANT VIEW DEFINITION ON DATABASE::[<database>] TO <username>;
Enable supplemental logging (cdc) for database to allow operations such as executing
sp_cdc_enable_table.USE [<database>]; EXEC sys.sp_cdc_enable_db;Grant table read access using one of the following models: broad read access, where you add the Fivetran user to
db_datareader, or scoped read access, where you create afivetran_datareaderrole, add the Fivetran user to it, and grantSELECTonly on the databases, schemas, or tables you want Fivetran to discover and sync.-- Broad read access model USE [<database>]; ALTER ROLE db_datareader ADD MEMBER <username>;-- Scoped read access model USE [<database>]; IF NOT EXISTS ( SELECT 1 FROM sys.database_principals WHERE name = N'fivetran_datareader' AND type = 'R' ) BEGIN CREATE ROLE [fivetran_datareader]; END; IF NOT EXISTS ( SELECT 1 FROM sys.database_role_members drm JOIN sys.database_principals r ON drm.role_principal_id = r.principal_id JOIN sys.database_principals m ON drm.member_principal_id = m.principal_id WHERE r.name = N'fivetran_datareader' AND m.name = N'<username>' ) BEGIN ALTER ROLE [fivetran_datareader] ADD MEMBER <username>; END; -- Grant access only to the databases, tables, or schemas you want Fivetran to read GRANT SELECT ON DATABASE::[<database>] TO [fivetran_datareader]; -- or GRANT SELECT ON OBJECT::[<schema>].[<table>] TO [fivetran_datareader]; -- or GRANT SELECT ON SCHEMA::[<schema>] TO [fivetran_datareader];Grant the Fivetran user bulk operation for reading backup log files.
USE [master];
GRANT ADMINISTER BULK OPERATIONS TO <username>;
Create the stored procedures required for the Binary Log Reader to read from either the online transaction logs or the backup transaction logs.
Binary Log Reader requires supplemental logging, which is activated by enabling CDC on the database and on each table selected for sync. The following list includes the
sp_fivetran_cdc_*helper stored procedures that Fivetran uses to manage supplemental logging. If you prefer to manage supplemental logging yourself, you can skip installing these procedures, but you must then enable CDC manually on every table before syncing it. For more information, see our Self-managed supplemental logging documentation.Create the following procedures in the target database:
sp_fivetran_cdc_enable_db: Enables CDC at the database level.sp_fivetran_cdc_drop_job: Drops the CDC capture job to reduce resource usage.sp_fivetran_cdc_stop_job: Stops the CDC capture job to pause change tracking.sp_fivetran_cdc_enable_table: Enables CDC on individual tables for supplemental logging.sp_fivetran_replflush: Flushes the transaction log usingsp_replflush.sp_fivetran_repldone: Marks a transaction as processed usingsp_repldone.
Create the following procedures in
msdb:sp_fivetran_xp_dirtree: Allows directory listing for reading backup log files.sp_fivetran_xp_fileexist: Allows to check if the directory exists.sp_fivetran_restore_info: Retrieves metadata from backup files for backup log reading.
For each AOAG secondary, install only the helper Fivetran stored procedures in
msdb. The target-database assembly and target-database stored procedures replicate from the primary to the secondary, so you do not need to install those target-database objects on the secondary.View SQL script
USE [<database>];

-- Create CDC enable procedure
IF OBJECT_ID(N'sp_fivetran_cdc_enable_db', 'P') IS NOT NULL
DROP PROCEDURE sp_fivetran_cdc_enable_db;
GO
CREATE PROCEDURE sp_fivetran_cdc_enable_db
WITH EXECUTE AS OWNER
AS
SET NOCOUNT ON
EXEC sys.sp_cdc_enable_db;
GO

-- Drop CDC job
IF OBJECT_ID(N'sp_fivetran_cdc_drop_job', 'P') IS NOT NULL
DROP PROCEDURE sp_fivetran_cdc_drop_job;
GO
CREATE PROCEDURE sp_fivetran_cdc_drop_job
WITH EXECUTE AS OWNER
AS
SET NOCOUNT ON
EXEC sp_cdc_drop_job @job_type = N'capture'
GO

-- Stop CDC job
IF OBJECT_ID(N'sp_fivetran_cdc_stop_job', 'P') IS NOT NULL
DROP PROCEDURE sp_fivetran_cdc_stop_job;
GO
CREATE PROCEDURE sp_fivetran_cdc_stop_job
WITH EXECUTE AS OWNER
AS
SET NOCOUNT ON
EXEC sp_cdc_stop_job @job_type = N'capture'
GO
IF OBJECT_ID(N'sp_fivetran_cdc_enable_table', 'P') IS NOT NULL
DROP PROCEDURE sp_fivetran_cdc_enable_table;
GO

-- Enable CDC on a table
CREATE PROCEDURE sp_fivetran_cdc_enable_table
@source_schema NVARCHAR(500),
@source_name   NVARCHAR(500),
@capture_instance NVARCHAR(500) = NULL, -- Optional; generated if not provided
@role_name        NVARCHAR(500) = NULL  -- Optional
WITH EXECUTE AS OWNER
AS
BEGIN
SET NOCOUNT ON;

-- Generate the capture instance if not provided
IF @capture_instance IS NULL
BEGIN
SET @capture_instance = N'fivetran_' + CAST(OBJECT_ID(@source_schema + '.' + @source_name) AS NVARCHAR(500));
END;

-- Enable CDC for the specified table
EXEC sys.sp_cdc_enable_table
@source_schema    = @source_schema,
@source_name      = @source_name,
@capture_instance = @capture_instance,
@role_name        = @role_name;
END;
GO

-- Execute sp_replflush
IF OBJECT_ID(N'sp_fivetran_replflush', 'P') IS NOT NULL
DROP PROCEDURE sp_fivetran_replflush;
GO

CREATE PROCEDURE sp_fivetran_replflush
WITH EXECUTE AS OWNER
AS
SET NOCOUNT ON
EXEC sp_replflush
GO

-- Execute sp_repldone
IF OBJECT_ID(N'sp_fivetran_repldone', 'P') IS NOT NULL
DROP PROCEDURE sp_fivetran_repldone;
GO

CREATE PROCEDURE sp_fivetran_repldone
@xactid     BINARY(10),
@xact_seqno BINARY(10),
@numtrans   INTEGER = NULL,
@time       INTEGER = NULL,
@reset      INTEGER = NULL
WITH EXECUTE AS SELF
AS
BEGIN
DECLARE @stmt VARCHAR(200);
SET @stmt = 'EXEC sp_repldone ' +
'@xactid= ' + COALESCE(CONVERT(VARCHAR, @xactid, 1), 'NULL') +
', @xact_seqno= ' + COALESCE(CONVERT(VARCHAR, @xact_seqno, 1), 'NULL');
IF @numtrans IS NOT NULL SET @stmt += ', @numtrans= ' + CONVERT(VARCHAR, @numtrans);
IF @time IS NOT NULL     SET @stmt += ', @time= ' + CONVERT(VARCHAR, @time);
IF @reset IS NOT NULL    SET @stmt += ', @reset= ' + CONVERT(VARCHAR, @reset);
EXEC(@stmt);
END
GO

-- Create stored procedures in msdb database
USE [msdb];
GO

-- Create user in msdb if it does not exist
IF NOT EXISTS (
SELECT 1
FROM sys.database_principals
WHERE name = N'<username>'
)
BEGIN
CREATE USER [<username>] FOR LOGIN [<username>];
END
GO

IF OBJECT_ID(N'dbo.sp_fivetran_xp_dirtree', 'P') IS NOT NULL
DROP PROCEDURE dbo.sp_fivetran_xp_dirtree;
GO

CREATE PROCEDURE dbo.sp_fivetran_xp_dirtree
@path NVARCHAR(4000),
@depth INT = 1,
@fileFlag INT = 1
WITH EXECUTE AS OWNER
AS
SET NOCOUNT ON;
EXEC master.dbo.xp_dirtree @path, @depth, @fileFlag;
GO

IF OBJECT_ID(N'dbo.sp_fivetran_xp_fileexist', 'P') IS NOT NULL
DROP PROCEDURE dbo.sp_fivetran_xp_fileexist;
GO

CREATE PROCEDURE dbo.sp_fivetran_xp_fileexist
@path NVARCHAR(4000)
WITH EXECUTE AS OWNER
AS
SET NOCOUNT ON;
EXEC master.dbo.xp_fileexist @path;
GO

IF OBJECT_ID(N'dbo.sp_fivetran_restore_info', 'P') IS NOT NULL
DROP PROCEDURE dbo.sp_fivetran_restore_info;
GO

CREATE PROCEDURE dbo.sp_fivetran_restore_info
@backupFile NVARCHAR(4000),
@infoType NVARCHAR(20) -- 'HEADER', 'FILELIST', 'LABEL', 'VERIFY'
WITH EXECUTE AS OWNER
AS
BEGIN
SET NOCOUNT ON;
DECLARE @sql NVARCHAR(MAX);
DECLARE @source NVARCHAR(10);

-- Validate input to prevent SQL injection
-- Block invalid characters: semicolon, single quote, double quote, and SQL comments
IF @backupFile LIKE '%[;''""]%' OR @backupFile LIKE '%---%'
BEGIN
RAISERROR('Invalid characters detected in backup file path', 16, 1);
RETURN;
END

-- Determine if backup source is URL, TAPE, or DISK
IF LOWER(@backupFile) LIKE 'https://%'
SET @source = 'URL';
ELSE IF LOWER(@backupFile) LIKE '\\.\tape%' OR LOWER(@backupFile) LIKE 'tape%'
SET @source = 'TAPE';
ELSE
SET @source = 'DISK';

IF @infoType = 'HEADER'
BEGIN
SET @sql = 'RESTORE HEADERONLY FROM ' + @source + ' = ''' + @backupFile + ''';';
EXEC sp_executesql @sql;
END
ELSE IF @infoType = 'FILELIST'
BEGIN
SET @sql = 'RESTORE FILELISTONLY FROM ' + @source + ' = ''' + @backupFile + ''';';
EXEC sp_executesql @sql;
END
ELSE IF @infoType = 'LABEL'
BEGIN
SET @sql = 'RESTORE LABELONLY FROM ' + @source + ' = ''' + @backupFile + ''';';
EXEC sp_executesql @sql;
END
ELSE IF @infoType = 'VERIFY'
BEGIN
SET @sql = 'RESTORE VERIFYONLY FROM ' + @source + ' = ''' + @backupFile + ''';';
EXEC sp_executesql @sql;
END
ELSE
BEGIN
RAISERROR('Invalid @InfoType. Use HEADER, FILELIST, LABEL, or VERIFY.', 16, 1);
END
END
GO
Grant the Fivetran user
EXECUTEpermissions on those stored procedures you created.USE [<database>]; GRANT EXECUTE ON sp_fivetran_cdc_enable_db TO <username>; GRANT EXECUTE ON sp_fivetran_cdc_drop_job TO <username>; GRANT EXECUTE ON sp_fivetran_cdc_stop_job TO <username>; GRANT EXECUTE ON sp_fivetran_cdc_enable_table TO <username>; GRANT EXECUTE ON sp_fivetran_replflush TO <username>; GRANT EXECUTE ON sp_fivetran_repldone TO <username>; USE [msdb]; GRANT EXECUTE ON dbo.sp_fivetran_xp_dirtree TO <username>; GRANT EXECUTE ON dbo.sp_fivetran_xp_fileexist TO <username>; GRANT EXECUTE ON dbo.sp_fivetran_restore_info TO <username>;Create the following additional stored procedures if you are configuring the Binary Log Reader to read from the online transaction logs. Skip this step if you are configuring the Binary Log Reader to read from the backup transaction logs.
Create the following procedure in the target database:
sp_fivetran_repltrans: Retrieves active replication transactions usingsp_repltrans.
Create the following procedures in
msdb:sp_fivetran_dbcc_dbtable: ExecutesDBCC DBTABLEto retrieve table information.sp_fivetran_dbcc_loginfo: ExecutesDBCC LOGINFOto retrieve transaction log details.
View SQL script
USE [<database>];

-- Execute sp_repltrans
IF OBJECT_ID(N'sp_fivetran_repltrans', 'P') IS NOT NULL
DROP PROCEDURE sp_fivetran_repltrans;
GO

CREATE PROCEDURE sp_fivetran_repltrans
WITH EXECUTE AS OWNER
AS
SET NOCOUNT ON;
EXEC sp_repltrans;
GO

USE [msdb];
IF OBJECT_ID(N'sp_fivetran_dbcc_dbtable', 'P') IS NOT NULL
DROP PROCEDURE sp_fivetran_dbcc_dbtable;
GO

CREATE PROCEDURE sp_fivetran_dbcc_dbtable
@db_name NVARCHAR(500)
WITH EXECUTE AS OWNER
AS
SET NOCOUNT ON;
DBCC DBTABLE (@db_name) WITH TABLERESULTS
GO

-- Run DBCC LOGINFO
IF OBJECT_ID(N'sp_fivetran_dbcc_loginfo', 'P') IS NOT NULL
DROP PROCEDURE sp_fivetran_dbcc_loginfo;
GO
CREATE PROCEDURE sp_fivetran_dbcc_loginfo
@db_name NVARCHAR(500)
WITH EXECUTE AS OWNER
AS
SET NOCOUNT ON
DBCC LOGINFO (@db_name) WITH TABLERESULTS
GO
Grant the Fivetran user
EXECUTEpermissions on those additional stored procedures you created for reading from the online transaction logs.USE [msdb]; GRANT EXECUTE ON sp_fivetran_dbcc_dbtable TO <username>; GRANT EXECUTE ON sp_fivetran_dbcc_loginfo TO <username>; USE [<database>]; GRANT EXECUTE ON sp_fivetran_repltrans TO <username>;
Register DLL and configure CLR access
Skip this section if you're configuring the Binary Log Reader to read from backup transaction logs.
The configuration steps in this section include:
- Enabling CLR to let SQL Server load and execute the Binary Log Reader's .NET-based DLL
- Downloading the Fivetran SQL Server Binary Log Reader DLL, registering it on the host, and configuring access using an asymmetric key and a login created from that key
- Creating the DLL-backed CLR stored procedures used to read online transaction logs
- Granting execution rights that allow the Fivetran user to run the DLL-backed procedures.
Expand for instructions
Download the Fivetran SQL Server Binary Log Reader DLL and save it on your SQL Server host machine.
Instructions to download the DLL
- Log in to your Fivetran account.
- In the Fivetran dashboard, go to the Downloads page under Account Settings.
- Scroll down to the Fivetran SQL Server Binary Log Reader section and download the latest Fivetran SQL Server Binary Log Reader DLL.
- Place the Binary Log Reader DLL file on your SQL Server host machine.
- Make a note of the directory path to the DLL file (for example,
C:\MSSQL-CLR\Fivetran_Log_Reader.dll). You'll need it in the next steps.
Connect to your SQL Server instance using a login with the
sysadminrole.You must use the same admin user that you'll use to create the Fivetran connector. This is required only during the initial setup.
Enable CLR on your SQL Server database. Perform this step once for each database host.
If CLR is already enabled on your SQL Server database, skip to the next step (sign the DLL). To check if CLR is enabled, run
SELECT * FROM sys.configurations WHERE name = 'clr enabled';.USE master if (SELECT value_in_use FROM sys.configurations WHERE name = 'clr enabled') = 0 BEGIN EXEC sp_configure 'clr enabled', 1; RECONFIGURE; END;Sign the DLL with an asymmetric key. Perform this step once for each database host. Replace
'{Path to Fivetran Binary Log Reader DLL}'with the full directory path to the Fivetran Binary Log Reader DLL file on your SQL Server host machine.USE master; IF EXISTS (SELECT * FROM sys.server_principals WHERE name = 'FivetranUser') BEGIN DROP LOGIN FivetranUser END IF EXISTS (SELECT * FROM sys.asymmetric_keys WHERE name = 'FivetranCLRKey') BEGIN DROP ASYMMETRIC KEY FivetranCLRKey END IF NOT EXISTS (SELECT * FROM sys.asymmetric_keys WHERE name = 'FivetranCLRKey') BEGIN CREATE ASYMMETRIC KEY FivetranCLRKey FROM EXECUTABLE FILE = '{Path to Fivetran Binary Log Reader DLL}'; END;Create a login for the Fivetran user from the asymmetric key and grant
UNSAFE ASSEMBLYpermissions. Perform this step once for each database host.USE master IF NOT EXISTS (SELECT * FROM sys.server_principals WHERE name = 'FivetranUser') BEGIN CREATE LOGIN FivetranUser FROM ASYMMETRIC KEY FivetranCLRKey; GRANT UNSAFE ASSEMBLY TO FivetranUser ; ENDCreate an assembly and stored procedures to invoke the log reader DLL. You only need to do this in one database per SQL Server host. The connector automatically reuses the assembly and stored procedures for all other databases on the same host.
If the database is in an AOAG and you connect to a read-only secondary, do not create these target-database CLR objects on the secondary. The assembly and target-database stored procedures replicate from the primary. On the secondary, you only need the required
msdbhelper procedures.Create the assembly that the stored procedure will execute. Replace
<database>with the name of the database you intend to place the CLR stored procedures in and'{Path to Fivetran Binary Log Reader DLL}'with the full directory path to the Fivetran Binary Log Reader DLL file on your SQL Server host machine:USE <database>; -- Add assembly to trusted assemblies for SQL Server 2017+ (supports CLR strict security) IF CAST(SERVERPROPERTY('ProductMajorVersion') AS INT) >= 14 BEGIN DECLARE @hash VARBINARY(64); SELECT @hash = HASHBYTES('SHA2_512', (SELECT * FROM OPENROWSET(BULK N'{Path to Fivetran Binary Log Reader DLL}', SINGLE_BLOB) AS x)); IF NOT EXISTS (SELECT * FROM sys.trusted_assemblies WHERE hash = @hash) BEGIN EXEC sys.sp_add_trusted_assembly @hash, N'Fivetran CLR Assembly'; END END IF EXISTS (SELECT * FROM sys.assemblies WHERE name = 'Fivetran') BEGIN DROP PROCEDURE sp_fivetran_readlog DROP ASSEMBLY Fivetran END CREATE ASSEMBLY Fivetran FROM '{Path to Fivetran Binary Log Reader DLL}' WITH PERMISSION_SET = UNSAFE;Create the stored procedures that invoke the corresponding methods in the Binary Log Reader assembly:
CREATE OR ALTER PROCEDURE sp_fivetran_readlog (
@process int,
@handle bigint,
@offset bigint,
@bufSize int,
@parity tinyint,
@filter varbinary(1000) = NULL
)
AS EXTERNAL NAME Fivetran.LogReader.sp_Fivetran_ReadLog;

CREATE OR ALTER PROCEDURE sp_fivetran_logslice (
@process INT,
@handle BIGINT,
@offset BIGINT,
@bufSize INT
)
AS EXTERNAL NAME Fivetran.LogReader.sp_Fivetran_LogSlice;
(If using TDE) Create stored procedures for importing TDE certificates:
CREATE OR ALTER PROCEDURE sp_fivetran_importtdecertificate (
@cerFilename nvarchar(1000),
@pvkFilename nvarchar(1000),
@password nvarchar(100)
)
AS EXTERNAL NAME Fivetran.LogReader.sp_Fivetran_ImportTDECertificate;
GO

CREATE OR ALTER PROCEDURE sp_fivetran_istdecertificateimported (
@thumbprint nvarchar(100)
)
AS EXTERNAL NAME Fivetran.LogReader.sp_Fivetran_IsTDECertificateImported;
(If using TDE with decrypted DEKs) Create the stored procedure for importing a decrypted DEK:
CREATE OR ALTER PROCEDURE sp_fivetran_importdecrypteddek (
@thumbprint nvarchar(100),
@decryptedDek varbinary(500)
)
AS EXTERNAL NAME Fivetran.LogReader.sp_Fivetran_ImportDecryptedDek;
Once you complete this step, the DLL and associated stored procedures are ready for use by Fivetran.
Grant the Fivetran user
EXECUTEpermissions on the wrapper procedures:GRANT EXECUTE ON sp_fivetran_readlog TO <username>; GRANT EXECUTE ON sp_fivetran_logslice TO <username>; GRANT EXECUTE ON sp_fivetran_importtdecertificate TO <username>; GRANT EXECUTE ON sp_fivetran_istdecertificateimported TO <username>; -- If you created sp_fivetran_importdecrypteddek GRANT EXECUTE ON sp_fivetran_importdecrypteddek TO <username>;
Self-managed supplemental logging
By default, Fivetran manages supplemental logging automatically using helper stored procedures. You can also choose to manage supplemental logging yourself by skipping the helper procedures installation during setup or by removing them after installation.
- Self-managed supplemental logging is supported only when Binary Log Reader is configured to read from backup transaction logs and log truncation is managed by SQL Server Agent.
- We don't recommend managing supplemental logging yourself for most use cases. Choose this approach only if you have dedicated database administration resources and proven operational procedures for managing supplemental logging independently.
Expand for details
The following are the helper stored procedures that Fivetran uses to manage supplemental logging:
sp_fivetran_cdc_enable_db: Enables supplemental logging (CDC) at the database levelsp_fivetran_cdc_enable_table: Enables supplemental logging (CDC) on individual tablessp_fivetran_cdc_stop_job: Stops the supplemental logging capture jobsp_fivetran_cdc_drop_job: Drops the supplemental logging capture job
Managing supplemental logging yourself carries critical risks and requires you to take full responsibility for the following:
- Activating supplemental logging: Enable CDC on every new table in your source database before syncing it. Failure to do this causes Fivetran to raise a SupplementalLoggingNotEnabledTask, pausing syncing until you manually enable supplemental logging for that table.
- Execute
sys.sp_cdc_enable_dbat the database level before syncing any tables - Execute
sys.sp_cdc_enable_tablefor each table before syncing it
- Execute
- Coordinating log truncation: SQL Server Agent manages the capture job and log truncation. Use
sp_cdc_drop_jobandsp_cdc_stop_jobas needed to ensure log truncation is properly coordinated with your database backups and to prevent excessive transaction log growth. - Handling all CDC administration overhead: Without the helper procedures, every new table and every schema change requires manual database administration and CDC setup.
(Optional) Export Transparent Data Encryption (TDE) certificate and private key. This step applies only if you use the Binary Log Reader method and your database has SQL Server transparent data encryption (TDE) enabled.
Expand for instructions
Run the following SQL command to export the TDE certificate and its private key to files. Replace the placeholders
<TDE_certificate_name>,<path_to_TDE_certificate_file>,<path_to_TDE_private_key_file>, and<TDE_password>with the actual values specific to your environment. Make sure the SQL Server service account has write permissions to the specified paths.BACKUP CERTIFICATE <TDE_certificate_name> TO FILE = '<path_to_TDE_certificate_file.cer>' WITH PRIVATE KEY ( FILE = '<path_to_TDE_private_key_file.pvk>', ENCRYPTION BY PASSWORD = '<TDE_password>' )Run the following commands in the command prompt to encode the certificate and private key:
If you are using a Windows machine, download a Base64 utility. Base64 encoding ensures that the certificate and key are in a format that is easily transferable, especially when they need to be imported into systems that require a specific format or do not handle binary files well.
base64 <path_to_TDE_certificate_file>
base64 <path_to_TDE_private_key_file>
Make a note of the command outputs. You will need them later when you specify replication parameters in the Fivetran setup form.
(Optional) Configure Always On Availability Group (AOAG). This step applies only if you use the Binary Log Reader method and connect to a secondary node in an Always On Availability Group.
If you connect directly to a secondary node, you must manually enable supplemental logging for your tables on the primary node and configure a separate task to advance the CDC log truncation point. However, if you connect to a standalone database or an AG listener of an Always On Availability Group, supplemental logging is already enabled.
For more information on how the Binary Log Reader interacts with Always On Availability Groups, see Using Binary Log Reader with Always On Availability Groups and read replicas section.
When you add a new table to the source database, it is essential to enable supplemental logging for the new table, otherwise the sync will fail.
Expand for instructions
Enable supplemental logging on the primary node for each table you want to sync. Replace
<schema>and<table>with the actual names of the schema and the table for which you want to enable supplemental logging.-- You only need to enable CDC once if the database is not already enabled EXEC sys.sp_cdc_enable_db; -- Enable CDC for the specified table DECLARE @source_schema NVARCHAR(500) = <schema>; DECLARE @source_name NVARCHAR(500) = <table>; DECLARE @capture_instance NVARCHAR(500); SET @capture_instance = N'fivetran_' + CAST(OBJECT_ID(@source_schema + '.' + @source_name) AS NVARCHAR); EXEC sys.sp_cdc_enable_table @source_schema = @source_schema, @source_name = @source_name, @capture_instance = @capture_instance, @role_name = NULL; -- Drop the capture job. You only need to drop the capture job once per database. EXEC sp_cdc_drop_job @job_type = N'capture';The CDC tables created for this configuration are used only to log the primary key during updates. They do not contain actual replicated data and are different from running SQL Server's native CDC replication. This process does not add any additional load to the database server and is different from running SQL Server's native CDC replication.
Create a separate task on the primary node to manage the truncation point for replication. A recommended approach is to schedule a SQL Server Agent job that periodically runs:
EXEC sp_repldone @xactid = NULL, @xact_seqno = NULL, @numtrans = 0, @time = 0, @reset = 1;
(Optional, applicable to CT and CDC only) Automatically enable CT or CDC for newly created tables and capture schema changes.
Expand for details
By default, when you create a new table in your database, you must manually enable CT or CDC for that table before we can sync it. Additionally, if you add a new column to an existing CDC-enabled table, you must manually recreate the CDC capture instance before we can sync the column.
To automatically enable CT or CDC for new tables and update CDC capture instances when columns are added, install the following stored procedures on your database. If your connection contains only CT-enabled tables, then any subsequent new tables will be CT-enabled. If your connection has a mixture of CT- and CDC-enabled tables or contains CDC-enabled tables only, then we will enable CDC over CT by default.
Instructions to install the stored procedures
Install the following script on your database. Before running the script, replace
<database>with your database name.If you have configured your connection to "Allow columns", you can exclude the
[dbo].[sp_ft_enable_cdc]and[dbo].[sp_ft_enable_change_tracking]stored procedures. If you have configured your connection to "Block All", you can exclude all the following stored procedures.USE [<database>]; /****** Object: StoredProcedure [dbo].[sp_ft_enable_cdc] Script Date: 1/17/2024 11:12:55 PM ******/ SET ANSI_NULLS ON GO SET QUOTED_IDENTIFIER ON GO CREATE OR ALTER PROCEDURE [dbo].[sp_ft_enable_cdc] @TableList NVARCHAR(MAX), @FivetranUser NVARCHAR(MAX) WITH EXECUTE AS OWNER -- Change to an appropriate sysadmin user AS BEGIN SET NOCOUNT ON; -- Table to store tables with results CREATE TABLE #ResultTables (TableName NVARCHAR(MAX), Result NVARCHAR(MAX)); -- Enable CDC for each table DECLARE @TableName NVARCHAR(MAX); DECLARE @SqlStatement NVARCHAR(MAX); WHILE LEN(@TableList) > 0 BEGIN -- Get the first table in the list SET @TableName = NULL; SET @TableName = SUBSTRING(@TableList, 1, CHARINDEX(',', @TableList + ',') - 1); -- Remove the processed table from the list SET @TableList = STUFF(@TableList, 1, LEN(@TableName) + 1, ''); -- Build and execute the SQL statement to enable CDC for the table SET @SqlStatement = ' BEGIN TRY EXEC sys.sp_cdc_enable_table @source_schema = ''' + PARSENAME(@TableName, 2) + ''', @source_name = ''' + PARSENAME(@TableName, 1) + ''', @role_name = ''' + @FivetranUser + '''; INSERT INTO #ResultTables (TableName, Result) VALUES (''' + @TableName + ''', ''Success''); END TRY BEGIN CATCH PRINT ERROR_MESSAGE(); INSERT INTO #ResultTables (TableName, Result) VALUES (''' + @TableName + ''', ERROR_MESSAGE()); END CATCH '; -- Execute the dynamic SQL statement EXEC sp_executesql @SqlStatement; END -- Return the list of tables with results SELECT * FROM #ResultTables; -- Drop the temporary table DROP TABLE #ResultTables; END; GO /****** Object: StoredProcedure [dbo].[sp_ft_enable_change_tracking] Script Date: 1/17/2024 11:10:45 PM ******/ SET ANSI_NULLS ON GO SET QUOTED_IDENTIFIER ON GO CREATE OR ALTER PROCEDURE [dbo].[sp_ft_enable_change_tracking] @TableList NVARCHAR(MAX), @FivetranUser NVARCHAR(MAX) WITH EXECUTE AS OWNER -- Change to an appropriate sysadmin user AS BEGIN SET NOCOUNT ON; -- Table to store tables with results CREATE TABLE #ResultTables (TableName NVARCHAR(MAX), Result NVARCHAR(MAX)); -- Enable change tracking for each table DECLARE @TableName NVARCHAR(MAX); DECLARE @SqlStatement NVARCHAR(MAX); WHILE LEN(@TableList) > 0 BEGIN -- Get the first table in the list SET @TableName = NULL; SET @TableName = SUBSTRING(@TableList, 1, CHARINDEX(',', @TableList + ',') - 1); -- Remove the processed table from the list SET @TableList = STUFF(@TableList, 1, LEN(@TableName) + 1, ''); -- Build and execute the SQL statement to enable change tracking SET @SqlStatement = ' BEGIN TRY ALTER TABLE ' + @TableName + ' ENABLE CHANGE_TRACKING; GRANT VIEW CHANGE TRACKING ON ' + @TableName + ' TO ' + @FivetranUser + '; INSERT INTO #ResultTables (TableName, Result) VALUES (''' + @TableName + ''', ''Success''); END TRY BEGIN CATCH PRINT ERROR_MESSAGE(); INSERT INTO #ResultTables (TableName, Result) VALUES (''' + @TableName + ''', ERROR_MESSAGE()); END CATCH '; -- Execute the dynamic SQL statement EXEC sp_executesql @SqlStatement; END -- Return the list of tables with results SELECT * FROM #ResultTables; -- Drop the temporary table DROP TABLE #ResultTables; END; GO /****** Object: StoredProcedure [dbo].[sp_ft_get_tables_with_ddl_changes] Script Date: 1/30/2024 9:10:47 PM ******/ SET ANSI_NULLS ON GO SET QUOTED_IDENTIFIER ON GO CREATE OR ALTER PROCEDURE [dbo].[sp_ft_get_tables_with_ddl_changes] @TableList NVARCHAR(MAX), @ddlTime DATETIME = NULL -- New parameter for ddlTime WITH EXECUTE AS OWNER -- Change to an appropriate sysadmin user AS BEGIN SET NOCOUNT ON; -- Declare a table variable to store the results DECLARE @ChangedTables TABLE ( TableName NVARCHAR(MAX), DdlTime DATETIME ); -- Split the comma-separated list into a table variable DECLARE @TableNames TABLE ( TableName NVARCHAR(MAX) ); INSERT INTO @TableNames (TableName) SELECT value FROM STRING_SPLIT(@TableList, ','); -- Check for DDL changes in cdc.ddl_history INSERT INTO @ChangedTables (TableName, DdlTime) SELECT tn.TableName, MAX(dh.ddl_time) AS LatestDdlTime FROM cdc.ddl_history dh INNER JOIN @TableNames tn ON CONCAT(OBJECT_SCHEMA_NAME(dh.source_object_id), '.', OBJECT_NAME(dh.source_object_id)) = tn.TableName WHERE @ddlTime IS NULL OR dh.ddl_time >= @ddlTime GROUP BY tn.TableName; -- Return the list of tables with the latest DDL changes SELECT TableName, DdlTime FROM @ChangedTables; END; GO /****** Object: StoredProcedure [dbo].[sp_ft_update_cdc] Script Date: 1/31/2024 1:19:40 AM ******/ SET ANSI_NULLS ON GO SET QUOTED_IDENTIFIER ON GO CREATE OR ALTER PROCEDURE [dbo].[sp_ft_update_cdc] @TableName NVARCHAR(MAX), @FivetranUser NVARCHAR(MAX), @CaptureInstance NVARCHAR(MAX), @CapturedColumnList NVARCHAR(MAX) WITH EXECUTE AS OWNER AS BEGIN SET NOCOUNT ON; -- Table to store tables with results CREATE TABLE #ResultTables (TableName NVARCHAR(MAX), Result NVARCHAR(MAX)); DECLARE @SourceSchema NVARCHAR(MAX); DECLARE @SourceName NVARCHAR(MAX); BEGIN TRY -- Assign values to variables for PARSENAME function SET @SourceSchema = PARSENAME(@TableName, 2); SET @SourceName = PARSENAME(@TableName, 1); -- Step 1: Disable the current CDC instance EXEC sys.sp_cdc_disable_table @source_schema = @SourceSchema, @source_name = @SourceName, @capture_instance = @CaptureInstance; -- Step 2: Create a new CDC instance EXEC sys.sp_cdc_enable_table @source_schema = @SourceSchema, @source_name = @SourceName, @role_name = @FivetranUser, @capture_instance = @CaptureInstance, @captured_column_list = @CapturedColumnList -- Insert the result into the #ResultTables table INSERT INTO #ResultTables (TableName, Result) VALUES (@TableName, 'Success'); END TRY BEGIN CATCH PRINT ERROR_MESSAGE(); -- Insert the error message into the #ResultTables table INSERT INTO #ResultTables (TableName, Result) VALUES (@TableName, ERROR_MESSAGE()); END CATCH; -- Return the list of tables with results SELECT * FROM #ResultTables; -- Drop the temporary table DROP TABLE #ResultTables; END; GOGrant the Fivetran user
EXECUTEpermission.USE [<database>]; GRANT EXECUTE ON dbo.sp_ft_enable_cdc to <username>; GRANT EXECUTE ON dbo.sp_ft_enable_change_tracking to <username>; GRANT EXECUTE ON dbo.sp_ft_get_tables_with_ddl_changes to <username>; GRANT EXECUTE ON dbo.sp_ft_update_cdc to <username>;
Specify replication parameters
In the Fivetran setup form's Replication tab,
Choose your incremental sync method in the Replication Method drop-down menu:
Read changes using CT or CDC mechanisms
Read changes using Fivetran Teleport Sync
Read changes using Binary Log Reader
If you select Read changes using Binary Log Reader, enter the parameters required for the Binary Log Reader method.
Parameters for Binary Log Reader (required)
Choose your transaction log source in the Log Type drop-down menu:
Fivetran reads incremental changes directly from the online transaction log files.
If your database uses Simple Recovery mode, you must set Log Type to Online Transaction Log and Log Truncator to Fivetran. User-managed and SQL Server Agent log truncation are not supported in Simple Recovery mode.
Choose your log truncation method in the Log Truncator drop-down menu. Learn more in our Log Truncation documentation.
Fivetran (Default) - Fivetran manages log truncation automatically by calling
sp_repldoneafter each successful sync.User-managed - You must manually manage log truncation. Use for AlwaysOn Availability Group secondary replicas or when manual control is required.
When log truncation is user-managed, transaction logs grow indefinitely unless you manually truncate them. You must run
sp_repldoneregularly to prevent excessive log growth.SQL Server Agent - SQL Server's native CDC capture job manages log truncation. Use when running alongside other replication or CDC solutions.
When your Log Type is Online Transaction Log, if a transaction is no longer available in the online log, Fivetran attempts to read from the backup logs, provided Fivetran has access to the backup log tracked in SQL Server MSDB.
Fivetran reads incremental changes from backup transaction log files.
Choose your backup transaction log file storage location in the Backup Storage Type drop-down menu:
Azure Blob Storage
Read from backup log files stored in an Azure Blob Storage container.
- In the Container Name field, enter the name of the Azure Blob Storage container that stores your backup log files.
- In the Connection String field, enter a Shared Access Signature (SAS) token that grants Fivetran read access to your Azure Blob Storage container. The SAS token should have at least read (
r) and list (l) permissions. For more information about creating a SAS token, see Create a shared access signature in Azure.
The SAS connection string must remain valid for Fivetran to continuously access the backup log files. Because SAS tokens expire after a set time, you must renew the token before expiration and update the connection string in your Fivetran connector settings to prevent sync interruptions.
Alternate Location
Read from backup log files in a local file system directory on the same SQL Server host.
- In the Backup Log Path field, enter the local directory path (for example,
C:\log_backups) where your backup log files are stored.
AWS S3
Read from backup log files stored in an AWS S3 bucket.
In the S3 Bucket field, enter the name of the AWS S3 bucket that stores your backup log files.
In the External ID field, enter the condition string that you specified when creating the IAM user.
In the RoleARN field, enter the role ARN with at least read (
s3:GetObject) and list (s3:ListBucket) permissions for the specified S3 bucket. The trust policy must allow the Fivetran IAM user (arn:aws:iam::834469178297:user/gcp_donkey) to assume this role.Example role trust policy
{
   "Version": "2012-10-17",
   "Statement": [
      {
            "Effect": "Allow",
            "Principal": {
                  "AWS" : "arn:aws:iam::834469178297:user/gcp_donkey"
            },
            "Action": "sts:AssumeRole",
            "Condition": {
                  "StringEquals": {
                  "sts:ExternalId": [
                     "<value-from-Fivetran-setup-form>",
                     ]
                  }
            }
      }
   ]
}
The role must remain valid for Fivetran to continuously access the backup log files.
Google Cloud Storage
Read from backup log files stored in a Google Cloud Storage bucket.
- Grant the service account access to the Google Cloud Storage bucket that stores your backup log files. The service account email address is displayed in the setup form. For more information about authorizing access to a service account, see our Google Cloud Storage setup guide.
- In the GCS Bucket field, enter the name of the Google Cloud Storage bucket that stores your backup log files. This must be the same bucket you authorized in the previous step.
In the Backup Log Format field, enter the backup log filename format string. Fivetran uses this format string to determine the processing order of backup transaction log files based on their filenames. Learn more in our Backup log filename format string documentation.
You can use the following format string variables:
%d- database name%Y- year (up to 4 digit decimal integer)%M- month (up to 2 digit decimal integer)%D- day (up to 2 digit decimal integer)%h- hours (up to 2 digit decimal integer)%m- minutes (up to 2 digit decimal integer)%s- seconds (up to 2 digit decimal integer)%n- file sequence number (up to 64 bit decimal integer)%%- matches %*- wildcard, matches zero or more characters
For example, if your backup log files are named
mydb_20240115_101530_1.trn,mydb_20240115_101530_2.trn, and so on, enter the format stringmydb_%Y%M%D_%h%m%s_%n.trnto match the filenames and ensure they are processed in the correct order.
(Optional, for TDE-enabled databases only) Set the Use transparent data encryption (TDE) toggle to ON and enter the following information:
Online Transaction Log
- In the TDE Certificate Path field, enter the directory path containing the certificate public key file you exported in the Export TDE certificate (optional) step (for example,
c:\\certificates\tde_certificate.cer). - In the TDE Private Key Path field, enter the directory path containing the certificate private key file you exported in the Export TDE certificate (optional) step (for example,
c:\\certificates\tde_private_key.pvk). - In the TDE Private Key Password field, enter the password for the TDE private key.
Backup Transaction Log BETA
- In the TDE Certificate field, upload the certificate public key file (
.cer) you exported in the Export TDE certificate (optional) step. - In the TDE Private Key field, upload the private key file (
.pvk) associated with the TDE certificate you exported in the Export TDE certificate (optional) step. - In the TDE Private Key Password field, enter the password for the TDE private key.
- In the TDE Certificate Path field, enter the directory path containing the certificate public key file you exported in the Export TDE certificate (optional) step (for example,
Click Test replication method. Fivetran runs the Validating replication config test that verifies your database has an incremental sync method enabled (either CDC or CT).
If a test fails, refer to the error message in the setup form to troubleshoot and resolve the issue, then click Test replication method again.
Once the tests pass, click Save and test to save the connection.
Fivetran will test and validate the connection to your database. After the tests are completed successfully, follow the prompts in the Fivetran dashboard to begin your initial sync.