SharePoint Setup Guide
Follow our setup guide to connect SharePoint to Fivetran.
Prerequisites
To connect SharePoint to Fivetran, you need:
- A SharePoint account
- A SharePoint folder containing files with supported file types and encodings
- The ability to grant Fivetran permission to read from this account
Setup instructions
Choose SharePoint access type
Decide how you want Fivetran to access your SharePoint site. You can configure the connection in different ways depending on your permission levels within Microsoft.
In the connection setup form, select your Access Type:
Quick setup (All sites via Fivetran App)
Access is delegated for each connection to Fivetran's pre-registered Microsoft Entra app. Simplest to set up if you have the needed permissions and most commonly used.
To connect to Fivetran using this access type, you need the following:
- Microsoft Entra Administrator (Global Admin) with the ability to "managePermissionGrantsForAll" (admin).
- SharePoint non-admin user, if allowed by a Global Administrator. See Microsoft Entra built-in roles to know more about role based access in Microsoft Entra.
Fivetran needs files.read, offline_access, and Sites.Read.All permissions for this access type.
Connection setup by admin
- In the connection setup form, click Authorize.
- After successful authorization, proceed to Find folder URL.
Connection setup by non-admin user
A non-admin can complete the connection setup once a Global Administrator performs the following steps:
You must perform these steps only once.
In the Azure Portal, go to Microsoft Entra ID.
In the search bar, search for Enterprise applications and click on it.
On the left navigation menu, under Security, click Consent and permissions.
Under User consent settings, select Allow user consent for apps from verified publishers, for selected permissions (Recommended) and click Save.
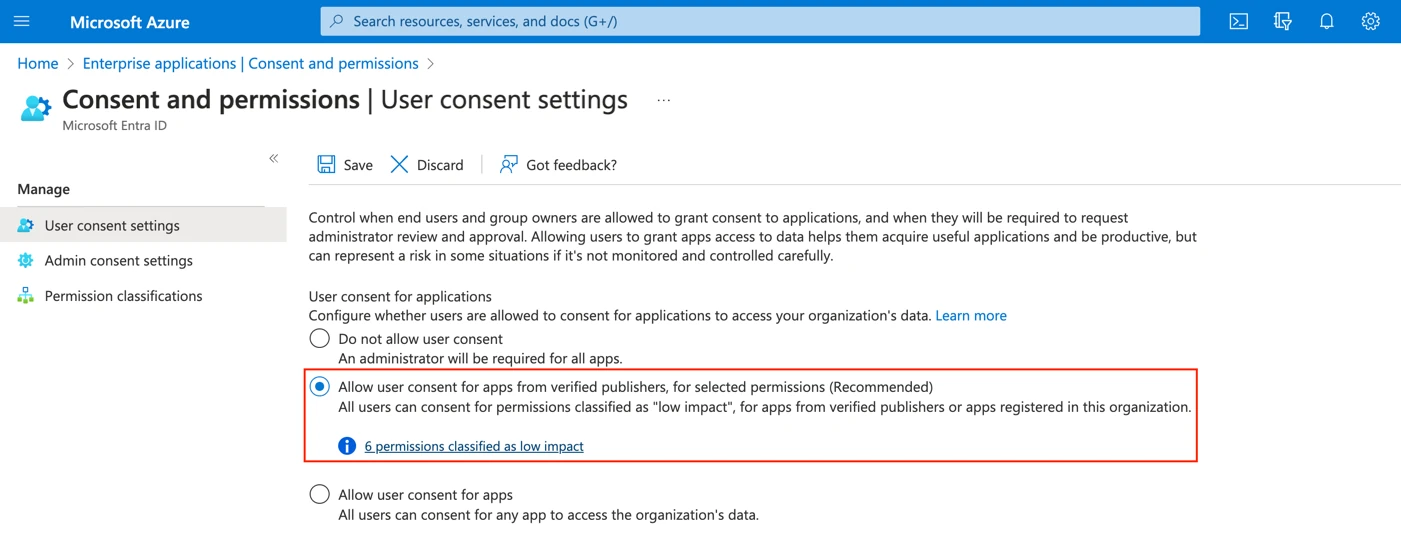
Go to Permission classifications and click Add permissions.
Select Microsoft Graph and add the following permissions:
Sites.Read.AllFiles.Readoffline_accessprofileopenidemail

Alternatively, a Global Administrator can enable users to request admin consent by navigating to Microsoft Entra ID > Enterprise Applications > Consent and Permissions > Admin Consent Settings. When this is configured, you will be prompted to request approval from an admin during connection authorization.
Once you have updated the consent settings, proceed to find folder URL.
Customer-registered app - Client secret (Granular access using your own Microsoft Entra app)
Create and configure your own Microsoft Entra app in Microsoft Entra ID to authenticate with Fivetran. This method can be reused across multiple Fivetran connections and offers more granular access control.
Register your app
You must perform these steps only once for each SharePoint tenant.
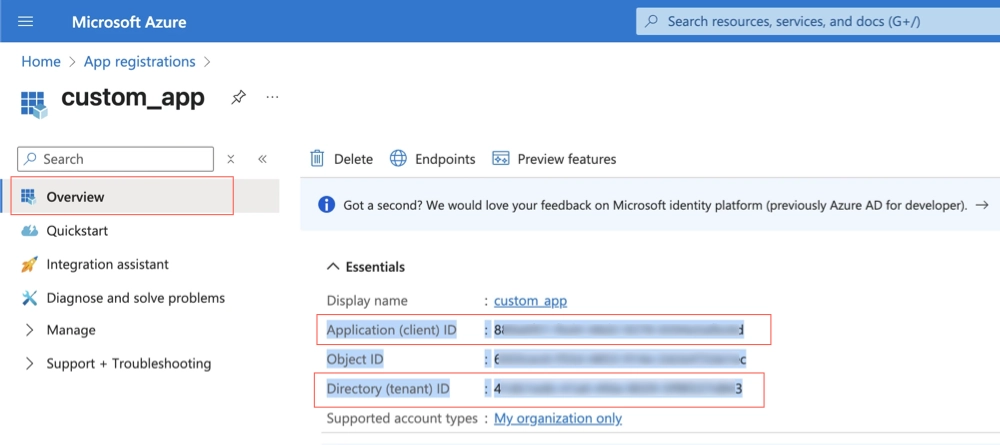
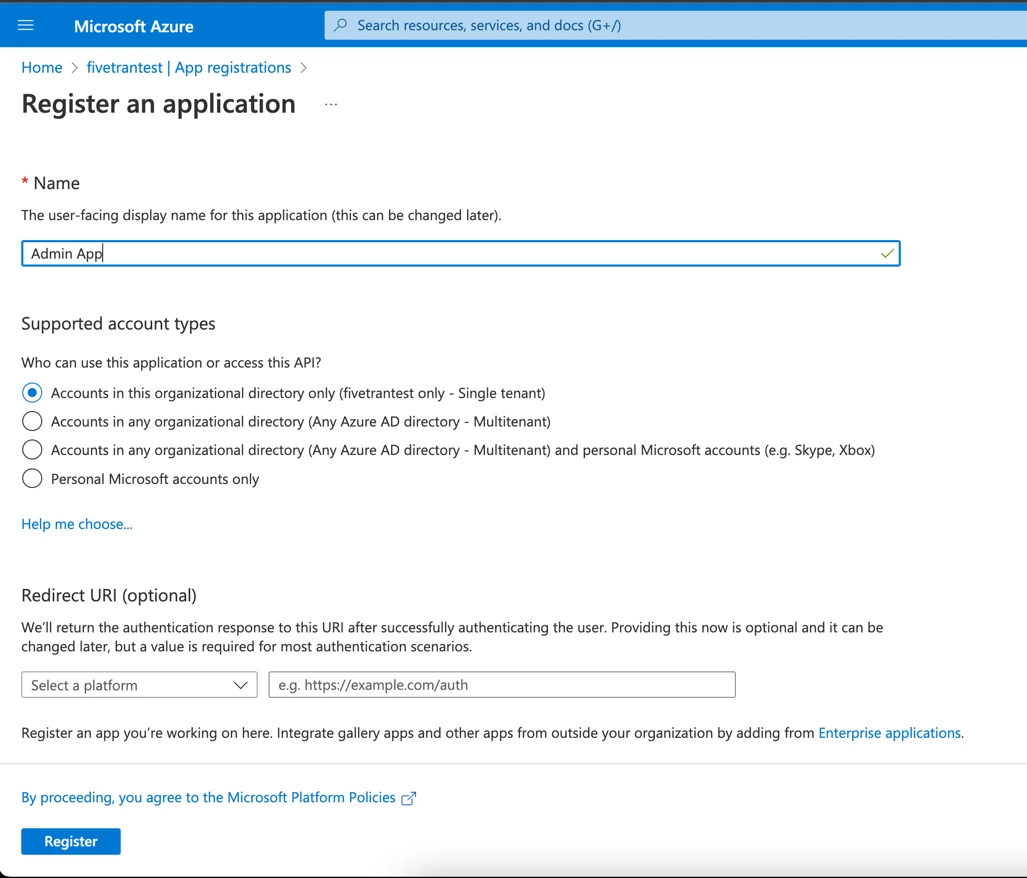
In the Azure Portal, go to Microsoft Entra ID > App registrations > New registration.
Enter a Name for your application. You will need the application name while configuring the connection.

Select Accounts in this organizational directory only as the supported account types and click Register.
In the new app's Overview page, make a note of the Application (client) ID and Directory (tenant) ID. You will need them to configure Fivetran.
Go to Certificates & secrets > New client secret and make a note of the secret value. You will need it to configure Fivetran.
Navigate to API Permissions > Add a permission > Microsoft Graph.
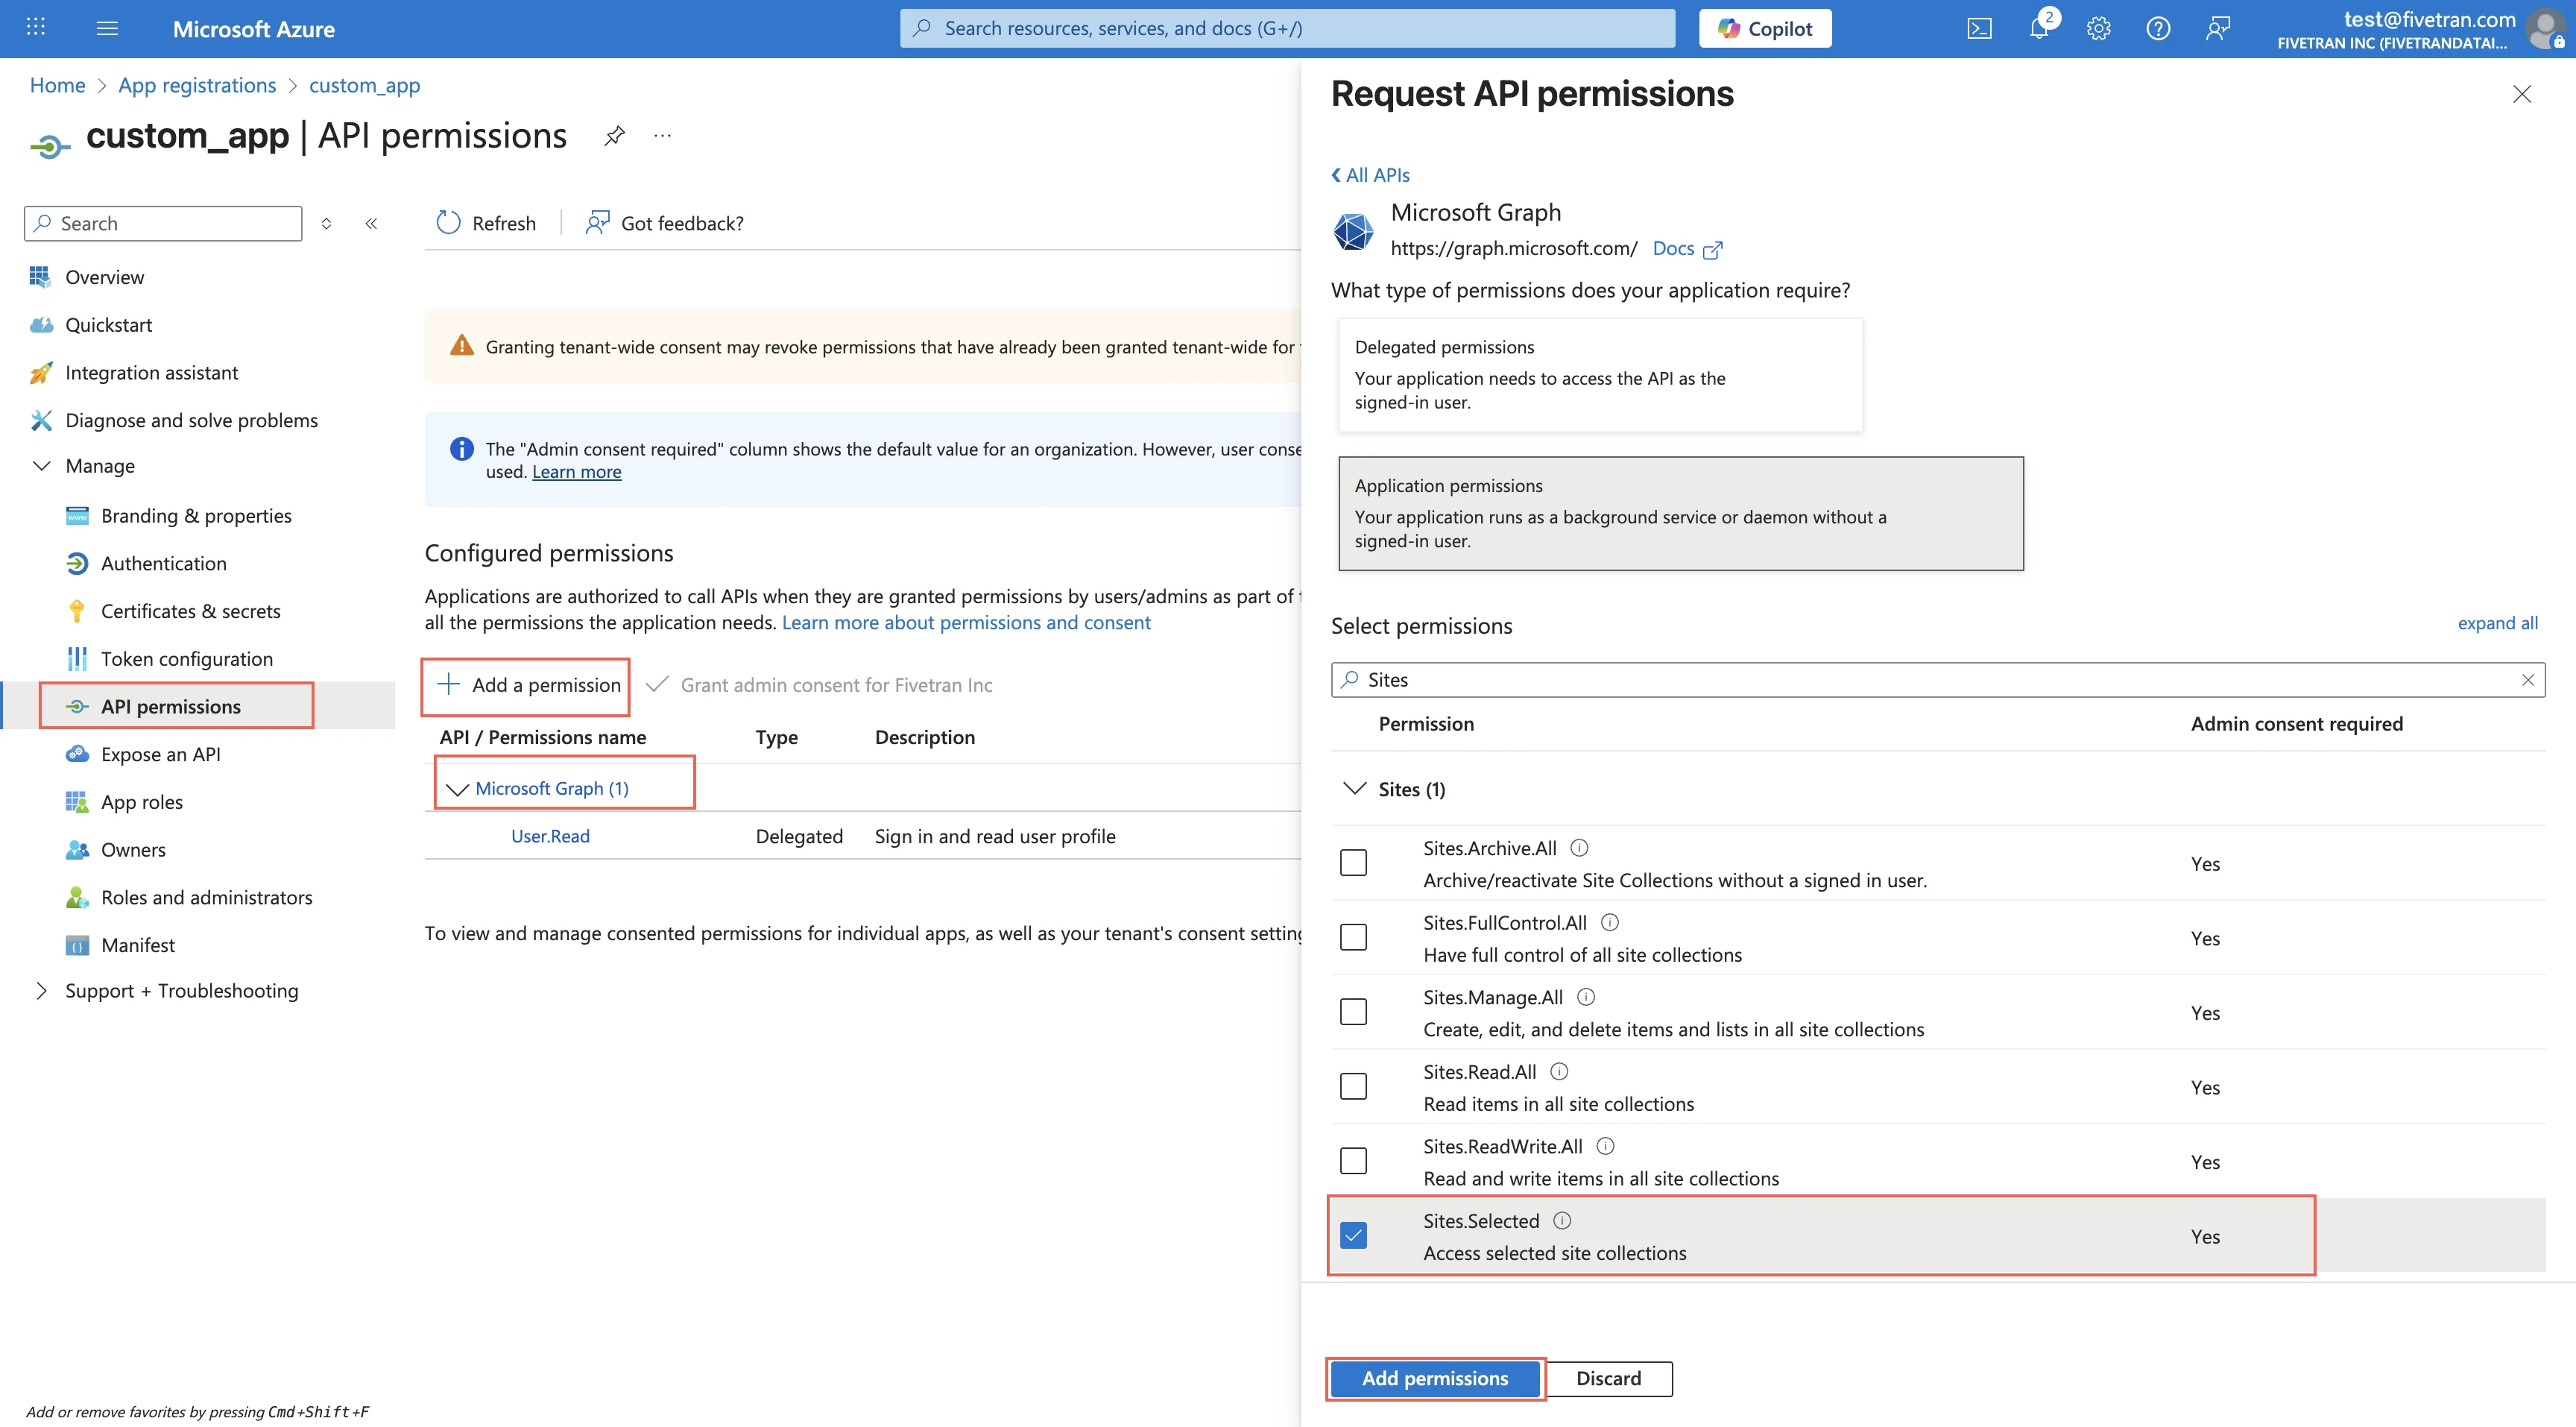
Select the required Application permissions.
Select Sites.Selected and click Add permissions.
Click Grant admin consent to apply the permissions.
Grant access for a selected site to the SharePoint app
You must perform these steps only once for each SharePoint site.
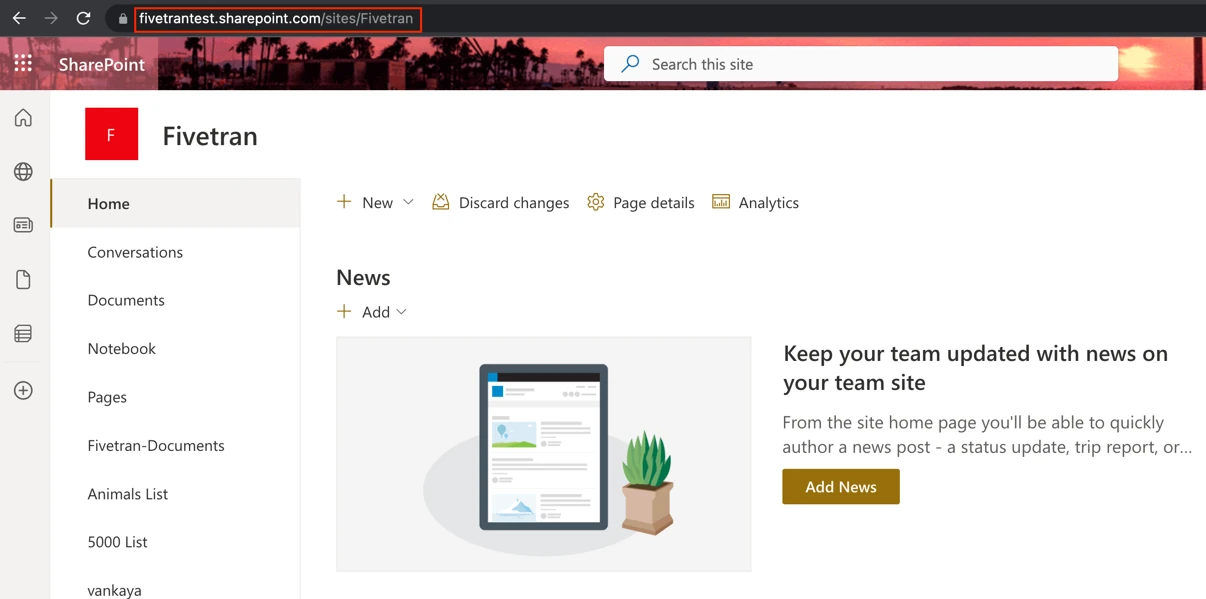
Navigate to the site you would like to connect to Fivetran.
Go to Home and copy the site URL.
Append
/_api/site/idto the site's URL in your browser.Make a note of the site ID in the JSON response. Make sure you are logged in to your SharePoint site while performing this step.

Log in to Microsoft Graph Explorer with an account that has a SharePoint Administrator or higher role.
In Graph Explorer, on the top right, click your avatar.
Select Consent to permissions and then choose Consent for Sites.FullControl.All to provide the Graph Explorer tool the ability to modify site permissions for your tenant.
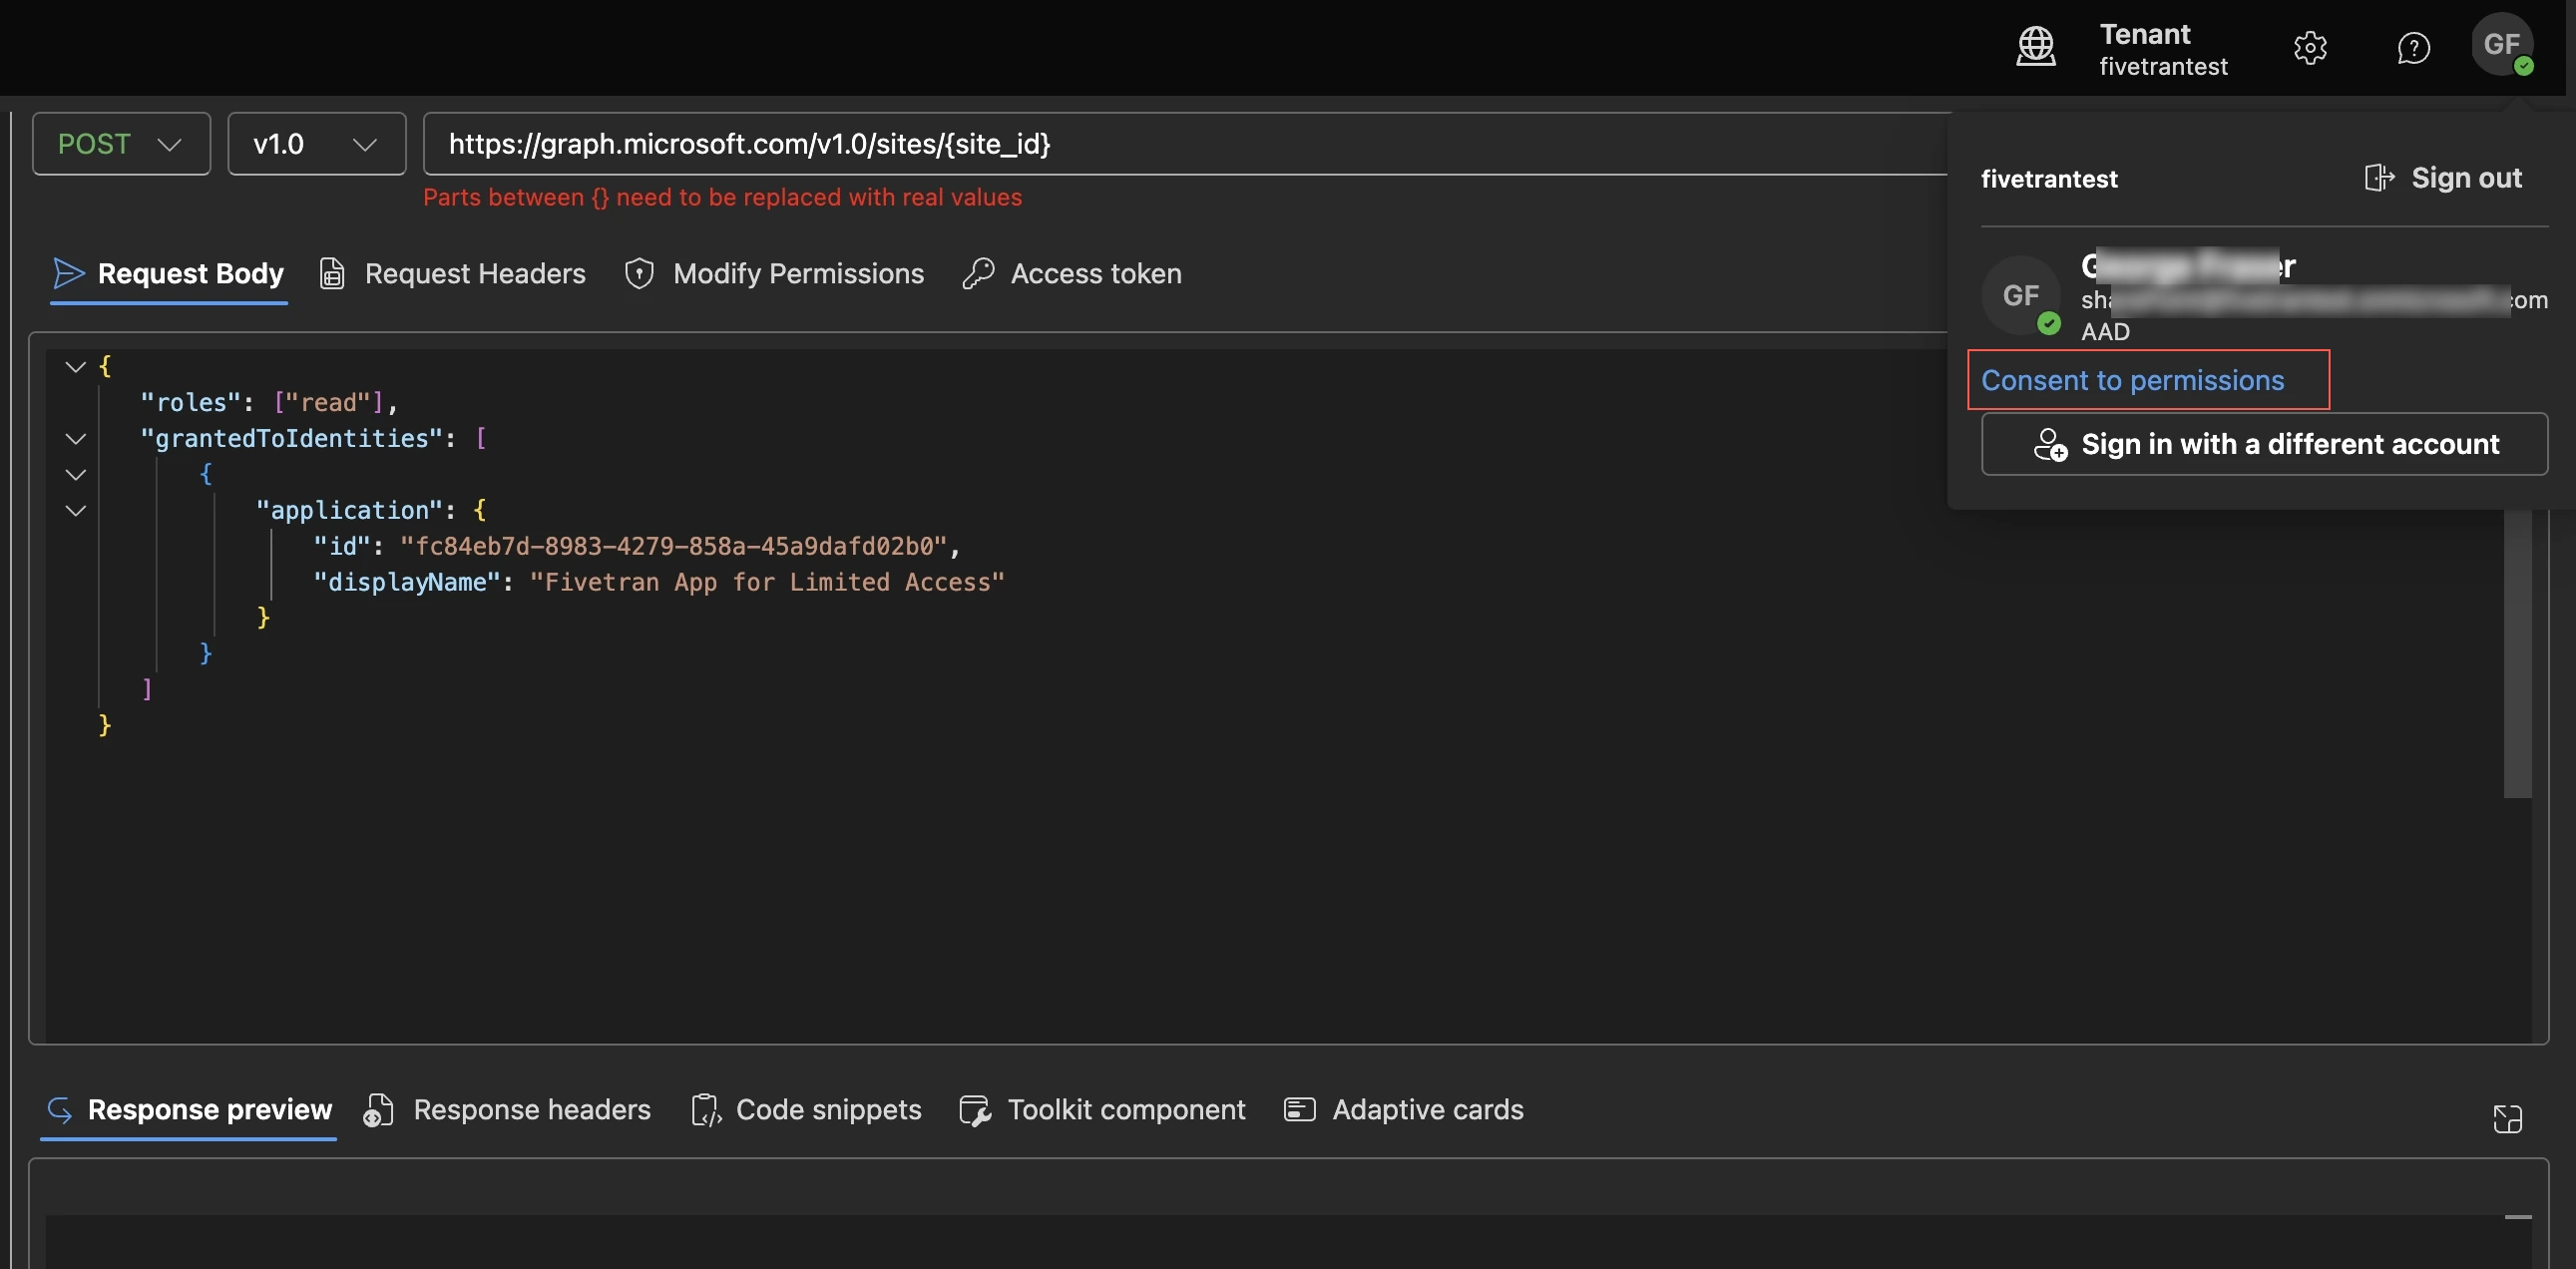
Make a POST request to the endpoint
https://graph.microsoft.com/v1.0/sites/{site_id}/permissionswith Request HeaderContent-Type: application/jsonand Request Body:{ "roles": ["read"], "grantedToIdentities": [ { "application": { "id": "<application_client_id>", "displayName": "<application_name>" } } ] }Replace
{site_id},{application_client_id}, and{application_name}from the above step Register your app.Once you have granted access to the site, allow up to a minute for the changes to reflect in the SharePoint app, proceed to find folder URL.
Customer-registered app - Client certificate (Granular access using your own Microsoft Entra app)
Client certificate authentication uses public key cryptography, providing better security than client secrets for authenticating a Microsoft Entra app.
Generate a client certificate
A client certificate consists of two parts:
- Private key (e.g.,
.pemor.pfxfile): Keep this secure and never share it. Fivetran uses this to authenticate. - Public certificate (e.g.,
.cerfile): Upload this to Azure. It's safe to share as it only validates the private key.
You can create a self-signed certificate using OpenSSL (cross-platform) or PowerShell (Windows).
Use OpenSSL (Recommended for macOS and Linux)
OpenSSL is generally pre-installed on macOS and Linux systems. For Windows, you can install it through OpenSSL for Windows or use WSL (Windows Subsystem for Linux).
Execute the following command in your terminal to generate the certificates:
openssl req -x509 -newkey rsa:2048 -keyout private_key.pem -out certificate.pem -days 365 -nodesParameters
Parameter Description openssl reqCreates and processes certificate requests. -x509OpenSSL creates a certificate directly, instead of creating a Certificate Signing Request (CSR). -newkey rsa:2048Generates a new RSA private key with 2048-bit encryption. -keyout <filename>Specifies where to save the private key file. -out <filename>Specifies where to save the certificate file. -days <number>Specifies certificate validity period in days. -nodes"No DES" - Don't encrypt the private key (no password protection). Once you run the command, you will be prompted to enter the certificate details. For example, Country, State, Organization, etc.
Press Enter to skip the optional fields.
Running this command generates two .pem files:
private_key.pem: Your private key. Make a note of this key. You will need it to configure Fivetran.certificate.pem: Your public certificate. You must upload this key in Azure.
Store your private_key.pem file securely. If you lose it, you'll need to generate a new certificate and reconfigure both Azure and Fivetran.
- (Optional) Use the following command to convert the certificate to
.cerformat for Azure:
openssl x509 -outform der -in certificate.pem -out certificate.cer
Use PowerShell (Windows)
Open PowerShell as an Administrator and execute the following commands:
# Generate the certificate
$cert = New-SelfSignedCertificate -DnsName "FivetranSharePoint" -CertStoreLocation "Cert:\CurrentUser\My" -NotAfter (Get-Date).AddDays(365) -KeySpec KeyExchange

# Export the public certificate (.cer file for Azure)
Export-Certificate -Cert $cert -FilePath "C:\path\to\your\certificate.cer"

# Export the private key as PFX (password-protected)
$password = ConvertTo-SecureString -String "your_secure_password" -Force -AsPlainText
Export-PfxCertificate -Cert $cert -FilePath "C:\path\to\your\certificate.pfx" -Password $password
Replace
C:\path\to\your\with the directory path you want to use and choose a strong password for the PFX file.Once you run the command, the following files generate:
certificate.cer: Your public certificate. You must upload it in Azure.certificate.pfx: Your private key in PFX format. Make a note of this key. You will need it to configure Fivetran.
If you want to convert the PFX to PEM format for Fivetran, use the following command:
# Extract private key
openssl pkcs12 -in certificate.pfx -nocerts -out private_key.pem -nodes

# Extract certificate
openssl pkcs12 -in certificate.pfx -clcerts -nokeys -out certificate.pem
Register your app
You must perform these steps only once for each SharePoint tenant.
In the Azure Portal, go to Microsoft Entra ID > App registrations > New registration.
Enter a Name for your application. You will need it while configuring Fivetran.
Select Accounts in this organizational directory only as the supported account type and click Register.
Open the application you registered and click Overview.
Make a note of the Application (client) ID and Directory (tenant) ID. You will need them to configure Fivetran.
Navigate to API Permissions > Add a permission > Microsoft Graph.
Select the Permission you want for your application.
Select Sites.Selected and click Add permissions.
Click Grant admin consent to apply the permissions.
Upload certificate to Azure
Once you register your application, upload the public certificate you generated:
- In your registered application, go to Certificates & secrets > Certificates tab.
- Click Upload certificate and select your public certificate file (
certificate.cerorcertificate.pem). - Add a description. For example, Fivetran SharePoint Certificate and click Add.
Set a reminder to renew your certificate before it expires. It is valid up to 365 days from the date of creation. You will find the expiration date in the Certificates & secrets section.
Grant access for a selected site to the SharePoint app
You must perform these steps only once for each SharePoint site.
Navigate to the site you want to connect to Fivetran.
Go to Home and copy the site URL.
Append
/_api/site/idto the site URL.Make a note of the site ID in the JSON response. Make sure you are signed in to your SharePoint site while performing this step.
Log in to Microsoft Graph Explorer with an account having a SharePoint Administrator or higher role.
Go to the top right and click your profile icon.
Select Consent to permissions and then select Consent for Sites.FullControl.All to provide the Graph Explorer tool with the ability to modify site permissions for your tenant.
Make a POST request to the endpoint
https://graph.microsoft.com/v1.0/sites/{site_id}/permissionswith headerContent-Type: application/jsonand copy the following body:{ "roles": ["read"], "grantedToIdentities": [ { "application": { "id": "<application_client_id>", "displayName": "<application_name>" } } ] }
Replace {site_id}, {application_client_id}, and {application_name} with the values you found.
Once you grant access to the site, it will take up to a minute for the changes to reflect in your SharePoint application. Proceed to the find folder URL section.
Limited sites (Legacy)
Perform the following steps only if you selected the Limited sites (Legacy) option. A SharePoint admin must perform these steps.
Find tenant ID
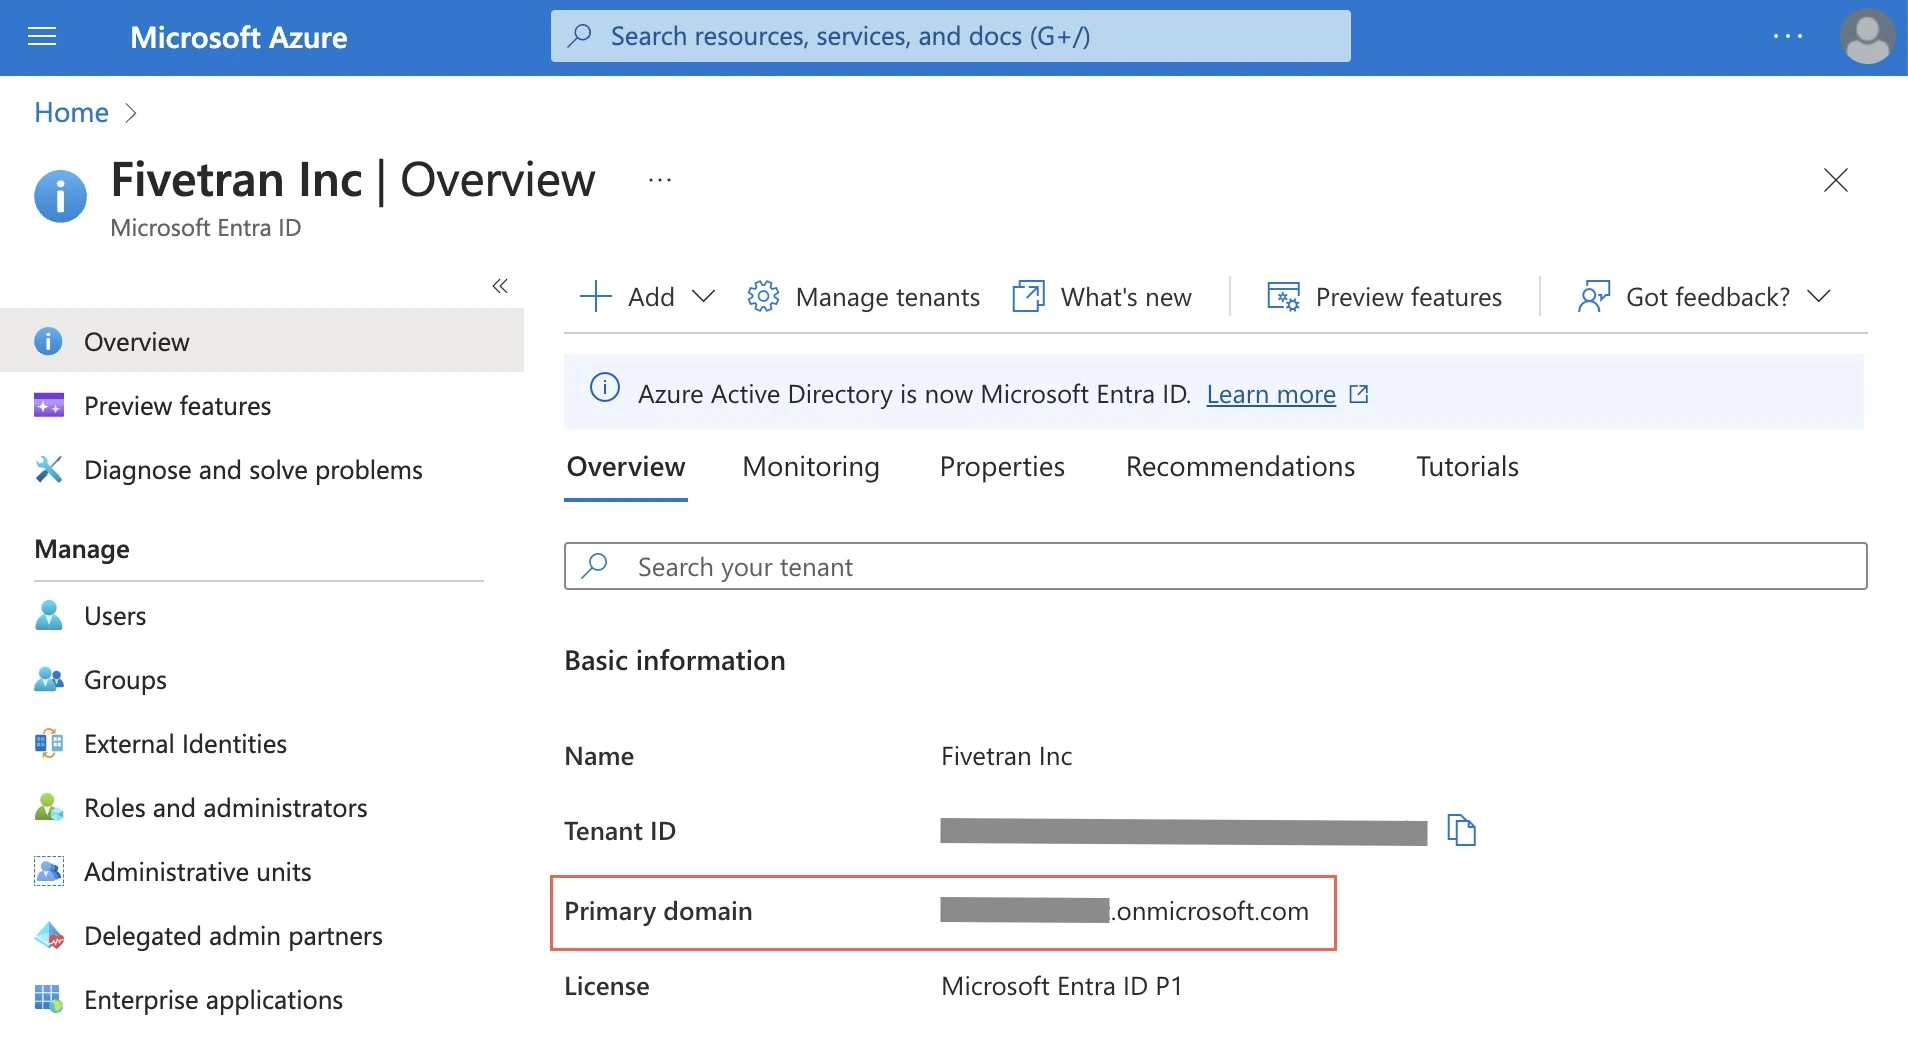
In the Azure Portal, go to Microsoft Entra ID.
Go to the Overview tab and make a note of the Tenant ID. You will need it later in this step.
Find SharePoint site ID
Log in to SharePoint and then navigate to the site you would like to connect to Fivetran.
Go to Home and copy the site URL.
Append
/_api/site/idto the copied URL. Enter the updated URL in the browser.Find your Site ID as illustrated below. Ensure that you are signed in to your SharePoint site while performing this step.
Make a note of the Site ID. You will need it to configure Fivetran.
Grant Fivetran access to your site
To grant Fivetran access to the SharePoint site where your folder is present, you must provide read permission of your site to the Fivetran application. You can grant permission in two ways:
We recommend using the Microsoft Graph Explorer to grant Fivetran access to your site.
By using the Microsoft Graph Explorer tool:
- Log in to the Microsoft Graph Explorer.
- Click the profile avatar and then click Consent to permissions > Consent for
Sites.FullControl.All.You grant
Sites.FullControl.Allpermission to Microsoft Graph Explorer, and not to the Fivetran application. Using the tool, you grant read permission of your site to the Fivetran application. You can revoke the permission for Microsoft Graph Explorer after connection creation. - Run the Microsoft Graph query. Replace
{site_id}with the Site ID you found above. The query grants permission of your site to Fivetran application with IDfc84eb7d-8983-4279-858a-45a9dafd02b0.If the permission is successfully granted, the query returns 201 created response.
By creating an app in Microsoft Entra ID:
In the Azure Portal, go to Microsoft Entra ID > App Registrations > New Registration.
Enter the Name and click Register.
In the Overview section of your app, make a note of Application (client) ID. You will need it later in this step.
Navigate to API permissions > Add a permission > Microsoft Graph > Application permissions > Add
Sites.FullControl.Allpermission.You don't grant
Sites.FullControl.Allpermission to Fivetran. Fivetran doesn't have access to this app. Using this app, you grant read permission of your site to Fivetran. You may delete your app after connection creation.Click Grant Admin Consent for {your tenant name} > Yes.

Go to Certificates & secrets > Add New client secret. Make a note of the value. This is the client secret value that you will need later in this step.
The value won't be available once you leave the page.
In Postman, click Import > Raw Text. Paste the following curl request:
curl -X POST -H "Content-Type: application/x-www-form-urlencoded" -d 'client_id=&scope=https%3A%2F%2Fgraph.microsoft.com%2F.default&client_secret=&grant_type=client_credentials' 'https://login.microsoftonline.com/{tenant_id}/oauth2/v2.0/token'You can also use the terminal to run the curl request.
In the request body, specify the
client_idandclient_secretvalues you found above.In the request URL, replace
{tenant_id}with the Tenant ID value you found.Send the request and make a note of the Access Token that is generated. You will need this later in this step.
In Postman, import the following curl request:
 curl --location -g --request POST "https://graph.microsoft.com/v1.0/sites/{site_id}/permissions" \
 --header 'Content-Type: application/json' \
 --header 'Authorization: Bearer {access_token}' \
 --data-raw '{
              "roles": ["read"],
              "grantedToIdentities": [{
                     "application": {
                     "id": "fc84eb7d-8983-4279-858a-45a9dafd02b0",
                     "displayName": "Fivetran App for Limited Access"
                    }
              }]
           }'
In the request header, replace
{access_token}with the access token generated above.In the request URL, replace
{site_id}with the Site ID you found.Send the request. The request grants permission of your site to the Fivetran application with ID
fc84eb7d-8983-4279-858a-45a9dafd02b0.If the permission is successfully granted, the request returns 201 created response.
Once you have finished, proceed to find folder URL.
If the connection setup tests fail, even after giving us permission for your SharePoint site, re-authorize our application. In the connection setup form, click Re-Authorize Connection.
Find folder URL
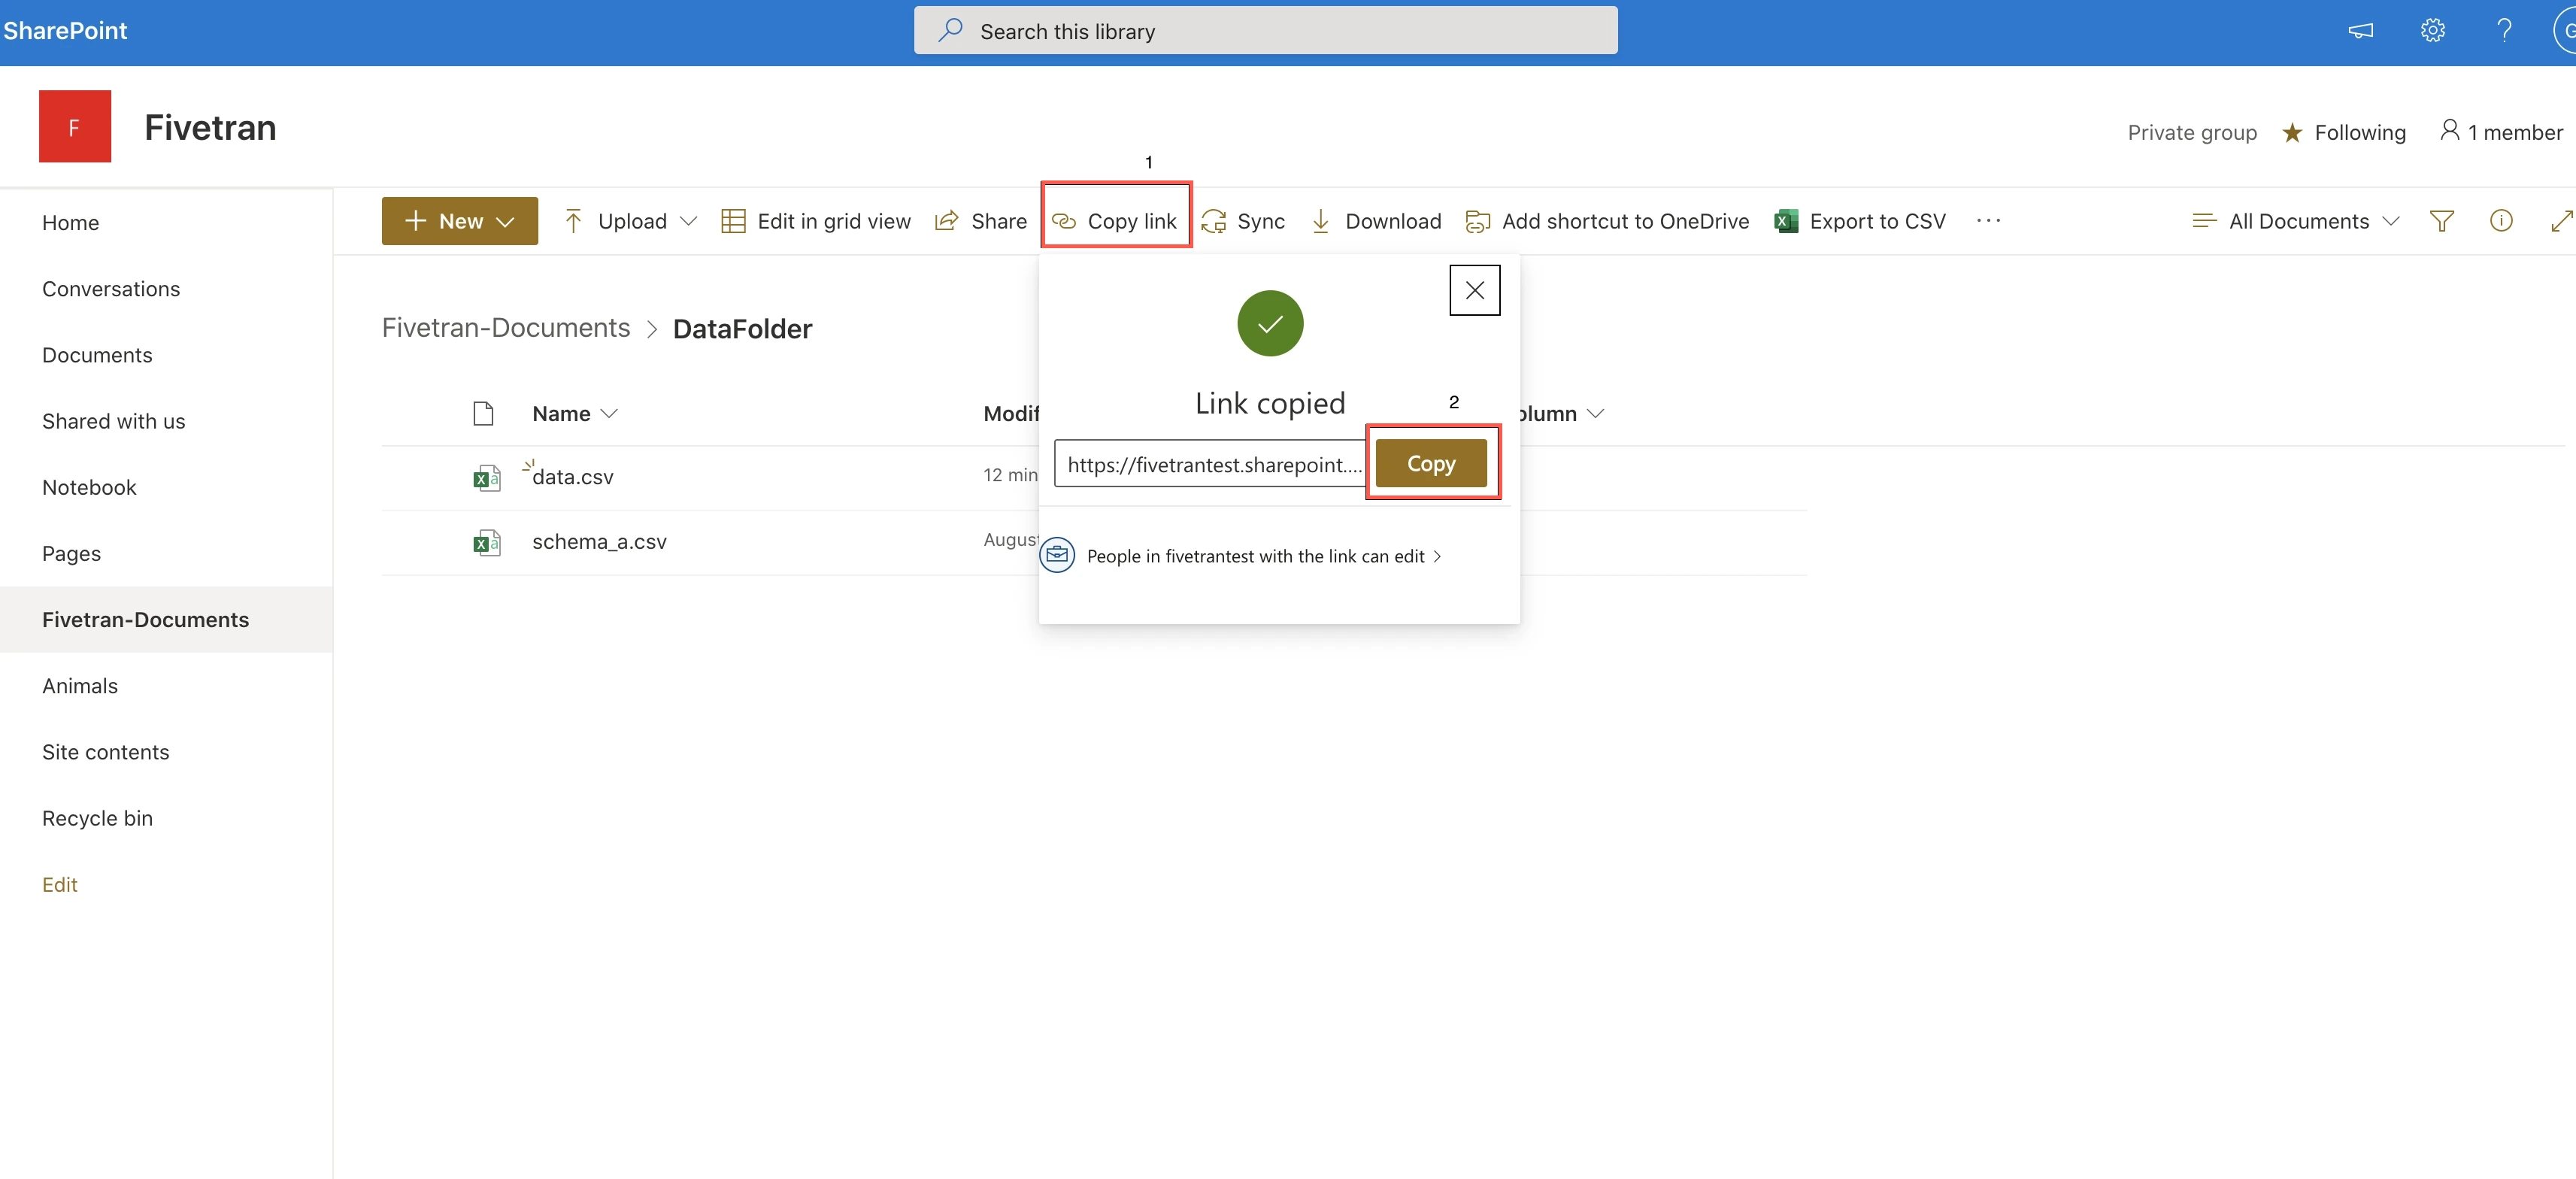
Log in to your SharePoint account.
Navigate to the folder you want to sync.
Find the URL of the folder and click Copy link and then Copy to make a note of it. You will need it to configure Fivetran.
Select sync strategy
Ensure that you (or the user who authorizes) is a member of the SharePoint site you want to sync.
In the connection setup form, select the Sync Strategy: Magic Folder or Merge Mode
Enter the Destination schema name of your choice.
In the Destination schema names field, choose the naming convention you want Fivetran to use for the schemas, tables, and columns in your destination:
- Fivetran naming: Standardizes the schema, table, and column names in your destination according to the Fivetran naming conventions.
- Source naming: Preserves the original column names from the source system in your destination. The source naming rules apply only to the column names, while the schema and table names follow the Fivetran naming rules.
If you want to modify your selection, make sure you do it before you start the initial sync.
If you selected Merge Mode as your sync strategy, enter the Table group name. We combine this with the destination schema to form the Fivetran connection name
<destination_schema>.<table_group_name>. This enables you to create multiple Merge Mode connections per destination schema. The Table group name value is used only in Fivetran and does not appear in your destination.Depending on the access type you selected, perform the following steps:
Quick setup (All sites via Fivetran App)
i. Click Authorize. You will be redirected to your SharePoint account to authorize Fivetran's access. Once you have finished, you will be redirected back to Fivetran.
Advanced setup (Granular access using your own Microsoft Entra app)
i. In the Connect section, enter the Tenant ID, Client ID, and Client Secret you found.
ii. In the Base folder URL field, enter the folder URL that you found.
iii. (Optional) Click Run connection test to validate the credentials and connection to SharePoint.
You can skip this intermediate test and proceed to the next step. However, if you choose to skip, we will perform this test once you have finished your configuration.
Customer-registered app - Client certificate (Granular access using your own Microsoft Entra app)
i. In the Connect section, enter the Tenant ID, Client ID, Client Certificate and Private Key for Client Certificate you found.
ii. In the Base folder URL field, enter the folder URL that you found.
iii. (Optional) Click Run connection test to validate the credentials and connection to SharePoint.
You can skip this intermediate test and proceed to the next step. However, if you choose to skip, we will perform this test once you have finished your configuration.
Limited sites (Legacy)
i. Enter the Microsoft Entra ID (formerly Azure Active Directory) Tenant ID of your SharePoint Site that you found.
ii. Click Authorize. You will be redirected to your SharePoint account to authorize Fivetran's access. Once you have finished, you will be redirected back to Fivetran.
Configure connection
Magic Folder Mode
- In the Folder share link field, enter the folder URL you found.
- If you want to sync files from nested folders within the specified folder, set the Include subfolders toggle to ON.
Merge Mode
In the setup form, choose your configuration options. Using these configuration options, you can select subsets of your folders, specific types of files, and more to sync only the files you need in your destination. In addition, setting up multiple connections targeted at the same file system but with different options allows you to slice and dice a file system any way you'd like.
Format
File Handling - We process and sync all files based on the file handling option you select:
- Extract structured data into destination tables - Parse supported file types and sync structured data into destination tables. We recommend this option for most use cases.
- Replicate unstructured files Beta - Copy unstructured files in their original format without extracting data. This option is ideal for PDF documents, images, and other non-tabular file formats. Learn more about unstructured file replication in our documentation.
- (Optional) (Access Type: Advanced setup only) To sync user-specific file access permissions for the replicated files, set the Sync file access permissions toggle to ON. To use this feature, you must make the following scope changes in your Microsoft Entra app:
GroupMember.Read.All– Required to retrieve group members.User.ReadBasic.All– To sync user email addresses. Without this scope, we can only sync user IDs.
- (Optional) (Access Type: Advanced setup only) To sync user-specific file access permissions for the replicated files, set the Sync file access permissions toggle to ON. To use this feature, you must make the following scope changes in your Microsoft Entra app:
File Type - We process all files as the selected file type. Use the File Pattern field to select the file extensions you want to sync.
If you select XML, we load your XML data into the
_datacolumn without flattening it.If you select XLS/XLSX/XLSM, proceed to the Configure Files section to determine how you want to analyze your spreadsheet.
If you select CSV or TSV, then enter the following details:
- (Optional) Delimiter - Specify the delimiter used in your CSV file. If your CSV file uses a custom delimiter, replace the default comma
,with your specific delimiter. For example, if your file is tab-delimited, enter\t, or if it's pipe-delimited, enter|. If you leave this field blank, we'll attempt to detect the delimiter for each file automatically. However, note that automatic detection may not work in all cases. If your files sync with an incorrect number of columns or use a unique delimiter, consider specifying the delimiter. You can store files with different delimiters in the same folder. For more details on how delimiter inference works, see our documentation. - Quote character - Typically, CSVs use double quotes
"to enclose a value. Set the toggle to off if you don't want to use an enclosing character. - Non-Standard escape character - Set the toggle to ON if your CSV generator uses non-standard ways of escaping characters like newline, delimiter, etc. Not standard in CSVs.
- Null Sequence - Set the toggle to ON if your CSVs use a special value indicating null. Specify the value indicating null only if you are sure your CSVs have a null sequence. Typically, CSVs have no native notion of a null character. However, some CSV generators have created one, using characters such as
\Nto represent null. - Skip Header Lines - Use this option to skip over a fixed number of header lines at the beginning of your CSV files. Set the toggle to ON, and then in the Number of skipped header lines field, specify the number of header lines you want to skip.
- Skip Footer Lines - Use this option to skip over a fixed number of footer lines at the end of your CSV files. Set the toggle to ON, and then in the Number of skipped footer lines field, specify the number of footer lines you want to skip.
- Headerless files - Set the toggle to ON if your CSV-generating software doesn't provide a header line. Fivetran can generate generic column names and sync data rows with them.
- Line Separator - Line separators are used in CSV files to separate one row from the next. By default, we use the new line character
\nas the line separator. If you use a different line separator for your CSV files, replace\nwith your custom line separator.This field is only available if you have selected CSV as your file type.
- (Optional) Delimiter - Specify the delimiter used in your CSV file. If your CSV file uses a custom delimiter, replace the default comma
If your file type is JSON or JSONL, then choose one of the following:
JSON Delivery Mode - Use this option to choose how Fivetran should handle your JSON data.
- If you select Packed, we load all your JSON data into the
_datacolumn without flattening it. - If you select Unpacked, we flatten one level of columns and infer their data types.
- If you select Packed, we load all your JSON data into the
Configure files
Base folder URL - Use the folder URL you found to choose the lowest common folder that includes all the files you want to sync and enter it in the Base folder URL field. This defines a specific location where Fivetran scans for files and helps ensure optimal performance.
For example, if the files are in
files/exports/customers/data_20251016.csvandfiles/exports/products/data_20251016.csv, enter theexportfolder URL as the base folder URL.This field is only available if you have selected User Authentication - Quick Setup or Admin-Approved Site Authentication - Controlled Access as your access type.
Files - Use this option to map a file name pattern to a destination table.
Click + Add files to specify destination tables and their corresponding file name pattern.
Table name - Use names that are unique across all SharePoint connections within the same destination schema.
(Optional) File Pattern - Use a regular expression as the file pattern to determine whether to sync specific files. The pattern you specify applies to paths relative to the configured base folder. If you want to sync everything under the base folder, leave this field blank.
For example, if under the base folder you have a folder
data, which has sub-folders,subFolder1,subFolder2, etc. These sub-folders have JSON files with the formatreport_03/12/2050.json. Use the following regex patterns to decide whether or not to sync specific files:.*matches all files in the data folder, including those in subfolders..*jsonmatches all JSON files in the data folder, including those in subfolders.subFolder2/report_.*\.jsonmatches all the JSON files in thesubFolder2folder that have a name that starts with the prefixreport_.. For example,report_file.json.report_\d{2}/\d{2}/\d{4}\.jsonmatches all the JSON files that begin with the prefixreport_and are followed by a date format ofDD/MM/YYYYorMM/DD/YYYY. For example,report_03/12/2050.json.We recommend that you test your regex.
(Optional) Archive File Pattern - Use a regular expression to filter and sync files from archived folders. We sync the files in compressed archives with filenames matching the specified pattern. For example, if you specify the archive folder pattern as
.*json, we will sync only the files that end in a .json file extension from the archive folder.You need to configure archive patterns per table. This is useful when an archive folder contains files following different naming patterns, allowing you to route each type to a specific destination table based on its pattern.
For example, if the archive folder contains
test12.jsonandcheck12.json, you can configuretest.*\.jsonas archive pattern for Table1 to sync onlytest12.jsonto Table1, andcheck.*\.jsonfor Table2 to sync onlycheck123.jsonto Table2.(Optional) Click Preview Files to validate the file pattern.
You can skip this intermediate test and proceed to the next step. However, if you choose to skip, we will perform this test once you have finished your configuration.
If you have selected XLS/XLSX/XLSM as your file type, we automatically analyze your spreadsheet to identify the cell reference. If you opt to enter a cell reference of your choice, enable the Manually provide cell reference toggle. We use the cell reference to sync all contiguous data starting from the top-left cell in all the spreadsheets matching the name.
Analyze sheet - Identify the sample file you would want to sync. We analyze and identify the eligible data sets. To determine the cell reference correctly, perform one of the following steps:
Set the Manually provide cell reference toggle to ON to enter the cell reference.
- In the Cell reference for syncs field, enter the cell reference in the
'<sheetName>'!<startColumnName><startRowName>format. For example, if you want to sync data starting from cell 'C3' of the 'Data2' worksheet, enter'Data2'!C3.
- In the Cell reference for syncs field, enter the cell reference in the
In the Spreadsheet to find data to be synced field, enter the path from the root folder of one of your Excel files.
This field is available only when you disable the Manually provide cell reference toggle.
- Click Analyze sheet.
- In the Cell reference for syncs drop-down menu, select the cell reference.
Learn more about syncing Excel files in our documentation.
- Click Save.
Primary Key used for file process and load - Use this option to let Fivetran know how you'd like to update the files in your destination. When you modify a previously synced file, the option you select determines if we should replace the rows in the destination table or append new rows to the table:
- If you select Upsert file using file name and line number, we will upsert your data using the surrogate primary keys
_fileand_line. If a file has a unique name, we will sync the data for that file as new data. - If you select Append file using file modified time, we will upsert your files using surrogate primary keys
_file,_line, and_modified. You can track the full history of a file or set of files, and your files will have a combination of old and new data or data that is updated periodically. - If you select Upsert file using custom primary key, you can keep the most recent version of every record, and your files will have a combination of the old and new data or data that is updated periodically. You can choose the primary keys you want to use after you save and test.
You can't modify your primary key option once the initial sync is successful. However, if you selected Upsert file using custom primary key, you can change the columns selected as primary keys after the initial sync.
- If you select Upsert file using file name and line number, we will upsert your data using the surrogate primary keys
Additional options
Compression - If your files are compressed but do not have extensions indicating the compression method, you can decompress them according to the selected compression algorithm. If all of your compressed files are correctly marked with a matching compression extension (.bz2, .gz, .gzip, .tar, or .zip), you can select infer. If you select uncompressed, we do not decompress the files and sync the uncompressed files. If you choose a compression format, we decompress every file using the format you select. For example, if you have an automated CSV output system that GZIPs files to save space but saves them without a .gzip extension, you can set this field to GZIP. We will decompress every file that we examine using GZIP.
Error Handling - Use the error handling option to choose how to handle errors in your files. If you know that your files contain some errors, you can choose to skip poorly formatted lines.
If you select skip, we ignore improperly formatted data within a file, allowing you to sync only valid data.
If you select fail, we fail the sync with an error when finding any improperly formatted data.
We recommend that you select fail unless you are sure that you have undesirable, malformed data.
You will receive a notification on your Fivetran dashboard if we encounter errors.
Finish Fivetran configuration
Click Save & Test. Fivetran will take it from here and sync your data from your SharePoint account.
Fivetran tests and validates the SharePoint connection. On successful completion of the setup tests, you can sync your SharePoint data to your destination.
Setup tests
Depending on your sync strategy, Fivetran performs the following SharePoint connection tests:
(Magic Folder Mode) The Validating Shared URL from SharePoint test validates if we have access to the folder URL of the SharePoint account you specified in the setup form.
(Merge Mode) The Connecting to API test verifies whether Fivetran successfully accesses the SharePoint folders. We perform this test only if your connection is configured.
(Merge Mode) The Finding tables test validates if you have specified at least one table in the files field to set up the connection.
(Merge Mode) The Validating Regex File Pattern test validates all the file pattern regex you specified in the setup form.
(Merge Mode) The Validating Archive Pattern test validates the archive pattern regex you specified in the setup form. We perform this test only if you specify a regex in the Archive File Pattern field.
(Merge Mode) The Validating EscapeChar test validates the escape character you specified for your CSV files and checks the length of the character, which must not be more than one. We perform this test only if you specify an escape character in the Escape Character field.
The Validating Infer FileType test validates whether infer is added as a value in the file_type parameter for connections created using the API. We perform this test only if you have set up your connection using the API.
(Merge Mode) The Multi-Character Delimiter Support test validates the length of the delimiter, which must be within 15 characters. We perform this test only if you specify the delimiter for your CSV files in the Delimiter field.
(Merge Mode) The Validating Excel Cell Reference Per Table test validates the cell references provided when the toggle is 'ON' per table for Excel file type.
(Merge Mode) The Finding Matching Files test checks if the connection can successfully retrieve a minimum of one sample file and a maximum of ten sample files based on the configuration you specified in the setup form.
The tests may take a couple of minutes to complete.