Quick Start for HVR - Redshift
This quick start guide helps you to get started with HVR for replicating data into Amazon Redshift database.
To proceed with this replication you must have basic understanding about HVR's architecture and terminologies like Hub, Location, Channel, Location Groups, Actions etc.
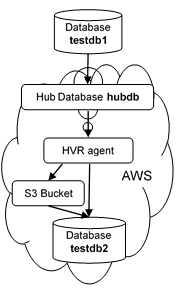
The example here demonstrates how to replicate tables from one Oracle schema (source location) to a Redshift MPP database (target location) residing in the Amazon cloud (AWS). To connect efficiently to AWS, an HVR agent installation on an EC2 Linux VM is used. To use HVR Bulk Refresh and Integrate with Burst, an additional AWS S3 location is created as well, which functions as an intermediate step to load data using Redshifts ultrafast "Copy from" function. For simplicity, we will assume the source database resides on the hub as well and Oracle has already been installed there.
Before proceeding with this example ensure that the requirements for using HVR with Oracle and Redshift are met.
For information about access privileges and advanced configuration changes required for performing replication using Oracle and Redshift, see:
Create Test Databases and Tables
Create Source Schema
create user sourcedb identified by hvr default tablespace users temporary tablespace temp quota unlimited on users;
Create Tables in Source Schema
create table sourcedb.dm51_product
(
 prod_id number(10) not null,
 prod_price number(10,2) not null,
 prod_descrip varchar2(100) not null,
 primary key (prod_id)
);
create table sourcedb.dm51_order
(
 prod_id number(10) not null,
 ord_id number(10) not null,
 cust_name varchar2(100) not null,
 cust_addr varchar2(100),
 primary key (prod_id, ord_id)
);
Insert Values in Source Tables
insert into sourcedb.dm51_product values (100, 90, 'Book');
insert into sourcedb.dm51_order values (100, 123, 'Customer1', 'P.O. Box 122, Anytown, Anycountry');
In the AWS portal, create a Redshift database using AWS -> Redshift Cluster -> Launch with cluster identifier hvrcluster and database nametestdb2.
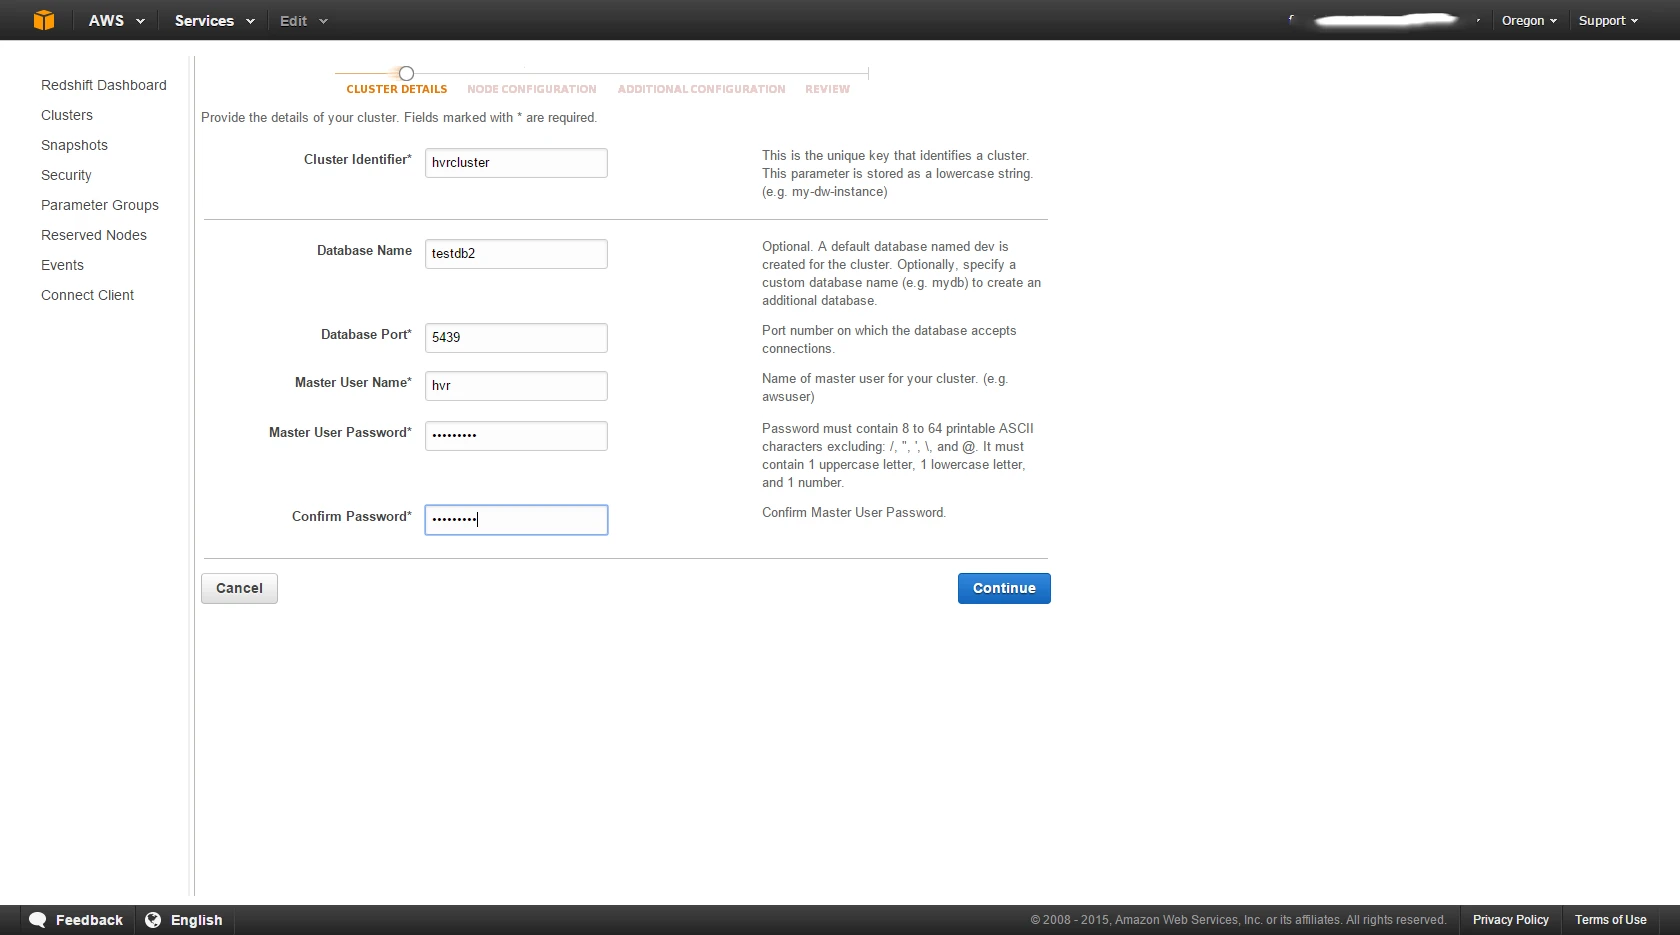
If you don't have a VPC and security group yet, you will create them during step Additional Configuration.
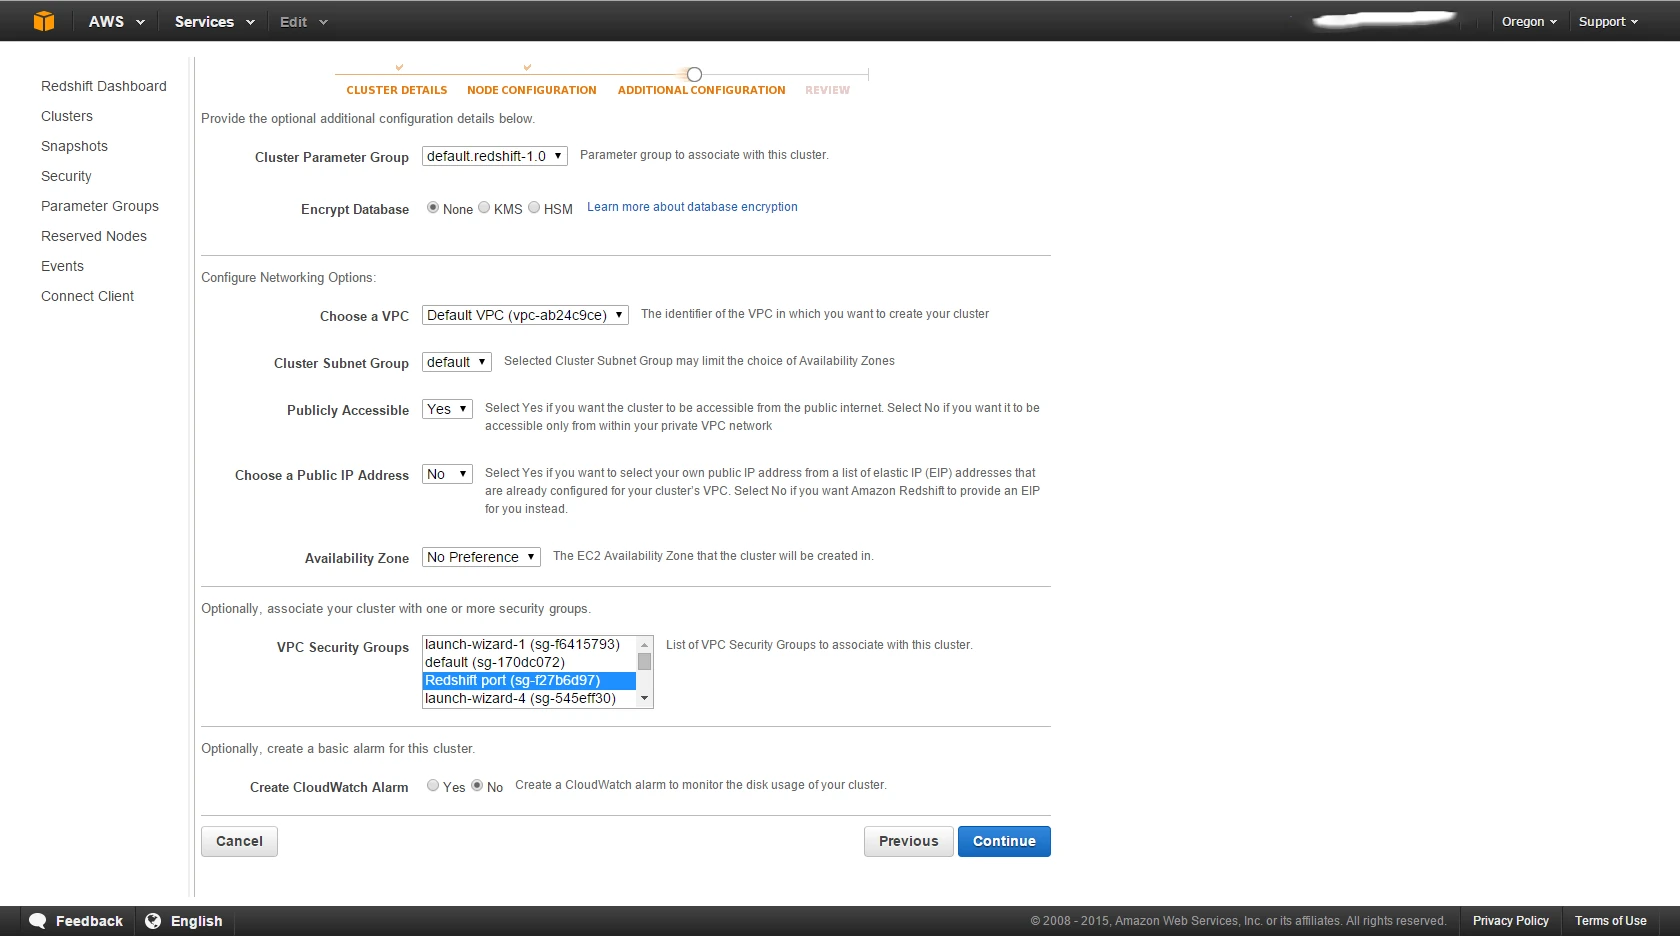
. You can use the defaults to create a minimal cluster or choose a multi node cluster. After creation, you can either create the tables in the cluster using the above .cre and .mod scripts through the SQL Workbench console or let HVR create them during initial loading (HVR Refresh with Create Absent Tables).
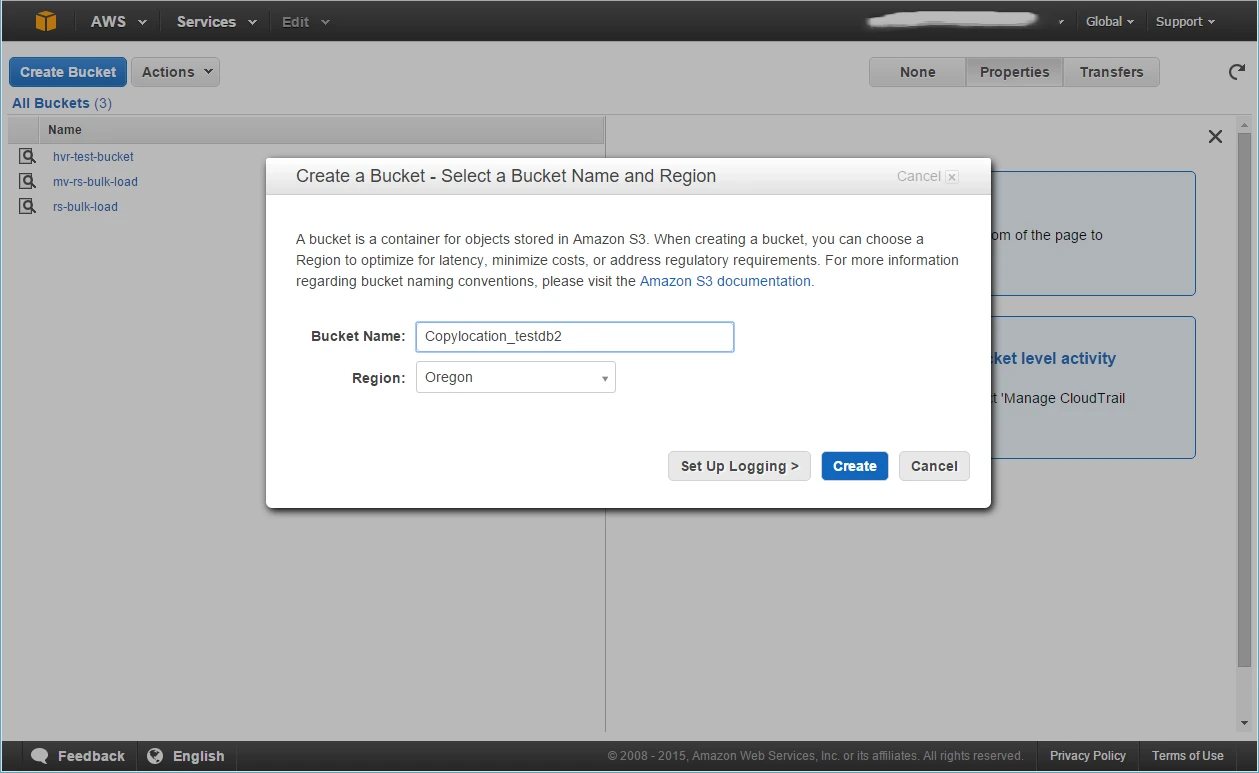
In order to use Bulk Refresh and Burst Integrate, HVR requires an additional S3 location to load data from into Redshift using the "Copy from" feature.
In the AWS portal, create an S3 location using AWS -> S3 -> Create Bucket with identifier Copylocation_testdb2. Create it in the same region as your Redshift database.
Install HVR on-premises
An HVR distribution is available for download at the Fivetran.com website. For more information, see Downloading HVR.
Install HVR on a hub machine. For details on installing HVR, see the respective operating system sections:
The HVR distribution requires a license key in order for the software to operate. Please see the HVR licensing page for more details on how to install the HVR license.
After the installation, you can control HVR using the HVR graphical user interface (HVR GUI).
- If the hub machine is Windows, then HVR GUI can be executed directly on the hub machine.
- To control HVR remotely from your PC, connect to the hub machine using Windows Remote Desktop Connection and launch HVR GUI on the hub machine.
- If the hub machine is Linux, then HVR GUI can be executed directly on the hub machine. However, an application like X Server or VNC viewer must be installed to run HVR GUI directly on Linux.
- To control HVR remotely from your PC, install HVR on the PC (with Windows or macOS) and configure the HVR Remote Listener on the hub machine.
- If the hub machine is Unix, then HVR GUI should typically be run remotely from a PC to control HVR installed on the hub machine. To do this, install HVR on the PC (with Windows or macOS) and configure the HVR Remote Listener on the hub machine.
The HVR Remote Listener allows you to connect HVR GUI available on your PC to the remote HVR hub machine. For more information about connecting to remote HVR installation, see Configuring Remote Installation of HVR on Unix or Linux and Configuring Remote Installation of HVR on Windows.
Create the Hub Database
This section describes how to create a hub database (schema). The hub database is a repository database that HVR uses to control its replication activities. It contains HVR catalog tables that hold all specifications of replication such as the names of the replicated databases, the replication direction and the list of tables to be replicated. For more information about HVR hub server and database, see section Hub Server in System Requirements.
HVR supports the creation of a hub database on certain databases (location classes) only. For the list of supported location classes, see section Hub Database in Capabilities.
For this demonstration, the hub database (e.g. hvrhub) is created in Oracle.
Create the hub database (hvrhub) with password (hvr).
create user hvrhub
identified by hvr
default tablespace users
temporary tablespace temp
quota unlimited on users;
Connect To Hub Database
This section describes how to connect HVR GUI to the hub database.
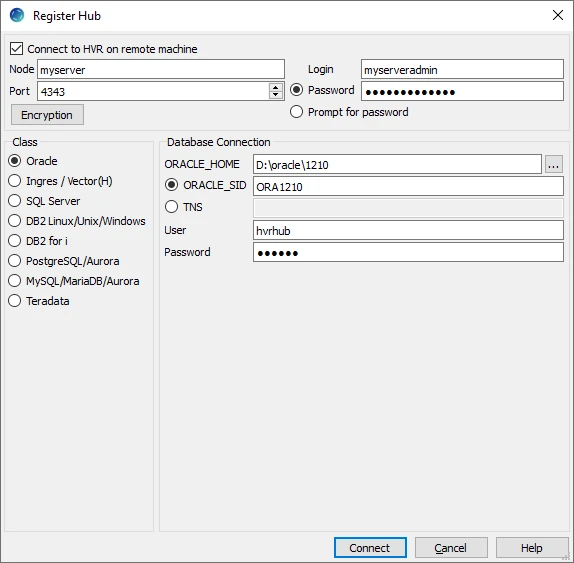
When you launch HVR GUI for the first time, the Register Hub dialog is displayed automatically. The Register Hub dialog can also be accessed from menu File by selecting Register Hub. Skip steps 1 to 4 if you want to run HVR GUI directly on the hub machine.
Click Connect to HVR on remote machine.
To connect HVR GUI on a PC to a remote HVR hub machine, the HVR Remote Listener must be configured and running on the HVR hub machine.
Enter the name or IP address of the hub machine in the Node field (e.g. myserver).
Enter the port number (defined in the HVR Remote Listener of the hub machine) in the Port field (e.g. 4343).
Enter the Login (e.g. myserveradmin) and Password for the hub machine. By default, this is the operating system login credentials of the hub machine.
Select Oracle in the Class pane.
Specify Database Connection details.
- Enter the directory path in ORACLE_HOME. You can also click the browse button to select the directory path.
- Enter the Oracle System ID in ORACLE_SID or TNS credentials.
- Enter the user name of the hub database in User (e.g. hvrhub).
- Enter the password for the hub database in Password (e.g. hvr).
Click Connect.
Click Yes in the prompt dialog asking to create catalog tables in the hub database.
HVR displays this prompt when connecting to a hub database for the first time.
On connecting successfully to the hub database, the navigation tree pane displays the hub machine and the hub database. Location Configuration, Channel Definitions, and Scheduler are displayed under the hub database.
Create Oracle and Redshift Locations
Next create the source location using right-click on Location Configuration ▶ New Location.
For the source, enter the credentials of the Oracle database testdb1 created earlier. The corresponding HVR location will be called db1:
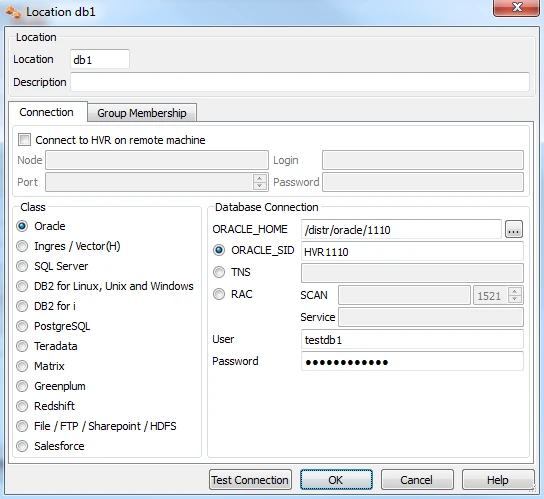
In this example there is no need to check Connect to HVR on remote machine because testdb1 is on the same machine as the hub.
Ignore the Group Membership tab for now.
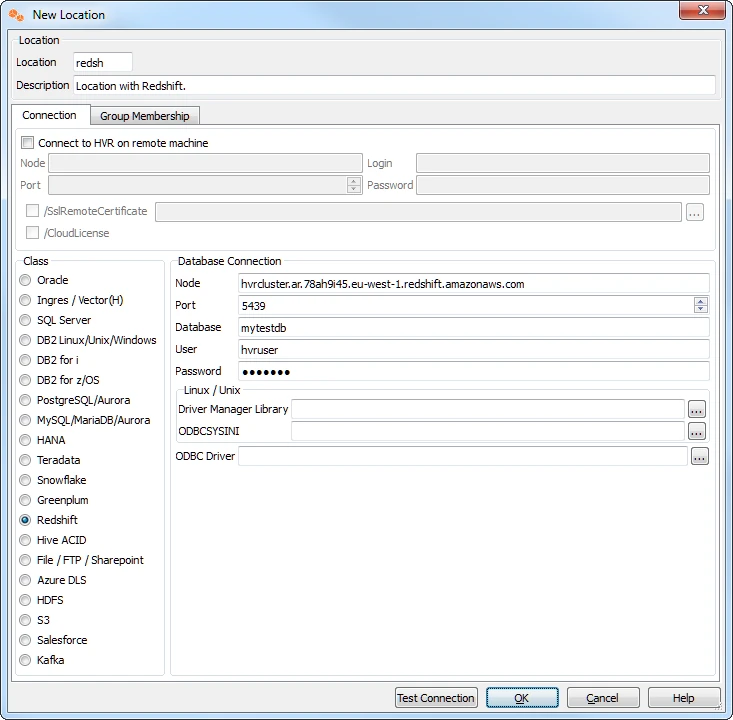
Create another location for the Redshift database testdb2 too and call it db2. Now do tick Connect to HVR on remote machine, because HVR needs to connect to the HVR remote listener agent installed before. Fill in the details of the VM running the remote listener there. Use operating system user hvr with any password. Choose Redshift as database and fill in the Redshift Connection info.
Create Location Groups
The channel needs two location groups. Under the new channel, right-click Location Groups ▶ New Group. Enter a group name (for instance CENTRAL).
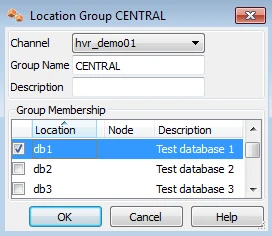
Add location db1 as a member of this group by checking the box for db1.
Then create a second location group, called DECENTRAL that has members db2 and db3.
The new channel also needs a list of tables to replicate. This can be done as follows: right-click Tables ▶ Table Explore.
- Choose the first of the three locations ▶ Connect.
- In the Table Explore window, click on both tables and click Add.
- In new dialog HVR Table Name click OK.
- Close the Table Explore window.
- Perform table select again on one of the other locations and confirm that all tables to be replicated have value Same in column Match.
Define Actions
The new channel needs two actions to indicate the direction of replication and a third action for the S3 copy location needed for the "Copy from" feature:
- Right-click group CENTRAL ▶ New Action ▶ Capture.
- Right-click Group DECENTRAL ▶ New Action ▶ Integrate. Check /Burst, this enables HVR to use the "Copy from" feature of Redshift which will increase significantly the integrate speed.
- Right-click Group DECENTRAL ▶ New Action ▶ LocationProperties. Check both /StagingDirectoryHvr and /StagingDirectoryDb with argument s3://Copylocation_testdb2/. Check /StagingDirectoryCredentials with argument 'aws_access_key_id=<_key>;aws_secret_access_key=<secret_key>'_.
These keys are created when your AWS account was created. You can manage these keys for specific users at AWS -> Identity & Access Management -> Users -> Security Credentials The keys should belong to a user having full S3 access - e.g. the user that created the bucket in the first place.
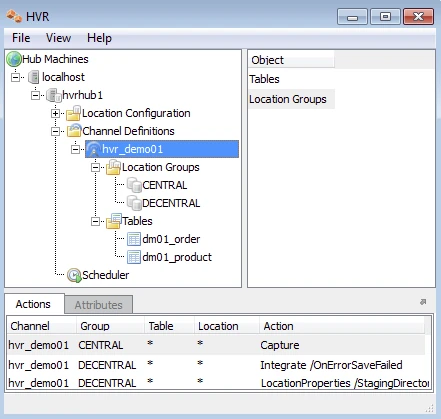
Note that the Actions pane only displays actions related to the objects selected in the left-hand pane. So click on channel hvr_demo01 to see all three actions.
Perform Initial Loading and Table Creation
HVR Refresh copies the data from one location to another location and optionally creates missing or mismatched tables and keys. In the navigation tree pane, right-click the channel and select HVR Refresh.
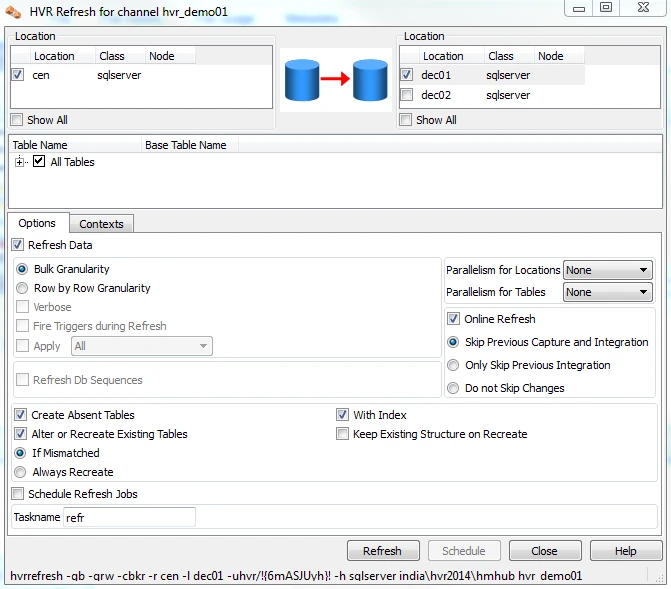
For the source select location db1 and for target select location check db2. Check the options Create Absent Tables, With Key, Recreate Mismatched Tables and click Refresh.
Enable Replication with HVR Initialize
Now that the channel definition is complete, create the runtime replication system.
- Right-click channel hvr_demo01 ▶ HVR Initialize.
- Choose Create or Replace Objects and click HVR Initialize.
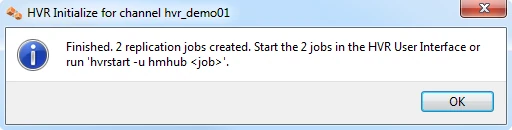
From the moment that HVR Initialize is done, all changes to database sourcedb will be captured by HVR when its capture job looks inside the logging.
HVR initialize also creates three replication jobs, which can be seen under the Scheduler node in the GUI.
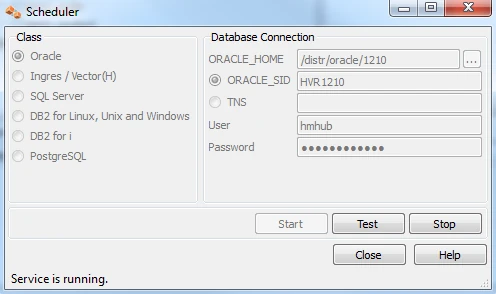
Start Scheduling of Replication Jobs
Start the Scheduler on the hub machine by clicking in the HVR GUI on the Scheduler node of the hub database.
Next, instruct the HVR Scheduler to trigger the replication jobs.
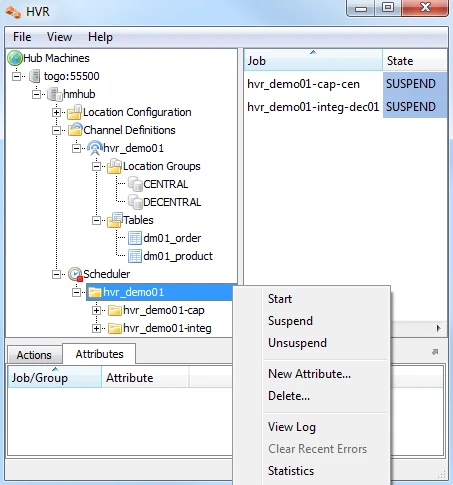
The replication jobs inside the Scheduler each execute a script under $HVR_CONFIG/job/hvrhub/hvr_demo01 that has the same name as the job. So job hvr_demo01–cap–db1 detects changes on database testdb1 and stores these as transactions files on the hub machine.
The other job (hvr_demo01–integ–db2) picka up these transaction files and perform inserts, updates and deletes on the target database.
Test Replication
To test replication, make a change in testdb1:
 testdb1/hvr
 SQL> insert into dm01_product values (1, 19.99, 'DVD');
 SQL> commit;
In the HVR log file you can see the output of the jobs by clicking on View Log. This log file can be found in $HVR_CONFIG/log/hubdb/hvr_demo01–cap–db1.
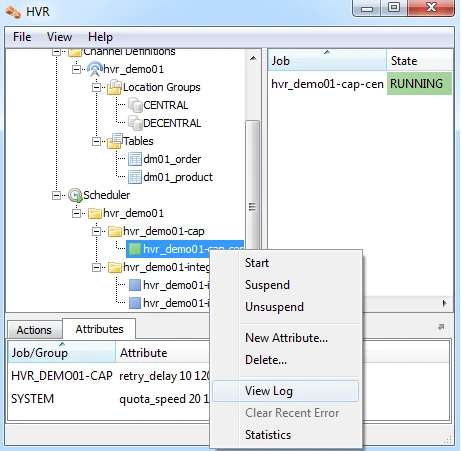
The job output looks like this:
 hvr_demo01-cap-db1: Scanned 1 transaction containing 1 row (1 ins) for 1 table.
 hvr_demo01-cap-db1: Routed 215 bytes (compression=40.6%) from 'db1' into 1 location.
 hvr_demo01-cap-db1: Capture cycle 1.
 hvr_demo01-integ-db2: Integrate cycle 2 for 1 transaction file (215 bytes).
 hvr_demo01-integ-db2: Integrated 1 change from 'dm01_product' (1 ins).
 hvr_demo01-integ-db2: Integrate used 1 transaction and took 0.004 seconds.
 hvr_demo01-integ-db2: Waiting...
This indicates that the jobs replicated the original change to testdb2. A query on testdb2 confirms this:
SQL> select * from dm01_product;
| prod_id | prod_price | prod_descrip |
| 1 | 19.99 | DVD |
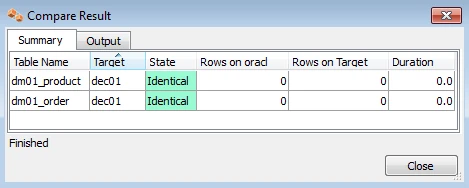
HVR Compare and Refresh
HVR Compare checks whether two locations have identical rows, and HVR Refresh copies the content of one location to the second location. In the HVR GUI, right–click on a channel ▶ HVR Compare (or HVR Refresh). Choose two locations by clicking on the Select buttons.
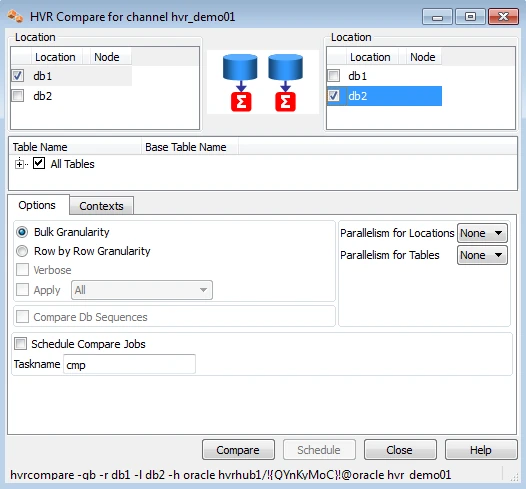
The outcome of the comparison is displayed below;