Reverse SSH
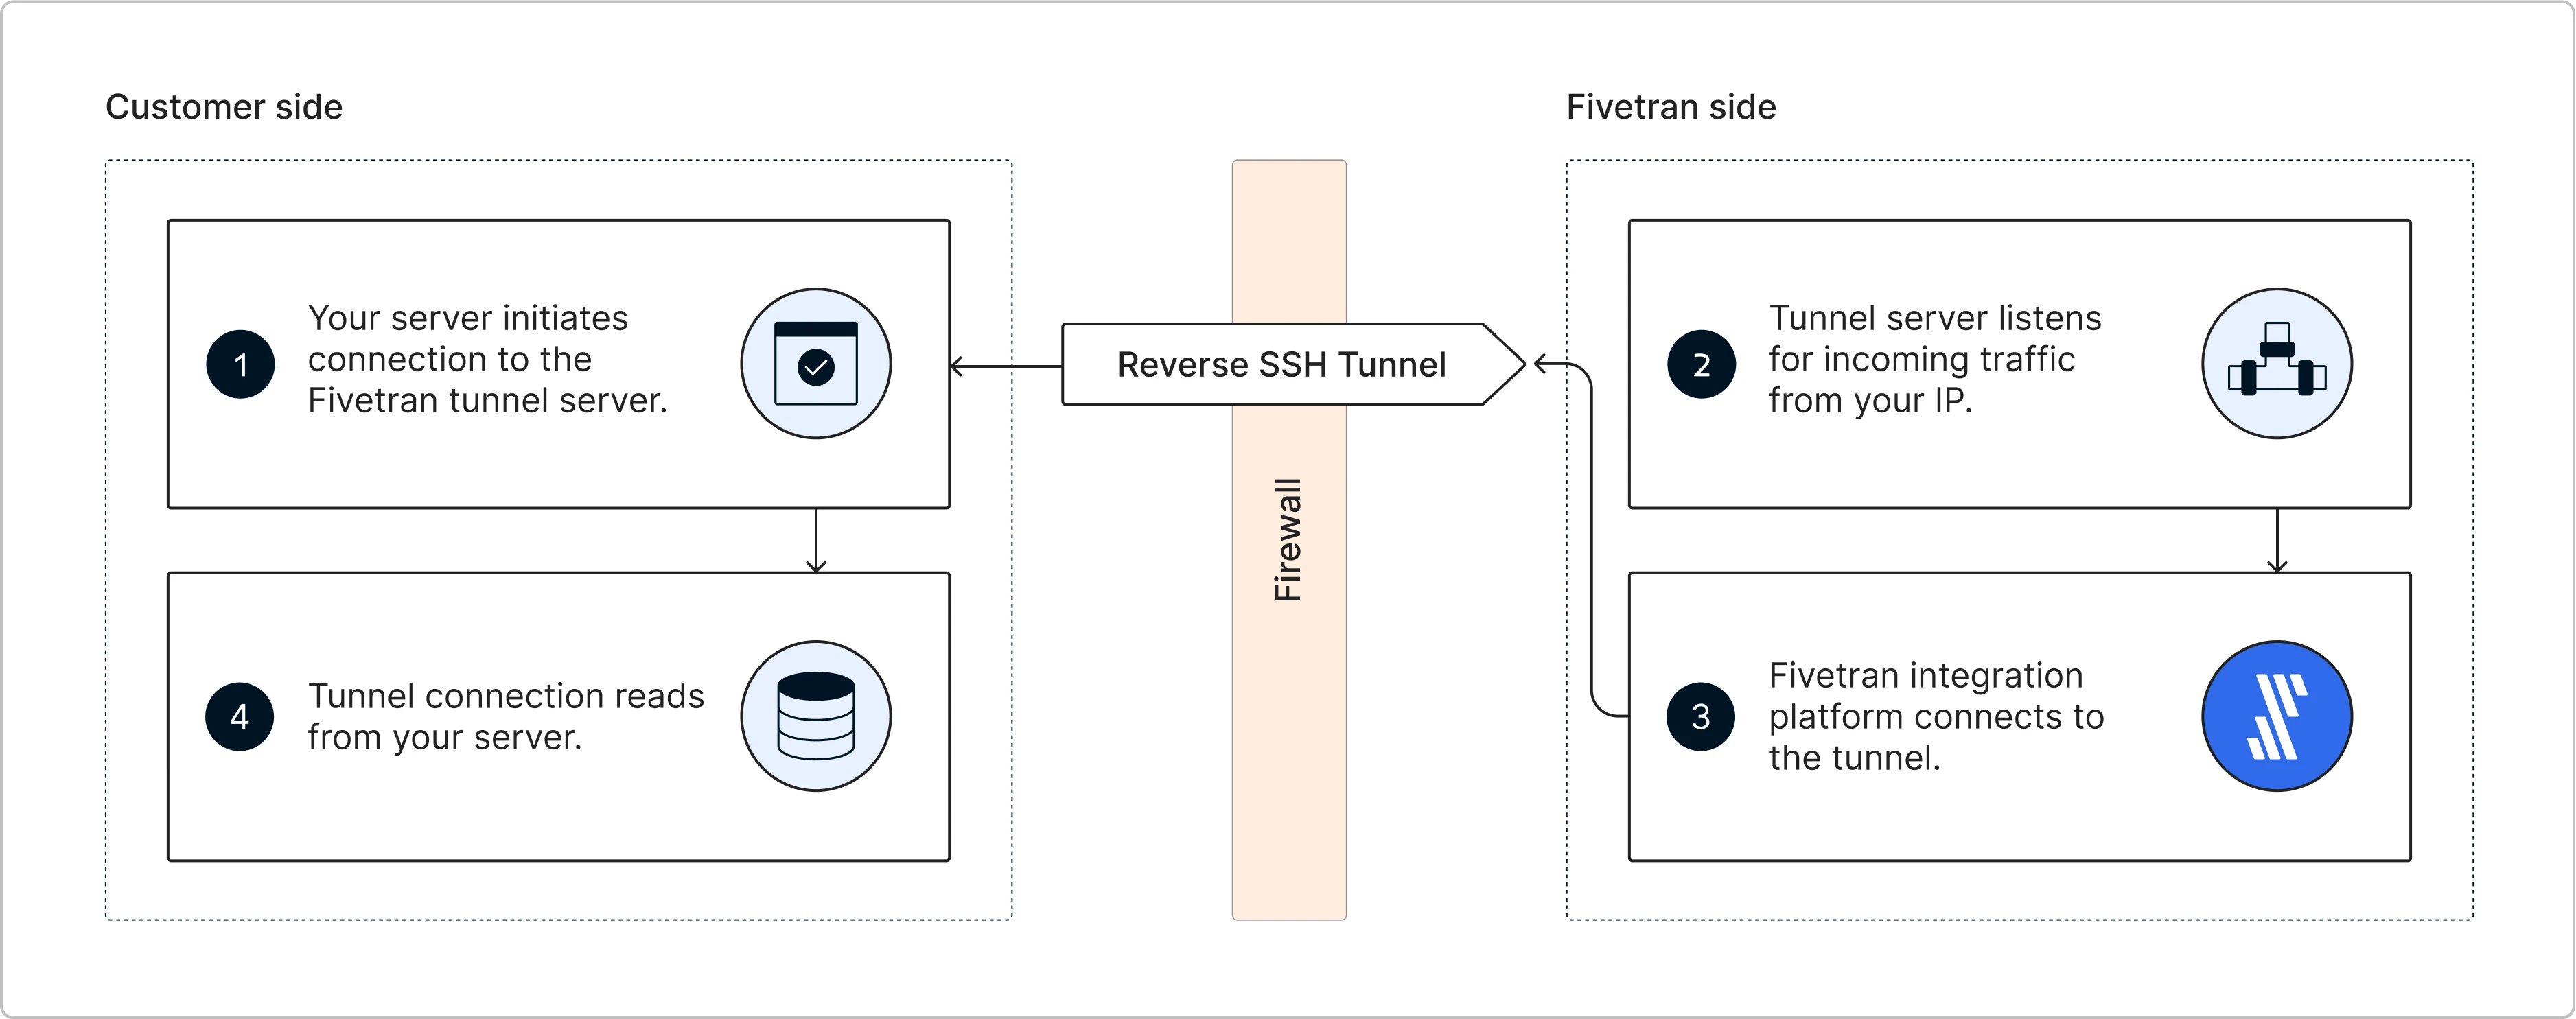
You can connect Fivetran to your database using a reverse SSH tunnel if you are unable to provide direct port access to your instance. Reverse SSH tunneling allows you to securely connect to a device located behind a firewall or NAT (Network Address Translation) remotely. With this method, the remote machine initiates the connection to the local machine, enabling remote access to services on the local machine.
To set up a reverse SSH tunnel to connect to Fivetran, create a Fivetran support ticket and provide the following details:
- The name of the Fivetran destination(s) where you want your reverse SSH tunnel to be set up
- Your SSH public key (see instructions below to learn how to generate)
- The public IP address (CIDR notation) of your SSH bastion host or proxy server
Follow the reverse SSH tunnel setup instructions specific to your operating system.
Linux
Expand for instructions
Perform the following steps to set up the reverse SSH tunnel on Linux:
Create an SSH user and generate key pair
Log in to your SSH tunnel host and run the following commands:
Create group
fivetran:sudo groupadd fivetranCreate user
fivetran:sudo useradd -m -g fivetran fivetranSwitch to the
fivetranuser:sudo su - fivetranCreate the
.sshdirectory:mkdir ~/.sshSet permissions:
chmod 700 ~/.sshGenerate an SSH key pair. Make a note of the key path - you will need it to complete your setup.
ssh-keygenDo not enter a password for the key file. When prompted to provide a password, hit Enter instead.
View the contents of the public key.
cat ~/.ssh/id_rsa.pubSend the public key along with the SSH server's IP address and SSH username (
fivetran) to Fivetran Support.
Once we create the Reverse SSH host and complete the setup on our side, we will provide you with the Reverse SSH host IP address and username. Then, proceed to the next step to initiate the SSH connection between your SSH server and Fivetran's Reverse SSH host.
Initiate SSH connection
To set up a secure tunnel between your local database and Fivetran's server, run the autossh command on your SSH server.
autossh -M 0 -f -N -R <SSH_HIGH_PORT>:<LOCAL_DB_MACHINE_NAME_OR_IP>:<LOCAL_DB_MACHINE_PORT> <FIVETRAN_SSH_USERNAME>@<FIVETRAN_SUPPLIED_IP> -g -i <PATH_TO_PRIVATE_KEY> -o ServerAliveInterval=10 -o ServerAliveCountMax=1 -o ExitOnForwardFailure=yes
Replace the placeholder variables with the actual values:
SSH_HIGH_PORT: It should be unique for each connection and should not be a reserved port number (for instance, port22is reserved for SSH connections and port443is reserved for HTTPS).For the SSH high port number, we recommend adding a single digit - usually
1- as a prefix to the source database port. For example, if you connect SQL Server, your database's default port is1433. Therefore, we recommend using port11433as the SSH high port for your first SQL Server connection, port11434for your second connection, and so on.LOCAL_DB_MACHINE_NAME_OR_IP: Internal IP address or name of the local database host machineLOCAL_DB_MACHINE_PORT: Internal port for communication with the database host. For High-Volume Agent connectors, this is the Agent Listener Port (for example,4343).FIVETRAN_SSH_USERNAME: SSH username for Fivetran's Reverse SSH host -fivetranFIVETRAN_SUPPLIED_IP: Reverse SSH host IP address provided by Fivetran (contact our support team or your Fivetran Technical Team to get this)PATH_TO_PRIVATE_KEY: File path to the private key on the SSH host machine (this is normallyid_rsa.pemor simplyid_rsa)
To track the progress of the autossh connection process, replace the -f flag with the -v flag to enable verbose logging. Without the -v flag, you will not see detailed logs of the connection process or confirmation when the script finishes running successfully. However, autossh will still run in the background if the -f flag is used.
If you want to rerun the autossh command using the same SSH high port number that you used previously, you must first stop or terminate the existing autossh process that is currently using that port. This is necessary to avoid conflicts and ensure that the port is free for the new connection.
Enter values into connection setup form
Once the reverse SSH tunnel is successfully established, enter the following values in Fivetran's connection setup form:
| Field | Value | Description |
|---|---|---|
| Host | localhost | Allows your SSH host to handle port routing |
| Port | { SSH high port } | The port that your SSH host will translate (for example, 13306). |
| User | { Database user } | |
| Password | { Database user's password } | |
| Database | { Database name } | The name of the database you want to replicate |
| Connection Method | Connect via an SSH tunnel | |
| SSH Host | { IP Address } | Supplied by Fivetran |
| SSH Port | 22 | |
| SSH User | fivetran |
All fields in { brackets } must be replaced with your actual values.
Windows
Expand for instructions
To set up a reverse SSH tunnel on Windows, you need to install PuTTY (an SSH and Telnet client) and PuTTYgen (a key generation tool) on your Windows machine. You can download the standalone binaries (EXE) or the installer package (MSI) for these tools from the official PuTTY download page.
If you choose to install using the MSI installer, it typically includes the entire PuTTY suite, which consists of PuTTY, PuTTYgen, and other tools.
Perform the following steps to set up a reverse SSH tunnel on Windows:
Generate key pair
Launch PuTTYgen.
Under Parameters, in the Type of key to generate field, select RSA.
In the Number of bits in a generated key field, enter
2048.Under Actions, click Generate to create a public/private key pair.
Click Save public key to save the public key file to your local computer.
Click Save private key to save the private key file (.ppk) to your local computer.
Do not save the key with a passphrase.
Send the public key, along with the SSH server's (Windows machine) IP address and SSH username (local Windows user running PuTTY) to Fivetran Support.
Once we create the Reverse SSH host and complete the setup on our side, we will provide you with the Reverse SSH host IP address and user name. Then proceed to the next step to configure and initiate the SSH connection between your SSH server and Fivetran's Reverse SSH Host.
Configure and initiate SSH connection
These instructions use PuTTY v0.78.
Launch PuTTY.
In the Session category, configure your session:
- In the Host Name field, enter the user name and IP address of the Reverse SSH Host provided by the Fivetran team in the format
{ssh_user}@{ssh_host_ip}(for example,fivetran@35.230.100.17). - In the Port field, enter
22. - Under Connection type, select the
SSHoption.
- In the Host Name field, enter the user name and IP address of the Reverse SSH Host provided by the Fivetran team in the format
In the Connection category, set the Seconds between keepalives to
5.In the Connection > SSH category, select the Don’t start a shell or command at all checkbox.
In the Connection > SSH > Auth > Credentials category, go to the Private key file for authentication field. Click Browse and select the private key file (.ppk) you created in the previous step (Generate key pair).
In the Connection > SSH > TTY category, select the Don’t allocate a pseudo-terminal checkbox.
In the Connection > SSH > Tunnels category, configure port forwarding:
- Select the Local ports accept connections from other hosts checkbox.
- Select the Remote ports do the same checkbox.
- Under Add new forwarded port:
- In the Source port field, enter a high port number (for example,
55432). The high port can be any non-reserved and unused port. - In the Destination field, enter your destination IP address and the database's port (for example,
localhost:5432for a server hosted on the same computer). - Select the Remote option.
- Select the Auto option.
- Click Add to add this entry to the list of Forwarded ports.
- In the Source port field, enter a high port number (for example,
In the Session category, save the configuration and initiate the SSH session:
- In the Saved Sessions field, enter a name for this configuration (for example,
fivetran-outbound). - Click Save to save your configuration.
- In the saved sessions list, select the newly saved session (for example,
fivetran-outbound). - Click Open to start the SSH session. This will open a terminal window and establish the SSH connection based on your configuration.
- In the Saved Sessions field, enter a name for this configuration (for example,
(Optional) Run PuTTY as a Service
When using a reverse SSH tunnel, it is important for the SSH session to automatically reconnect after a reboot or login to ensure uninterrupted remote access. Running PuTTY as a service through the Windows Task Scheduler ensures that your saved PuTTY session starts automatically, maintaining the reverse SSH tunnel without manual intervention.
Perform the following steps to run PuTTY as a service:
Save PuTTY session
- Navigate to the PuTTY installation directory (for example,
C:\puTTY\). - Open putty.exe and configure your reverse SSH tunnel.
- Save the session with a descriptive name (for example, 'ReverseSSHExample').
- (Optional) Create a shortcut for quick access:
- Right-click and drag putty.exe into the same directory.
- Select Create shortcut here.
- Right-click the shortcut and go to Properties.
- In the Target field, append: -load 'ReverseSSHExample'.
Configure Task Scheduler
- Press Windows + S, type 'task scheduler', and then press Enter.
- Open the Task Scheduler desktop application.
- In the Task Scheduler window, select Action > Create Task.
- In the General tab:
- Enter the task name (for example, Launch PuTTY with Config).
- Select the Run only when user is logged on checkbox.
- Select the Run with highest privileges checkbox.
- Go to the Triggers tab and click New.
- In the Begin the task drop-down menu, select At log on.
- Click OK.
- Go to the Actions tab and click New.
- In the New Action window, click Browse and select putty.exe.
- In the Add arguments (optional) field, type: -load 'ReverseSSHExample'.
- Click OK to save.
- Go to the Conditions tab.
- Clear the Start the task only if the computer is on AC power checkbox.
- Click OK.
- Go to the Settings tab.
- Ensure that only the Allow task to be run on demand checkbox is selected.
- Clear all other checkboxes.
- Click OK.
Test and Verify
- In Task Scheduler, right-click your created task and select Run.
- If prompted with a PuTTY Security Alert (first connection), click Accept to cache the host key.
- Once the session starts, confirm you have a successful connection.
- (Optional validation) Restart your Windows system to confirm PuTTY auto-starts with the saved session.