Braze Setup Guide
The way Fivetran connects Braze to your destination depends on whether you want to sync Braze Currents data and your cloud storage service. Follow the setup instructions for your cloud storage service.
Prerequisites
To connect your Braze account to Fivetran, you need:
- A Braze account with active subscription and admin privileges
- Braze API URL
- Braze API key
- A Fivetran account with Account Administrator privileges
- (Recommendation) A Braze Current connected to Google Cloud Storage, Amazon S3, or Microsoft Azure Blob Storage
Setup instructions without Braze Currents data
Create API key
Log in to your Braze dashboard at https://dashboard.braze.com or your designated dashboard URL. See Braze's endpoints documentation for a complete list of URLs.
In the bottom left corner of your Braze dashboard, click Developer Console.
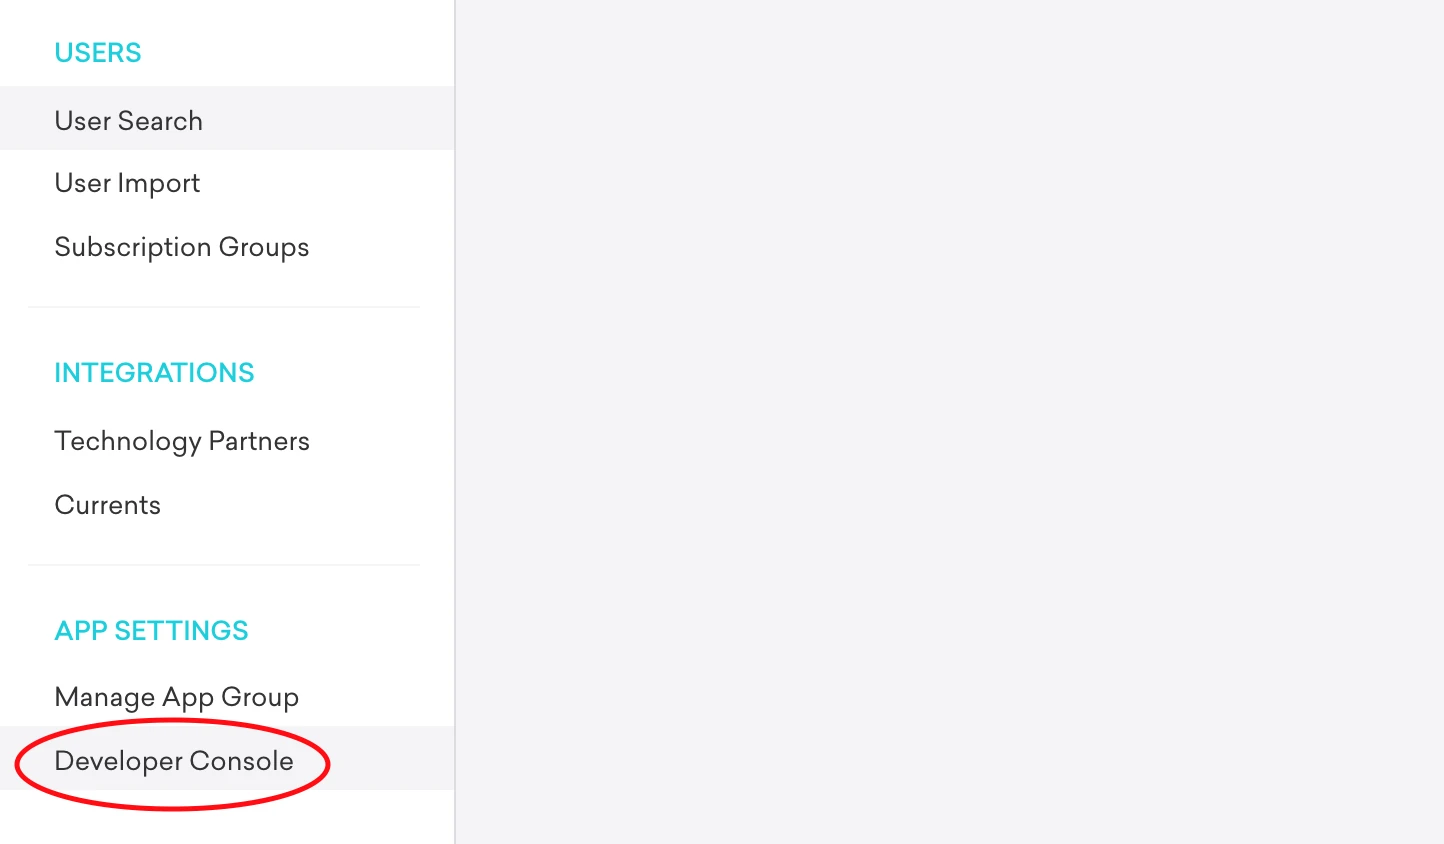
Follow Braze's API key guide to create an API key for Fivetran. Enable the following permissions for the API key:
- users.export.ids
- users.export.segment
- email.unsubscribe
- email.hard_bounces
- messages.schedule_broadcasts
- campaigns.list
- campaigns.details
- canvas.list
- canvas.details
- segments.list
- segments.details
- purchases.product_list
- events.list
- feed.list
- feed.details
- templates.email.info
- templates.email.list
- subscription.status.get
- subscription.groups.get
Make a note of the API key. You will need it to configure Fivetran.
Finish Fivetran configuration
In the connection setup form, enter the Destination schema name of your choice.
Enter the API URL and API Key you created.
(Optional) In the Historical sync time frame drop-down menu, select the amount of historical data you want to include in your initial sync.
- If you choose Sync data from selected date, enter a date in the Historic Sync Limit Date field.
Select the Cloud Storage as Do Not Sync Braze Current Data.
Click Save & Test. Fivetran will take it from here and sync your data from your Braze account.
Setup instructions - Google Cloud Storage
Find Fivetran email
In the connection setup form, select the Cloud Storage as Google Cloud Storage.
Make a note of the email address. You will need it to grant Fivetran access to your Google Cloud Storage bucket.

Create API key
Log in to your Braze dashboard at https://dashboard.braze.com or your designated dashboard URL. See Braze's endpoints documentation for a complete list of URLs.
In the bottom left corner of your Braze dashboard, click Developer Console.

Follow Braze's API key guide to create an API key for Fivetran. Enable the following permissions for the API key:
- users.export.ids
- users.export.segment
- email.unsubscribe
- email.hard_bounces
- messages.schedule_broadcasts
- campaigns.list
- campaigns.details
- canvas.list
- canvas.details
- segments.list
- segments.details
- purchases.product_list
- events.list
- feed.list
- feed.details
- templates.email.info
- templates.email.list
- subscription.status.get
- subscription.groups.get
Make a note of the API key. You will need it to configure Fivetran.
Grant bucket access
Go to your Google Cloud Storage console.
Find the bucket that you configured the Braze Current with. Click Edit bucket permissions.
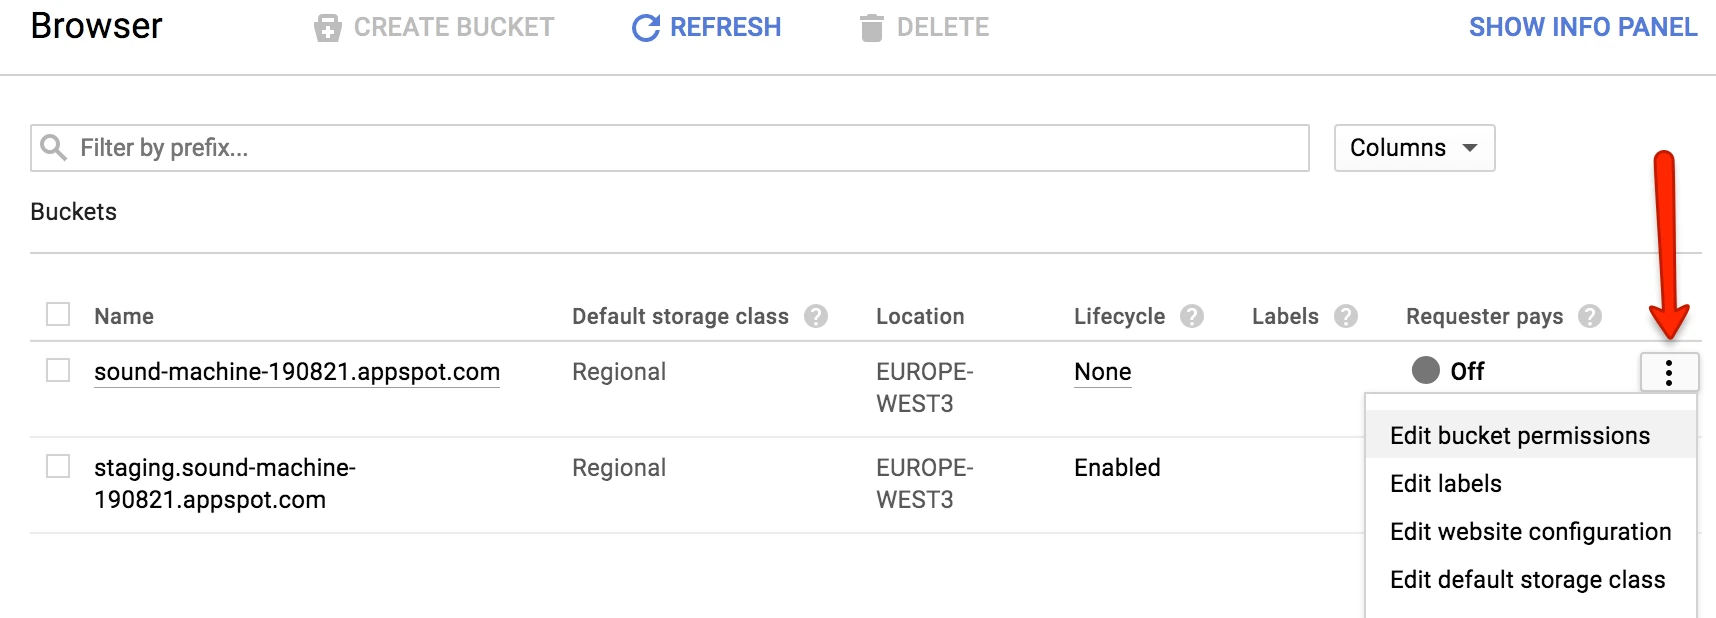
Grant
Storage Object Vieweraccess to the Fivetran email address you found.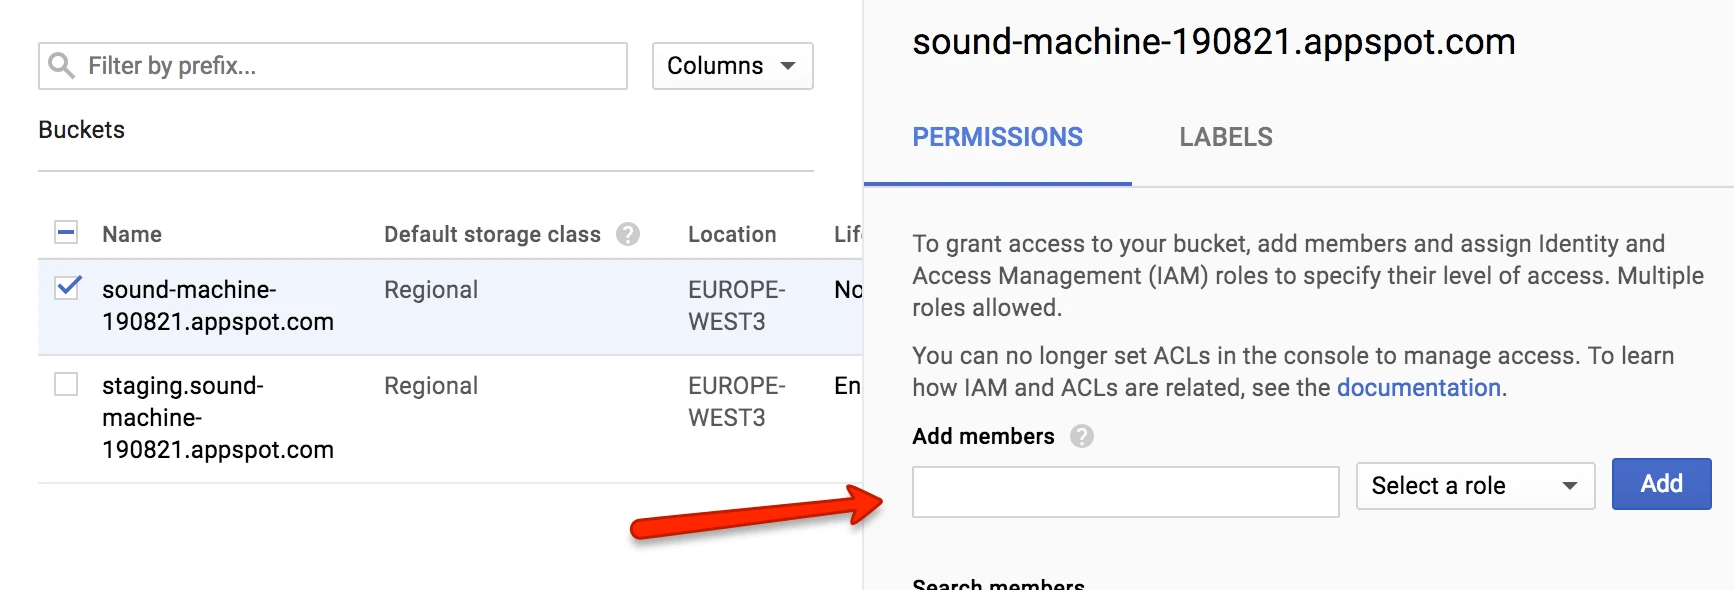
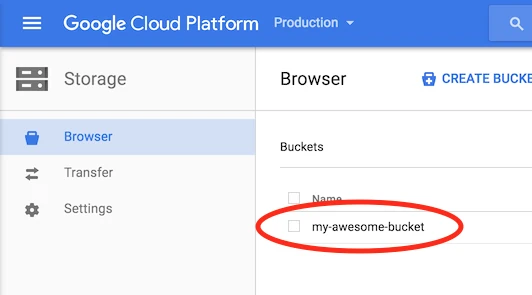
Make a note of your bucket name. You will need it to configure Fivetran.
(Optional) Enable User Profile Exports For Google Cloud Storage
Perform this step only if you want to sync the USER and USER_ALIAS tables.
To sync the USER and USER_ALIAS tables, in the connection setup form, set the Enable User Profile Exports toggle to ON, and select either:
- Google Cloud Storage: Provide the Google Cloud Storage bucket credentials to which Braze will write the user export files.
- No Export Storage: Braze will use their S3 storage and provide Fivetran with a link to the export files.
We recommend that you configure your own bucket. You can either:
- Use the same bucket you configured with Currents
- Use a different bucket
Find Google Cloud Storage credentials
Log in to the Braze dashboard.
On the left navigation menu, click Partner Integrations.
Select Google Cloud.
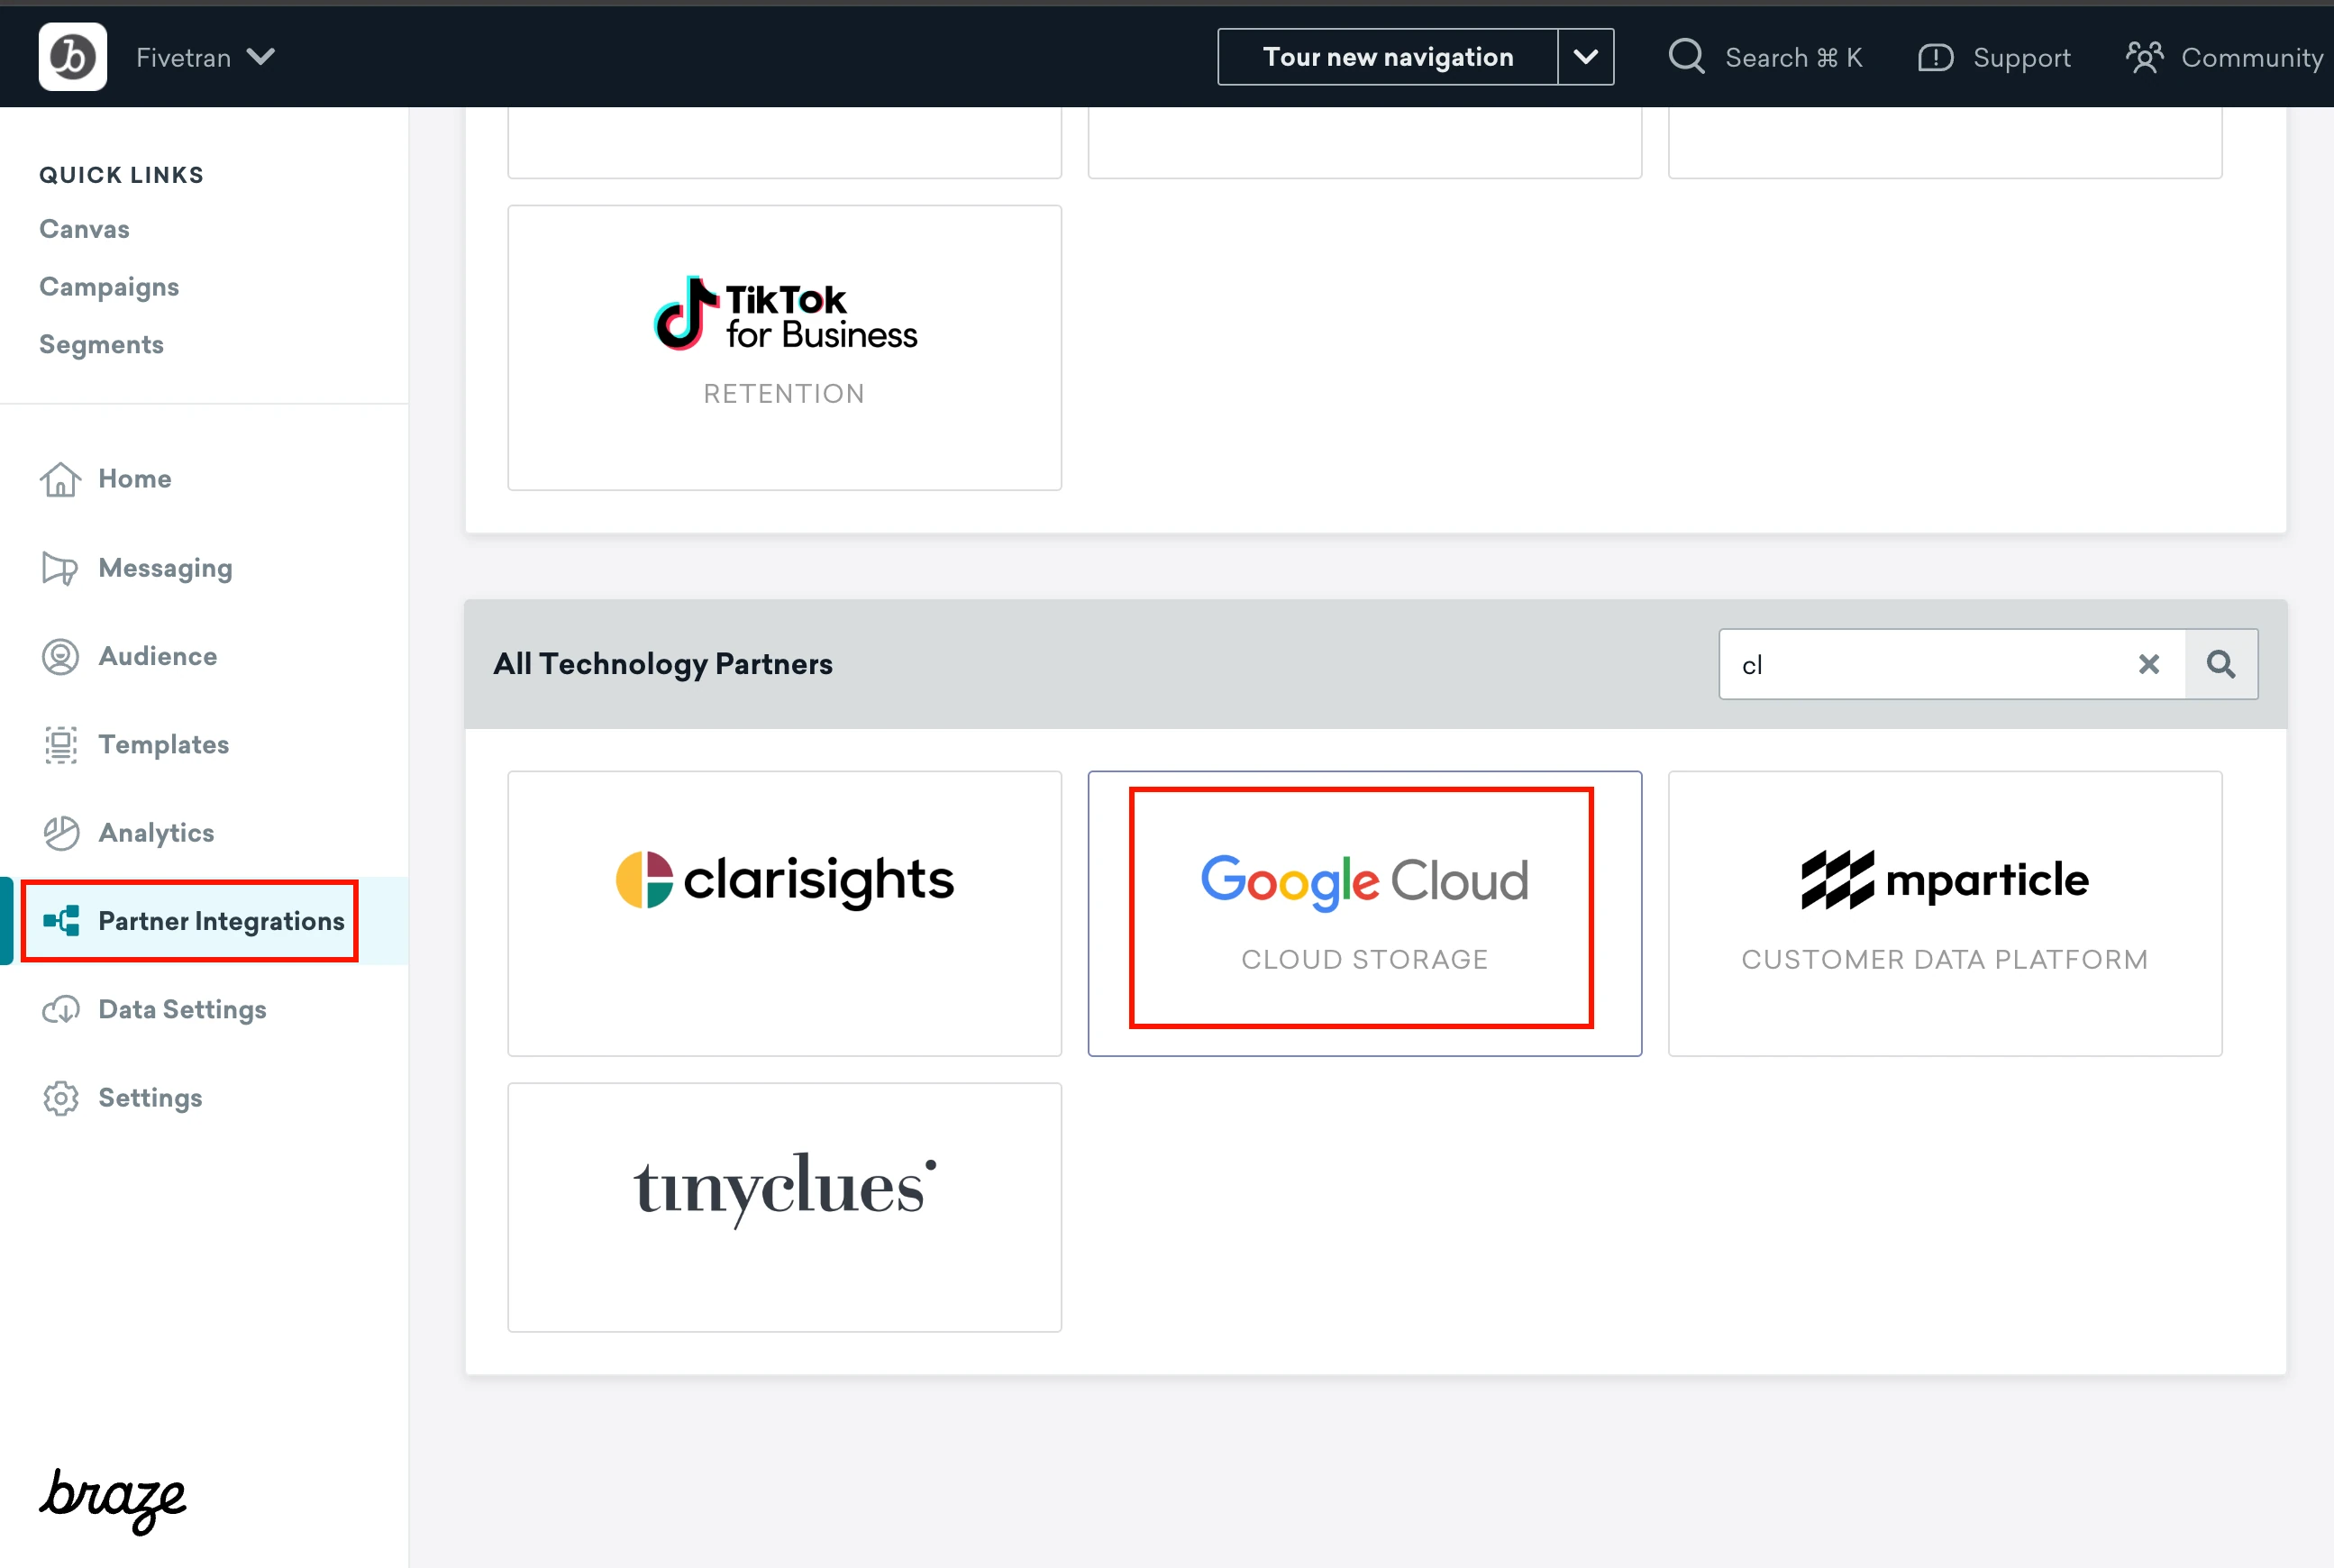
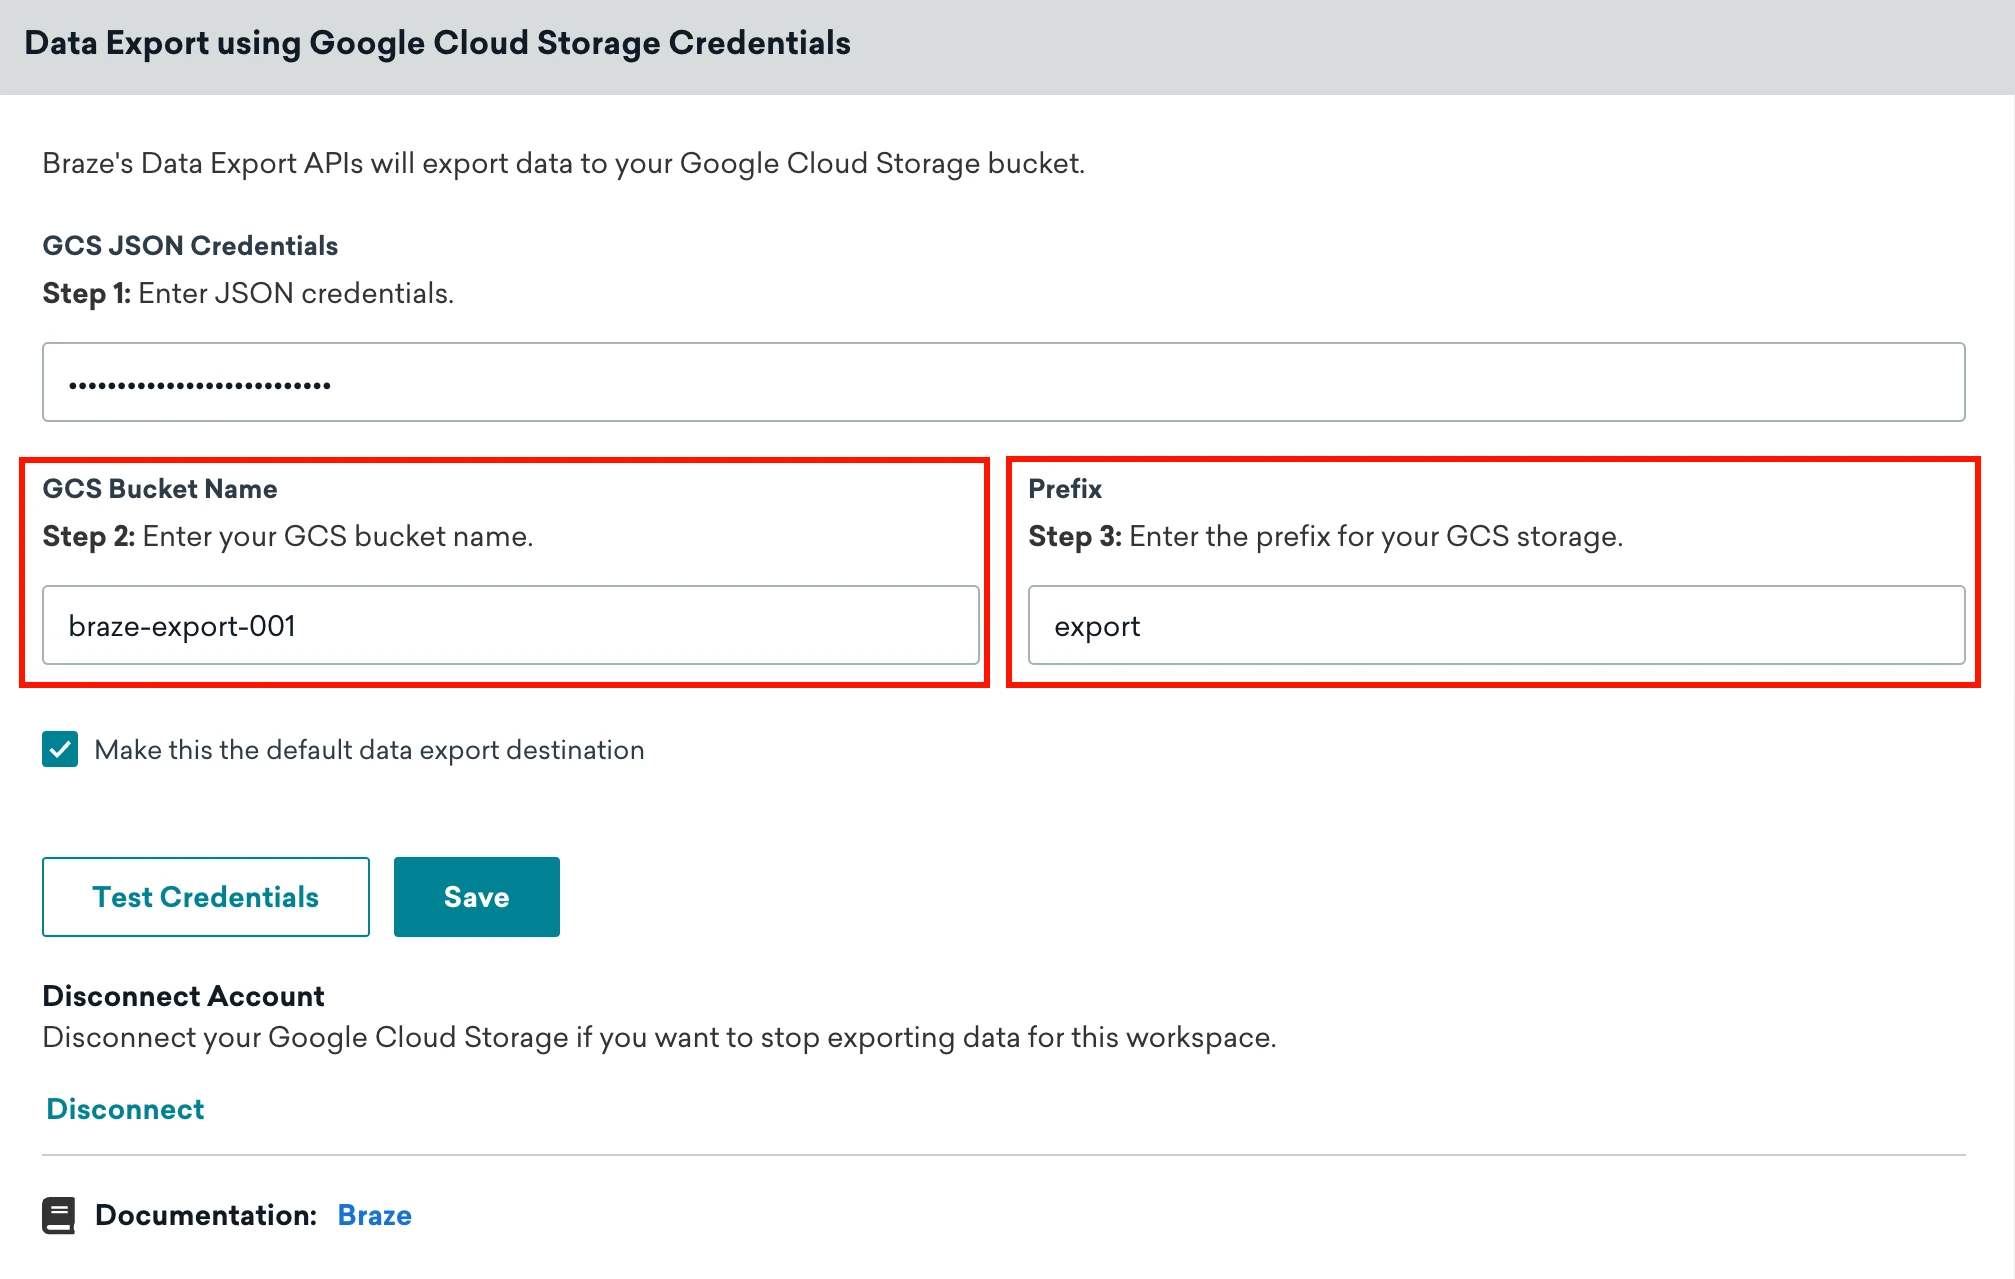
In the Data Export using Credentials section, make a note of the Bucket Name and Bucket Prefix (Folder) details. You will need them to configure Fivetran.
Grant bucket access to Fivetran
Go to your Google Cloud Storage console.
Select the bucket that you configured the Braze Export with.

Go to Permissions and then click Add principals.
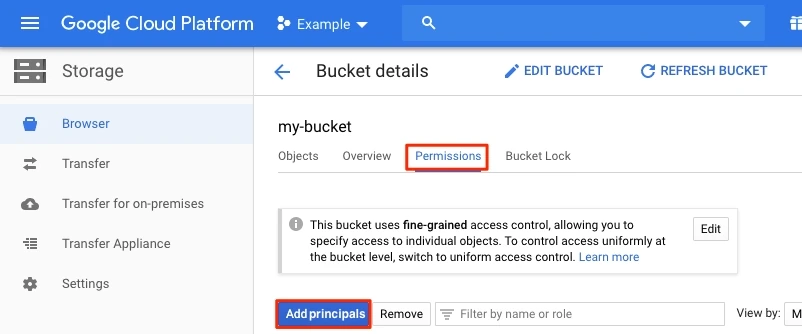
In the Add principals window, enter the Fivetran email address you found.
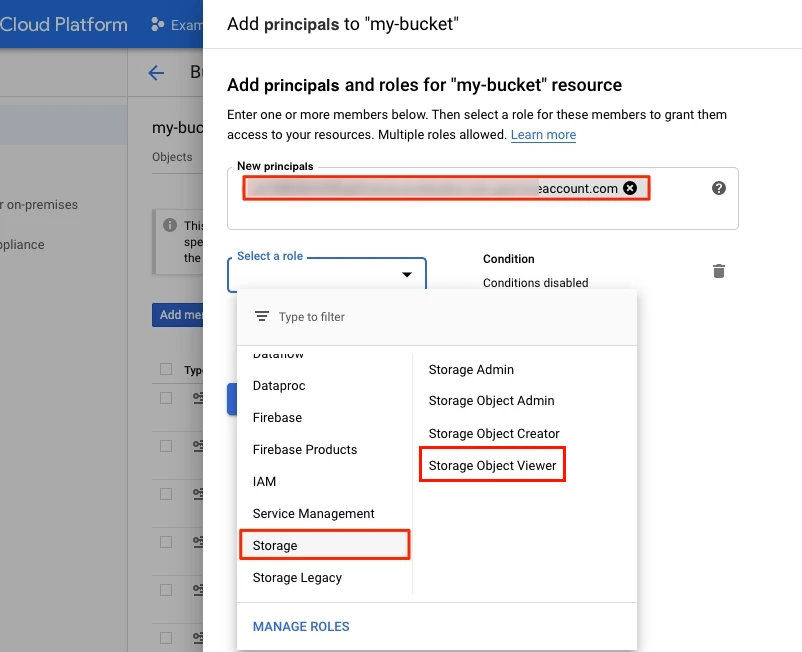
From the Select a role drop-down, select Storage Object Viewer.
Finish Fivetran configuration
In the connection setup form, enter the Destination schema name of your choice.
Enter the API URL and API Key you created.
(Optional) In the Historical Sync Time Frame drop-down menu, select the range of historical data you want to include in your initial sync.
Enter the Bucket Name that you found. You can also find the Bucket name in your Braze dashboard (Go to Integration > Current > your-current-name > Bucket Name).
Enter the Folder name. You can find the folder name in your Braze dashboard (Go to Integration > Current > your-current-name > Prefix).
(Optional) Set the Enable User Profile Exports toggle to ON, and then choose your Export Storage. Select Google Cloud Storage, enter the Exports Bucket Name and Exports Folder you found.
Click Save & Test. Fivetran will take it from here and sync your data from your Braze account.
Setup instructions - Amazon S3
Find External ID
In the connection setup form, select the Cloud Storage as Amazon S3.
Make a note of the External ID. You will need it to allow Fivetran access to your S3 bucket.
Create API key
Log in to your dashboard at https://dashboard.braze.com or your designated dashboard URL. See Braze's endpoints documentation for a complete list of URLs.
In the bottom left corner of your Braze dashboard, click Developer Console.

Follow Braze's API key guide to create an API key for Fivetran. Enable the following permissions for the API key:
- users.export.ids
- users.export.segment
- email.unsubscribe
- email.hard_bounces
- messages.schedule_broadcasts
- campaigns.list
- campaigns.details
- canvas.list
- canvas.details
- segments.list
- segments.details
- purchases.product_list
- events.list
- feed.list
- feed.details
- templates.email.info
- templates.email.list
- subscription.status.get
- subscription.groups.get
Make a note of the API key. You will need it to configure Fivetran.
Create IAM policy
Open the Amazon IAM console.
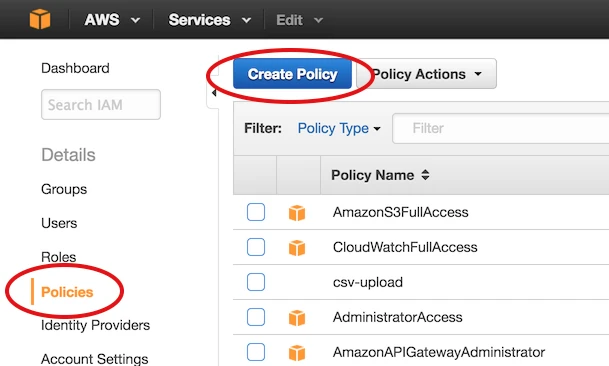
Click Policies, then Create Policy.
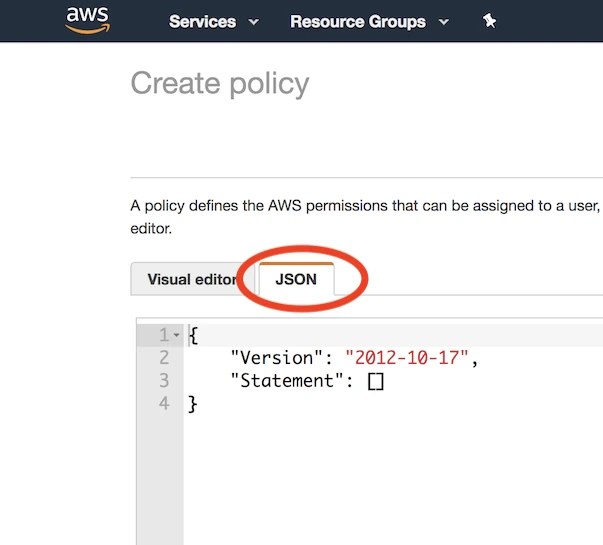
Click the JSON tab.
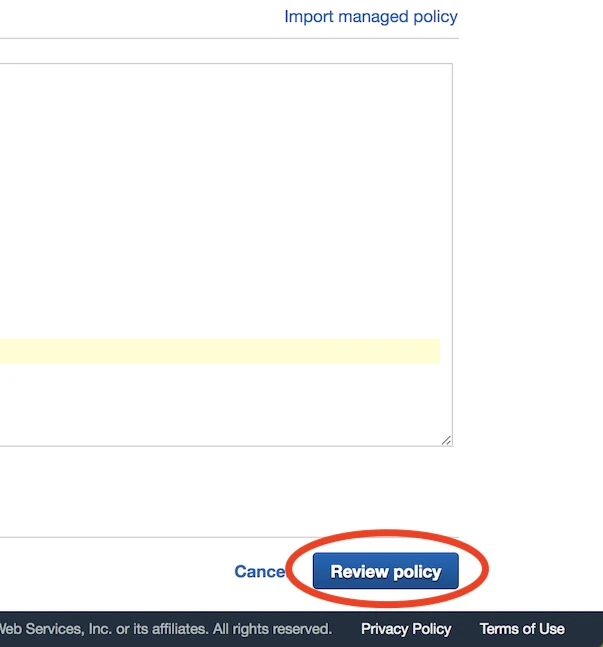
Copy the following policy, replacing
{your-bucket-name}with the name of your S3 bucket.{ "Version": "2012-10-17", "Statement": [ { "Effect": "Allow", "Action": [ "s3:Get*", "s3:List*" ], "Resource": "arn:aws:s3:::{your-bucket-name}/*" }, { "Effect": "Allow", "Action": [ "s3:Get*", "s3:List*" ], "Resource": "arn:aws:s3:::{your-bucket-name}" } ] }Click Review Policy.
Name the policy something memorable (for example, "Fivetran-S3-Access").
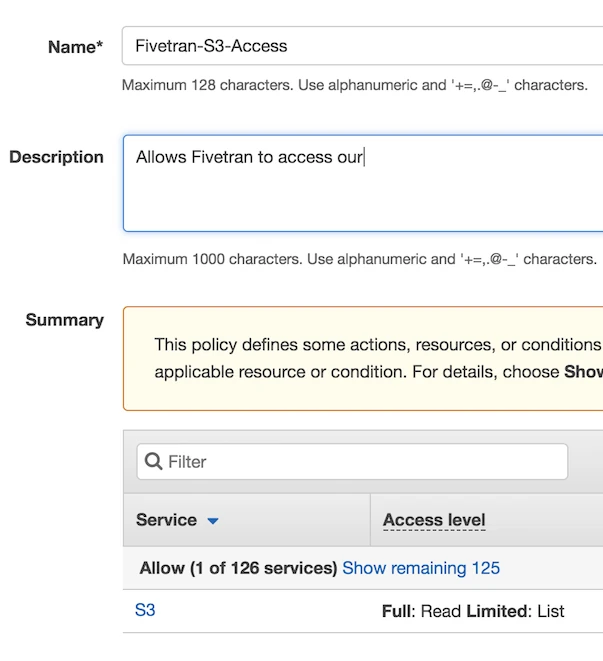
Click Create Policy.
Create IAM role
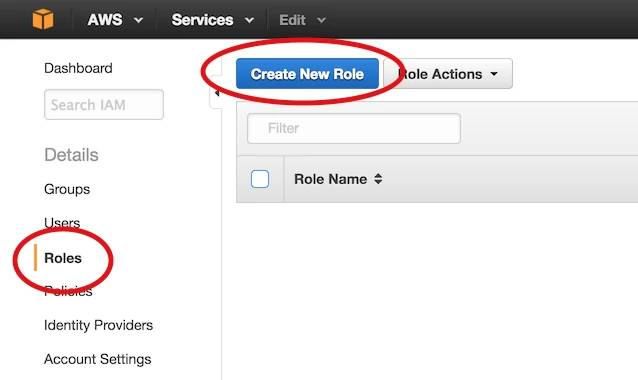
Click Roles, then Create New Role.
Select Another AWS Account, then enter Fivetran's account ID,
834469178297, in the Account ID field.
Select the Require external ID checkbox.
Enter the external ID you found.
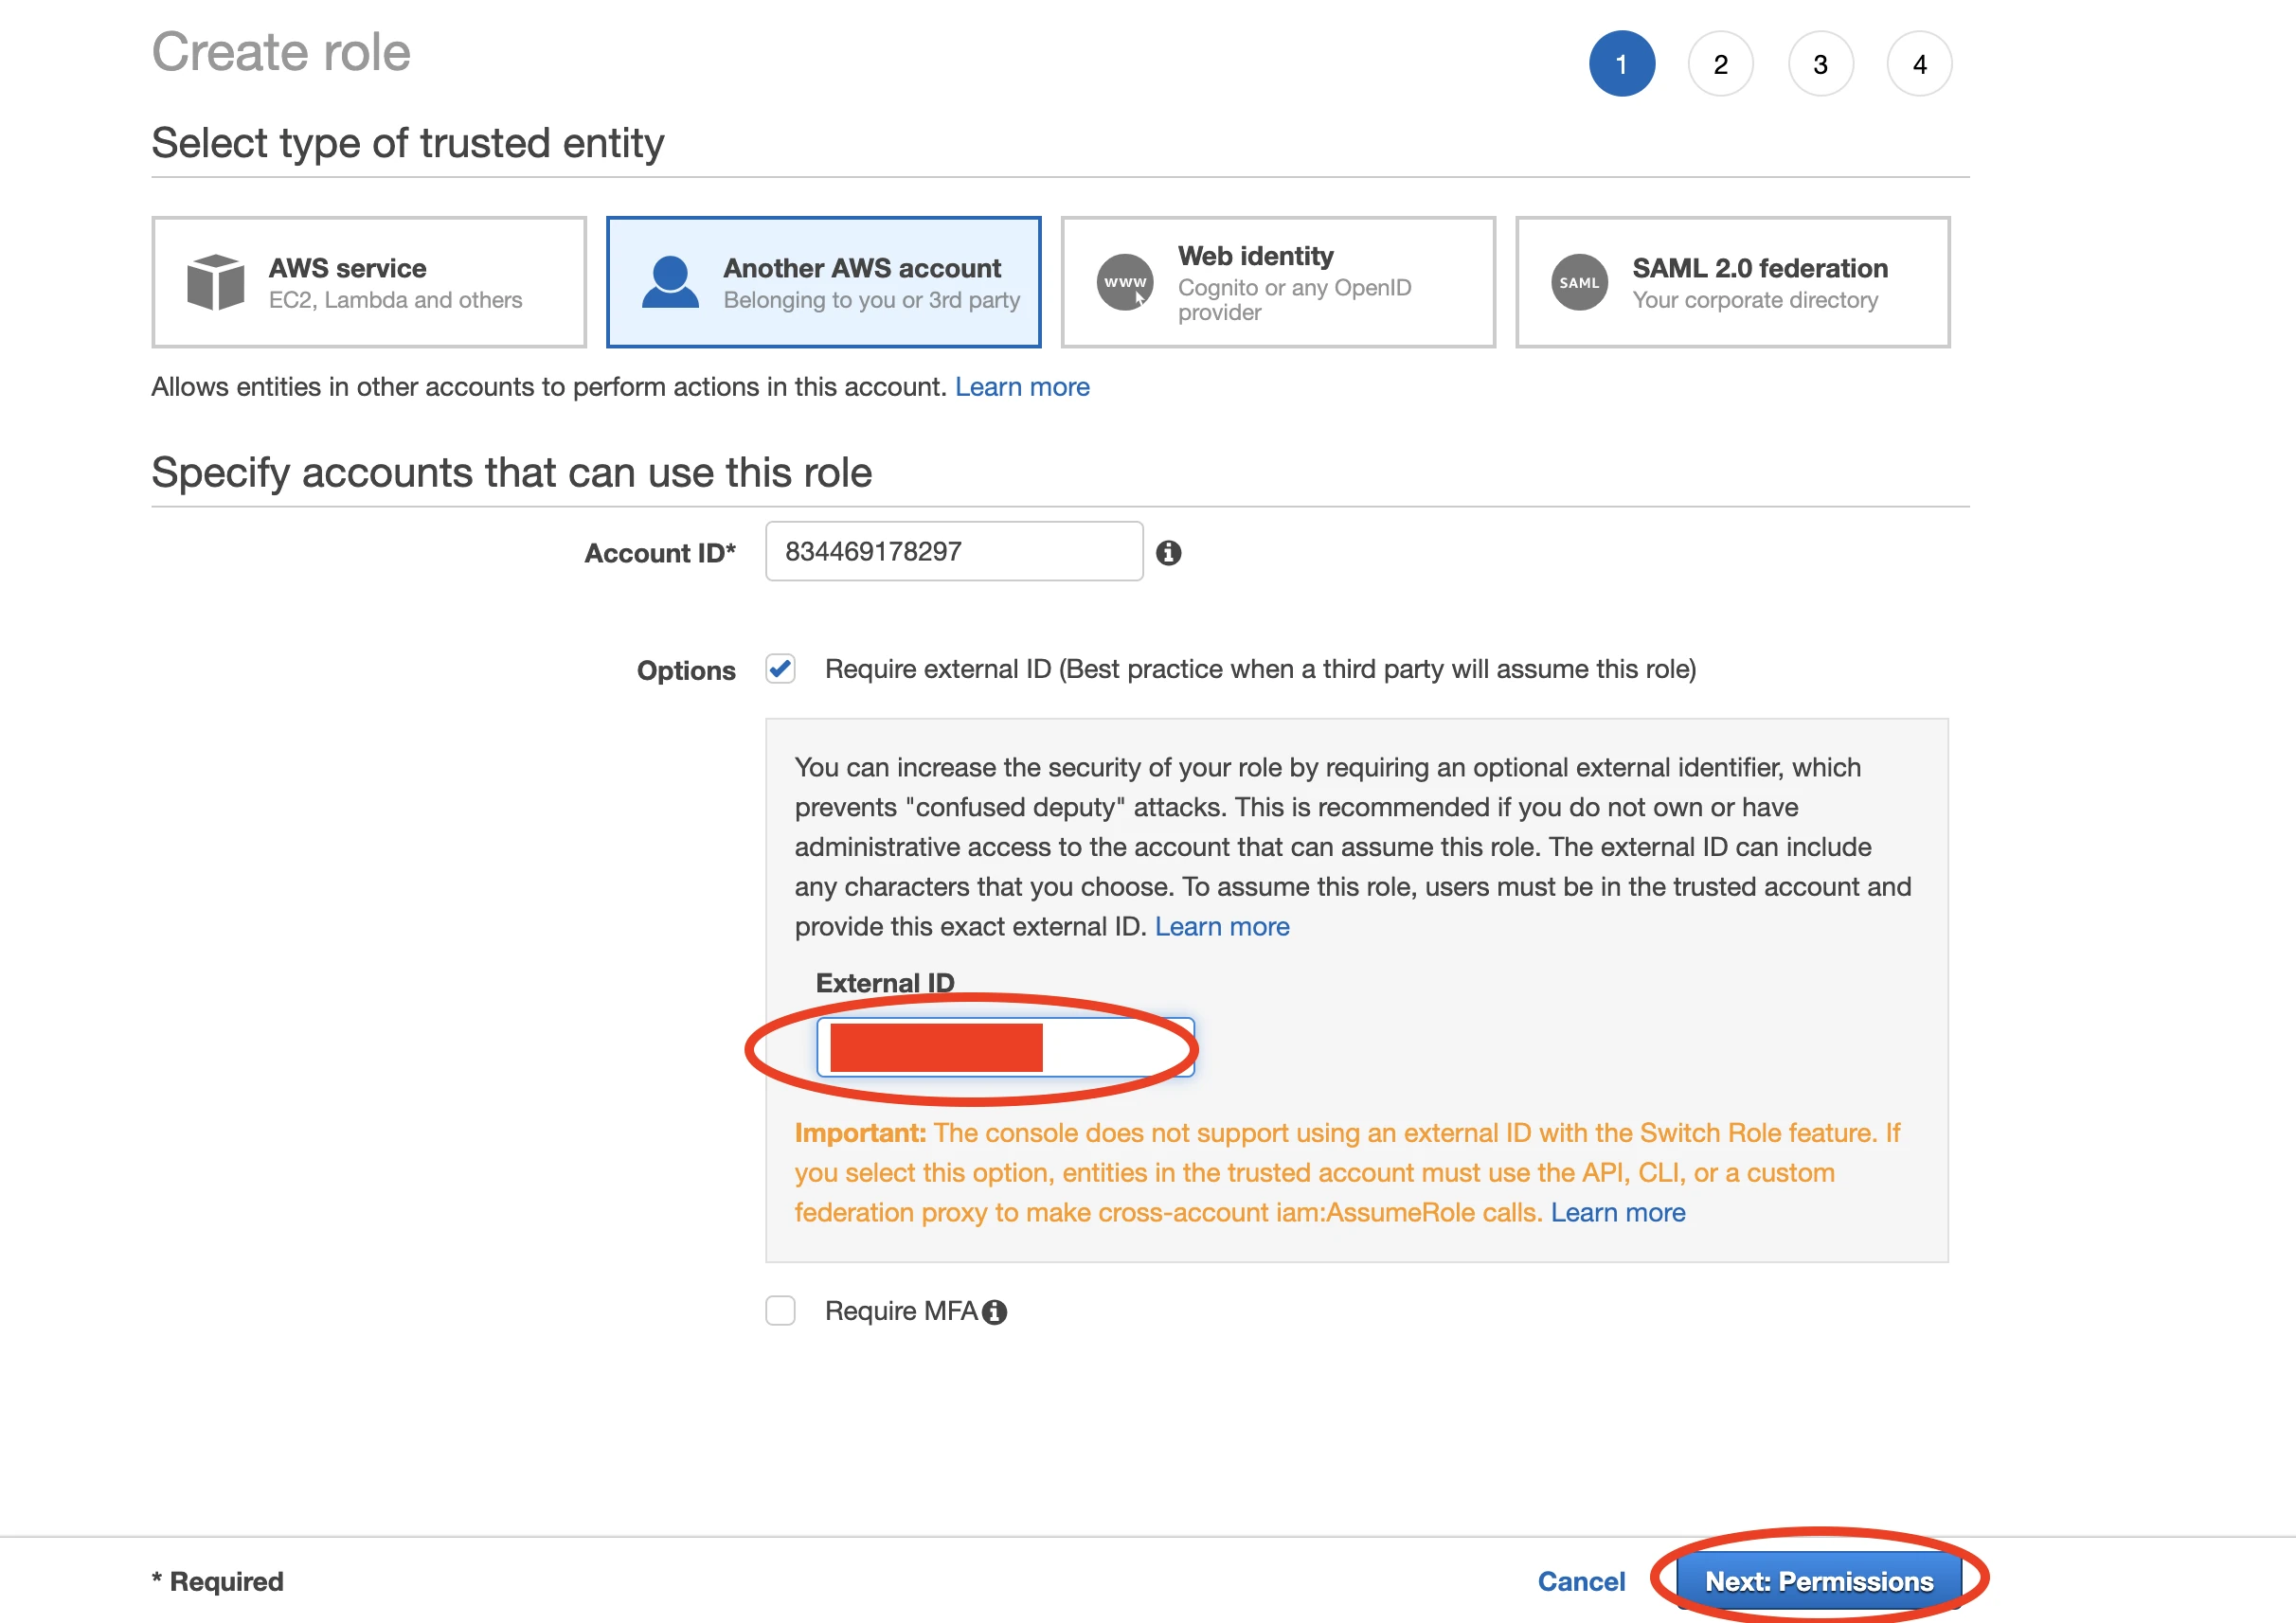
Click Next: Permissions.
Select the policy that you created earlier (for example, "Fivetran-S3-Access").
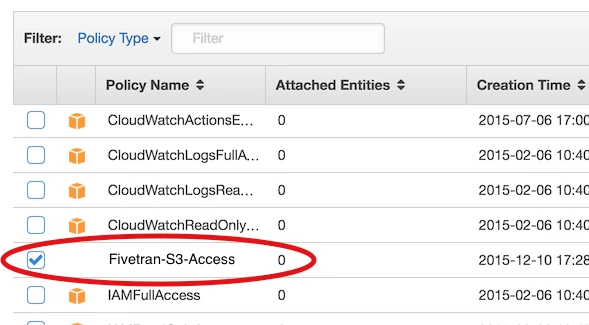
Click Next: Review.
Name your new role (for example, "Fivetran").
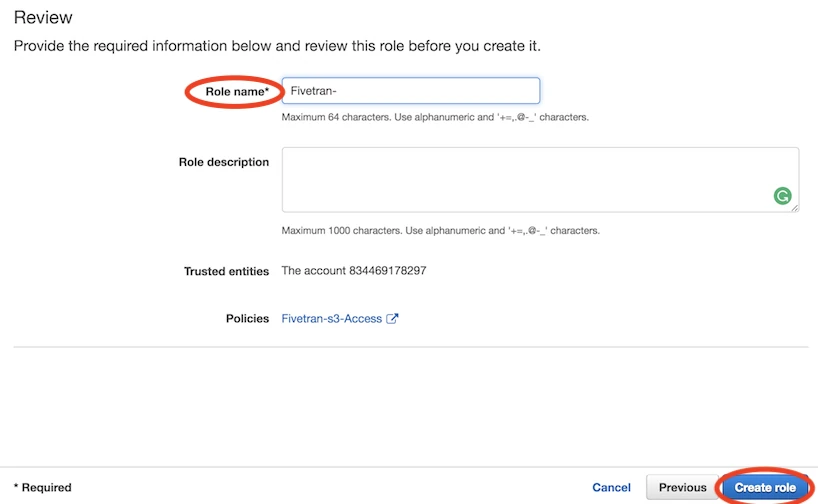
Click Create Role.
Click the role you just created.
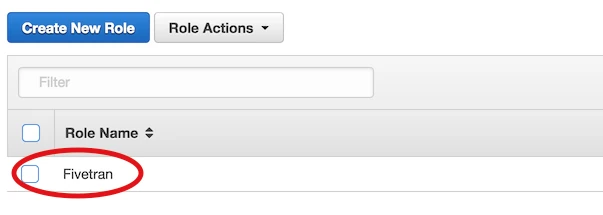
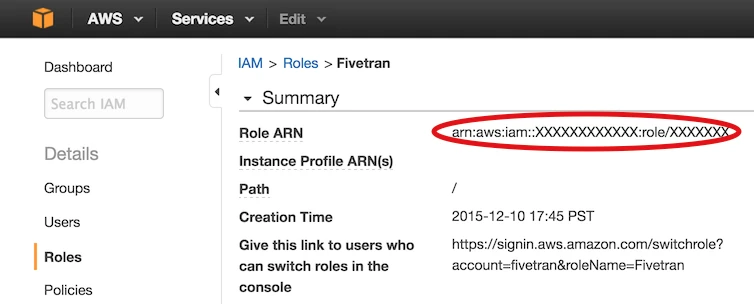
Find the Role ARN and make a note of it. You will need it to configure Fivetran.
(Optional) Set permissions
Perform this step only if you want to sync Braze Currents data.
You can specify permissions for the Role ARN that you designate for Fivetran. Giving selective permissions to this Role only allows Fivetran to sync what it has permissions to see.
(Optional) Enable User Profile Exports For AWS S3
Perform this step only if you want to sync the USER and USER_ALIAS tables.
To sync the USER and USER_ALIAS tables, you must use the Enable User Profile Exports toggle in the connection setup form. You can choose either:
- Amazon S3: You must provide an S3 bucket to which Braze will write the User export files.
- No Export Storage: Braze will use their S3 storage and provide Fivetran with a link to the export files.
We recommend that you configure your own S3 bucket. You can either:
- Use the same S3 bucket you used for the Currents
- Use a different S3 bucket
To use your S3 bucket, do the following:
Log in to the Braze dashboard.
In the left menu, click Technology Partners.
On the Technology Partners page, select Amazon S3 Cloud Storage.
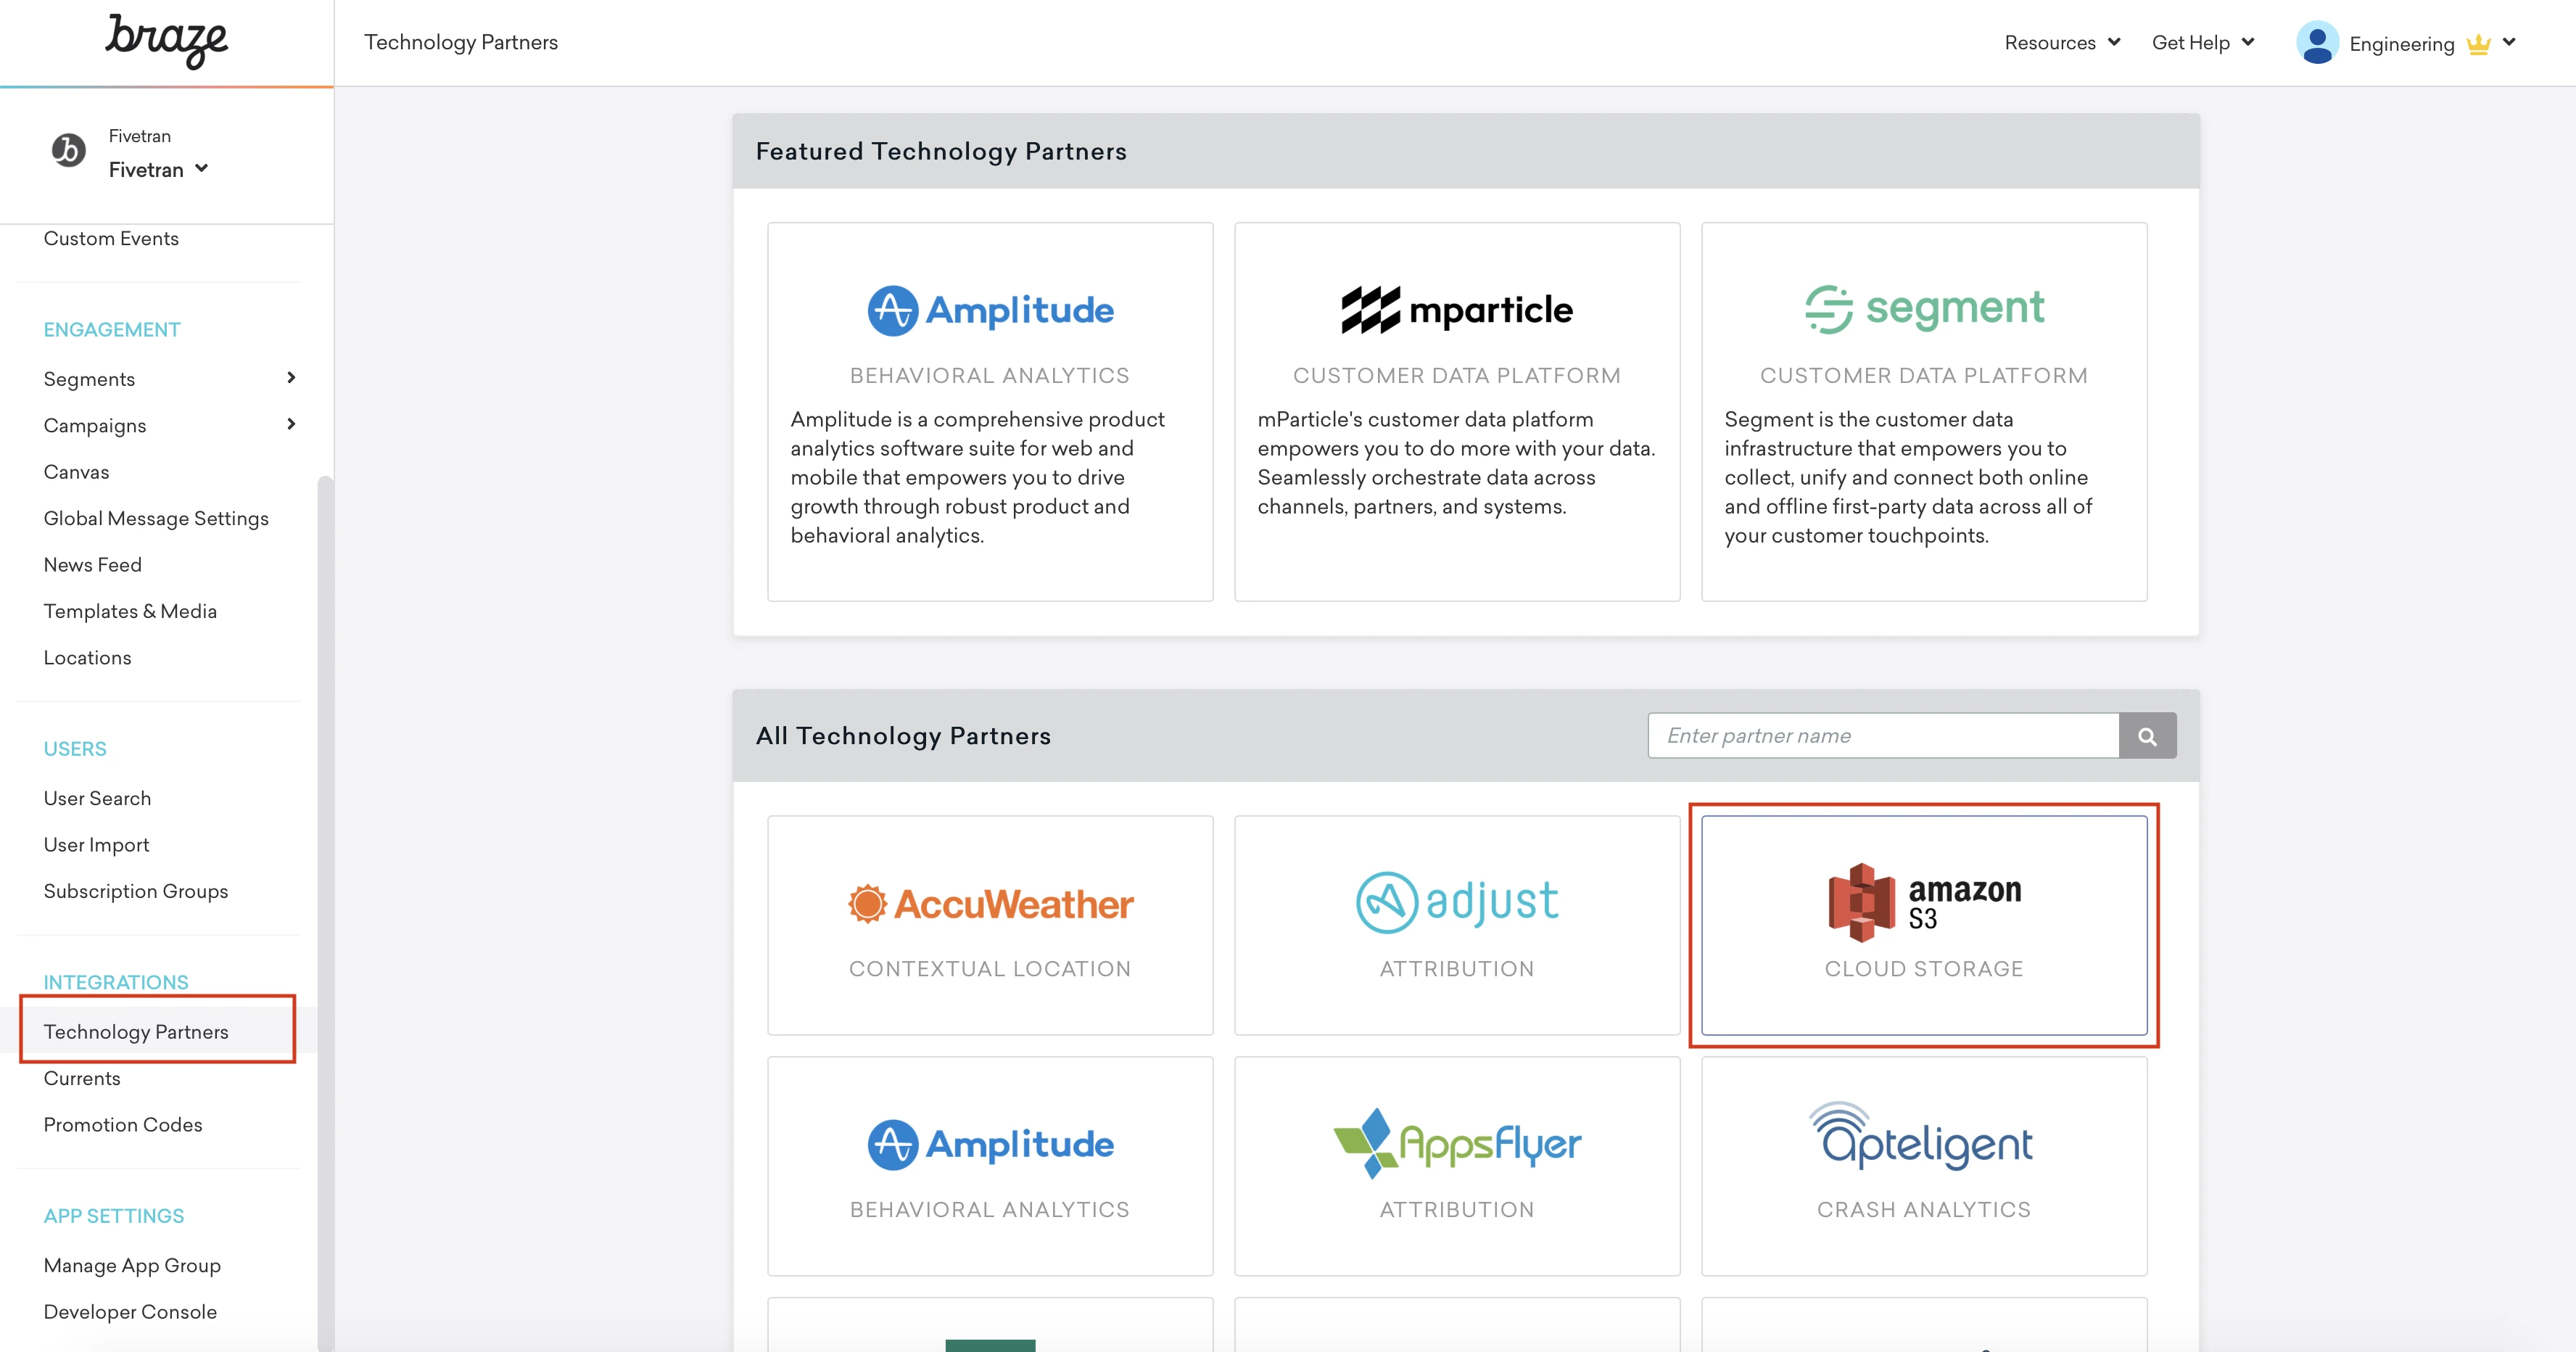
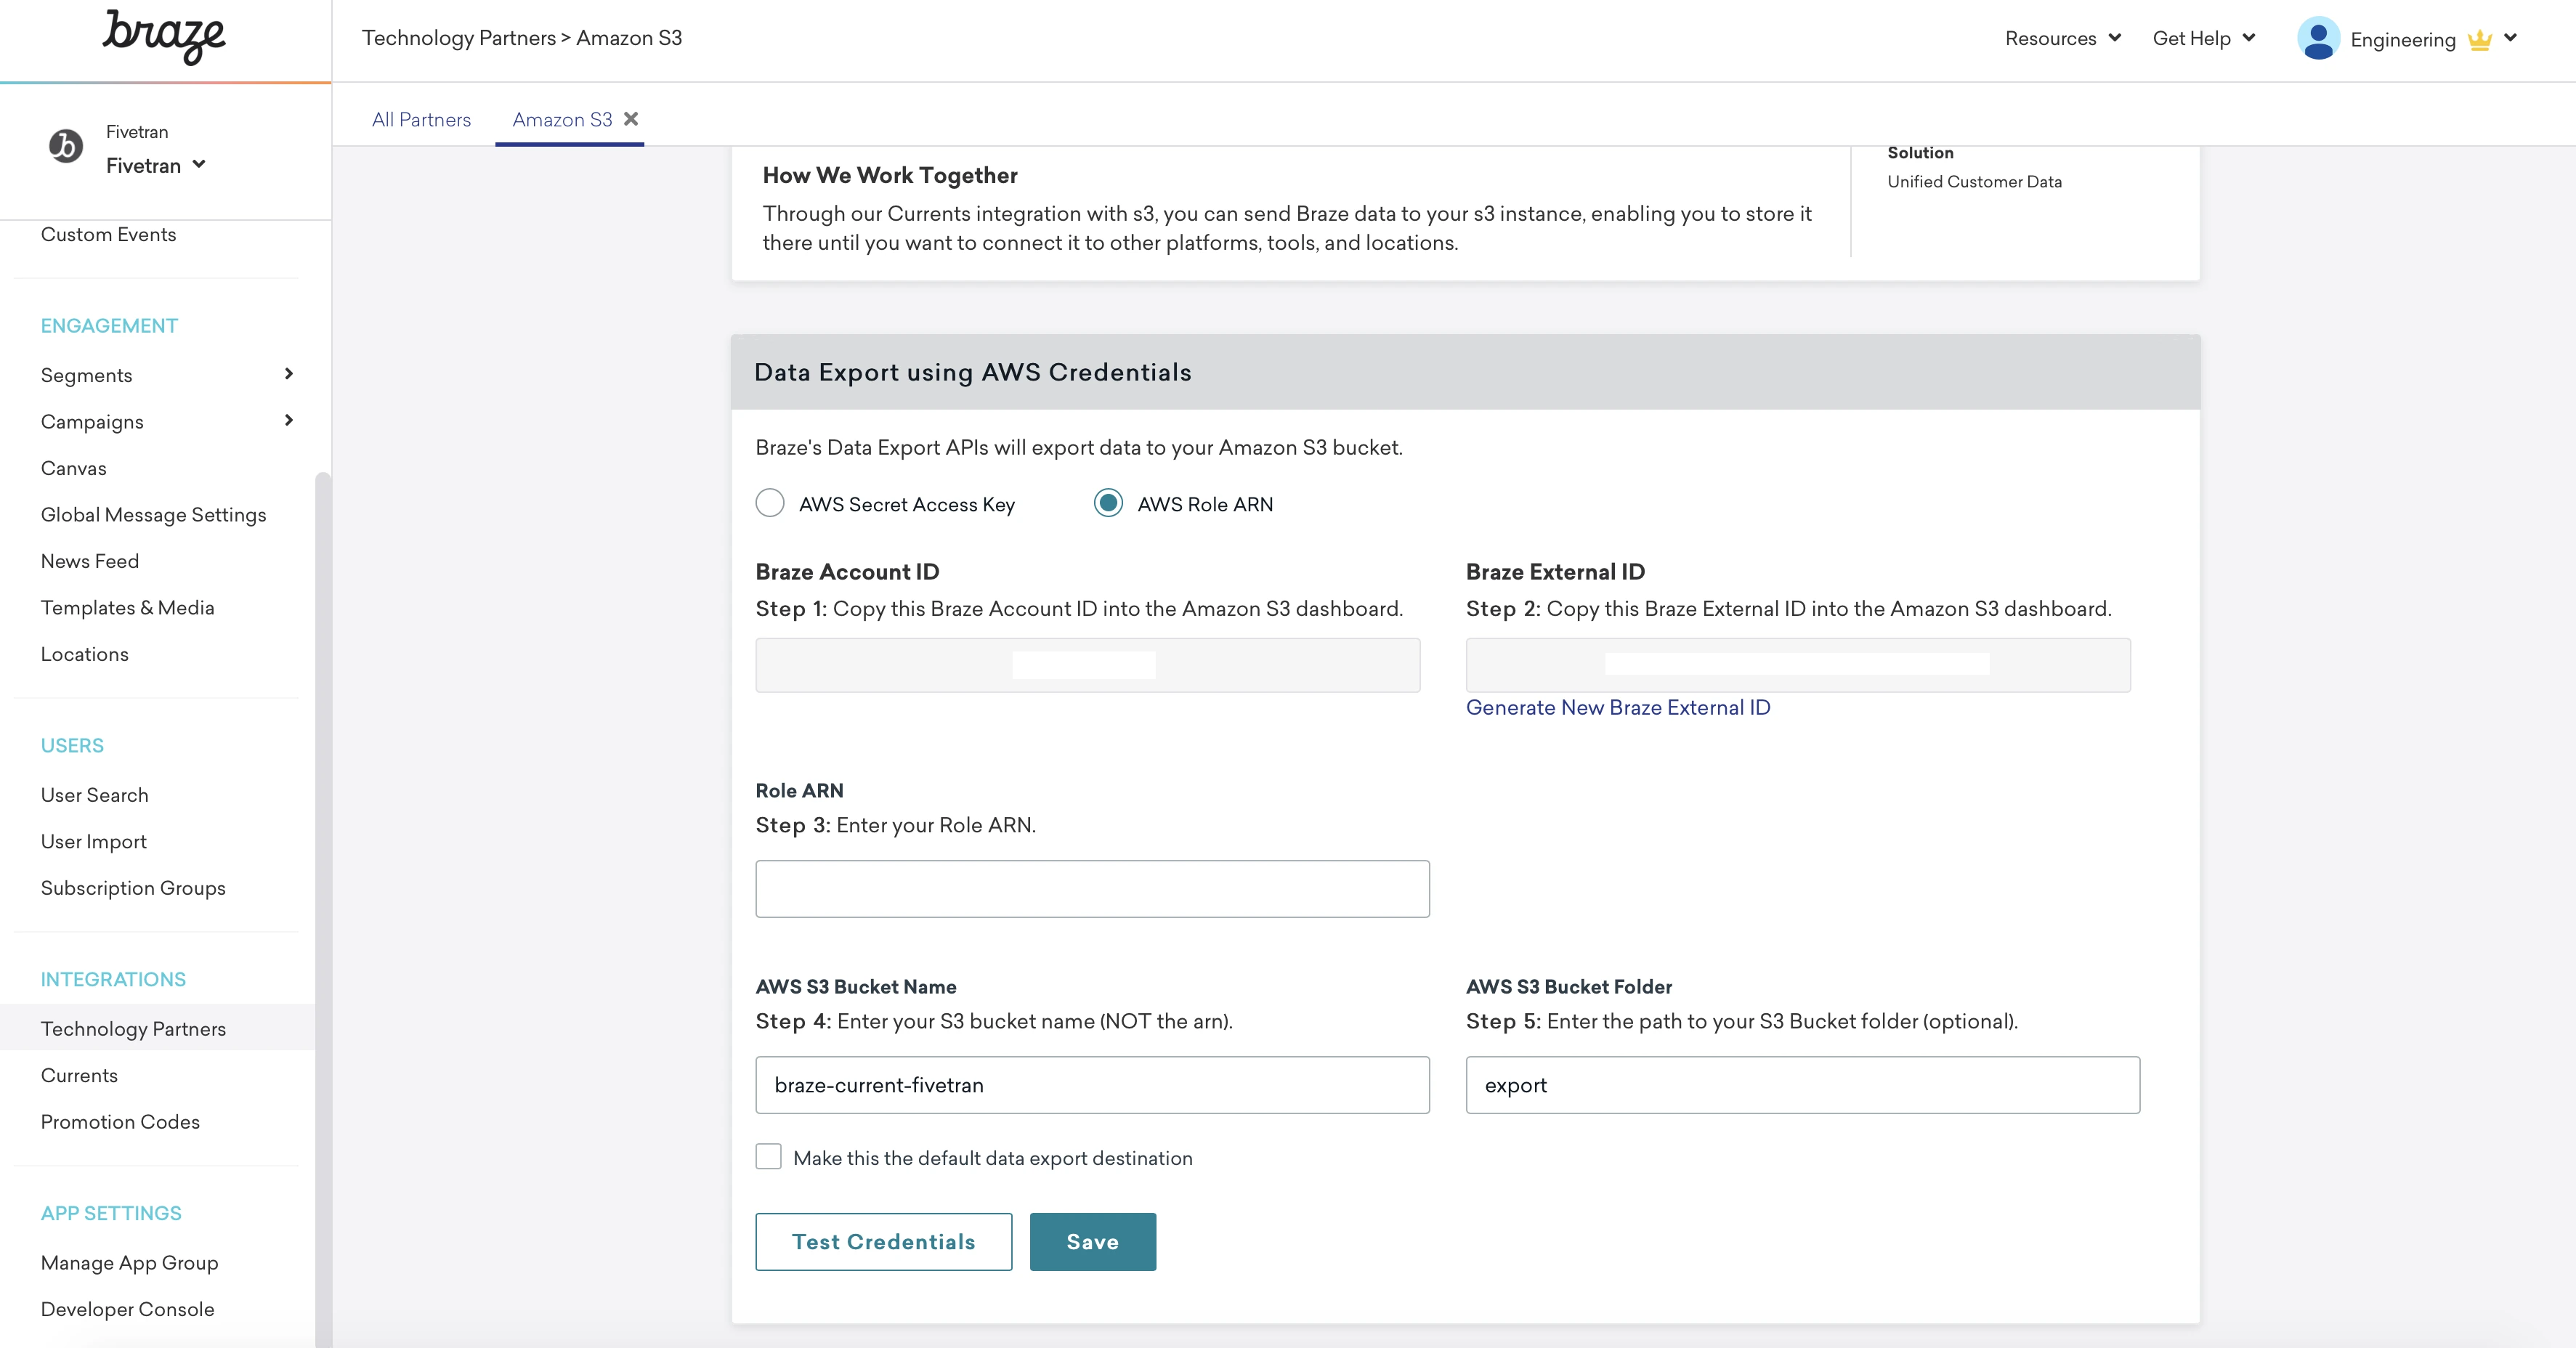
In the Data Export using AWS Credentials section, make a note of the Role ARN, AWS S3 Bucket Name, and AWS S3 Bucket Folder details. You will need them to configure Fivetran.
Finish Fivetran configuration
In the connection setup form, enter the Destination schema name of your choice.
Enter the API URL and API Key you created.
(Optional) In the Historical Sync Time Frame drop-down menu, select the range of historical data you want to include in your initial sync.
Enter the Bucket name from the Braze dashboard (Go to Integration > Current > your-current-name > Bucket Name).
Enter the Role ARN you found.
Enter the Folder name. You can find the folder name in your Braze dashboard (Go to Integration > Current > your-current-name > Prefix).
(Optional) Set the Enable User Profile Exports toggle to ON, and then choose your Export Storage. If you select Amazon S3, enter the following details you found:
- Exports Bucket
- Exports Folder
In the Exports Role ARN field, enter the Role ARN you found.
Click Save & Test. Fivetran will take it from here and sync your data from your Braze account.
Setup instructions - Microsoft Azure Blob Storage
Select Azure Blob Storage
In the connection setup form, select the Cloud Storage as Azure Blob Storage.
Create API key
Log in to your Braze dashboard at https://dashboard.braze.com or your designated dashboard URL. See Braze's endpoints documentation for a complete list of URLs.
In the bottom left corner of your Braze dashboard, click Developer Console.

Follow Braze's API key guide to create an API key for Fivetran. Enable the following permissions for the API key:
- users.export.ids
- users.export.segment
- email.unsubscribe
- email.hard_bounces
- messages.schedule_broadcasts
- campaigns.list
- campaigns.details
- canvas.list
- canvas.details
- segments.list
- segments.details
- purchases.product_list
- events.list
- feed.list
- feed.details
- templates.email.info
- templates.email.list
- subscription.status.get
- subscription.groups.get
Make a note of the API key. You will need it to configure Fivetran.
Find connection string
In the Microsoft Azure console, go to your storage account.
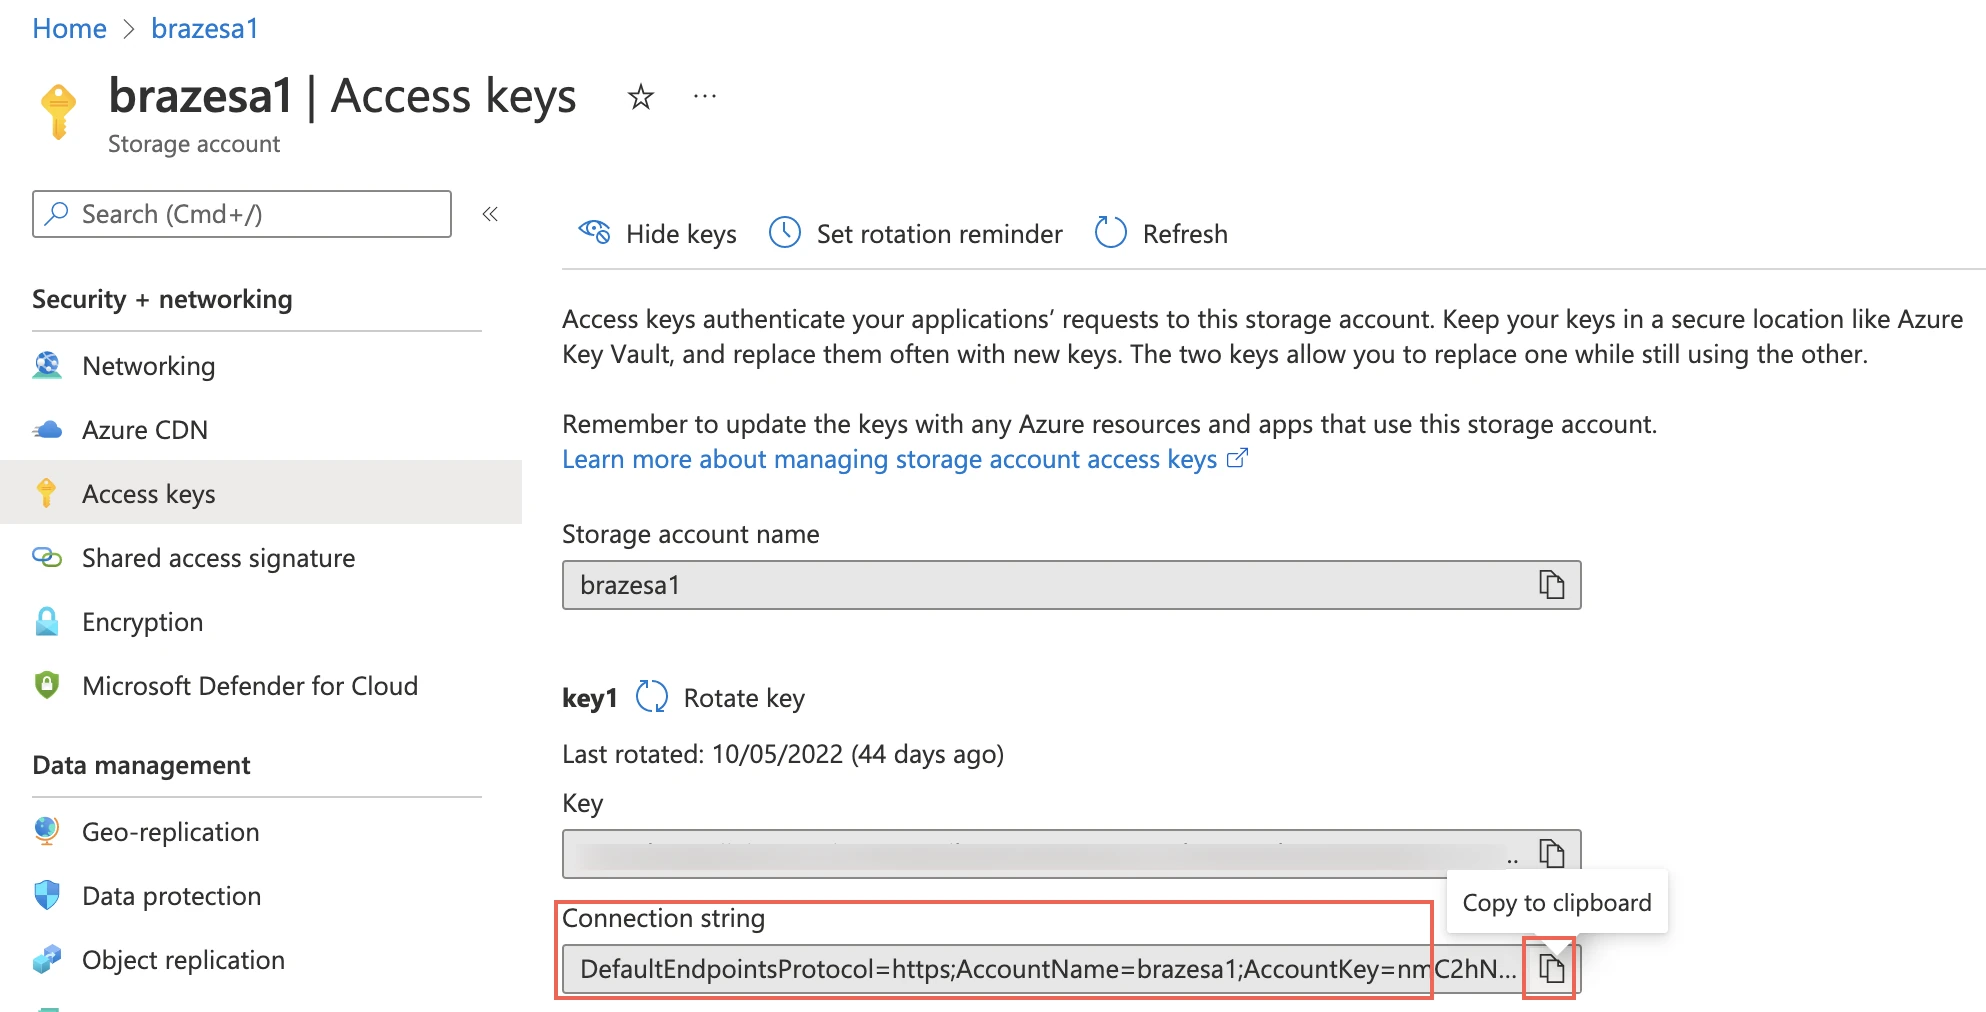
On the left navigation pane, select Access keys and then click Show Keys.
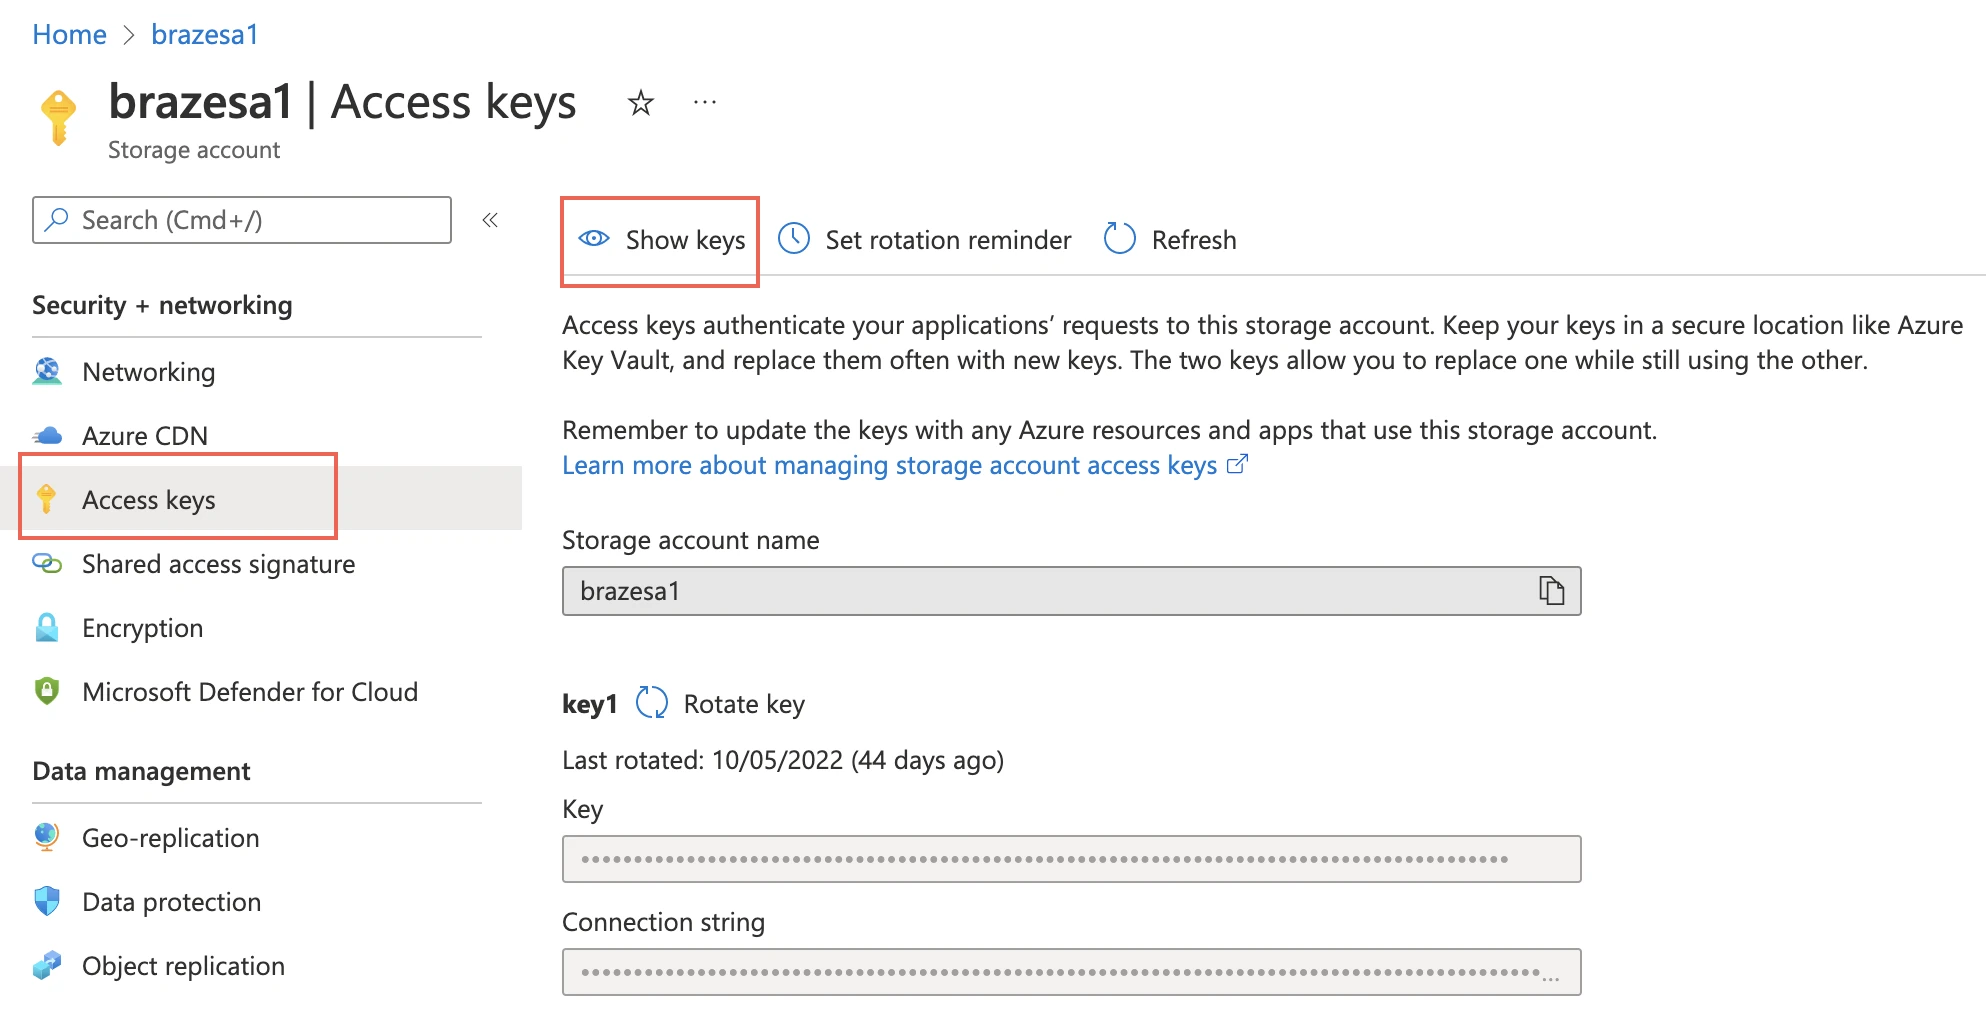
Find the Connection string and make a note of it. You will need it to configure Fivetran.
Grant container access
In the Microsoft Azure console, go to your storage account.
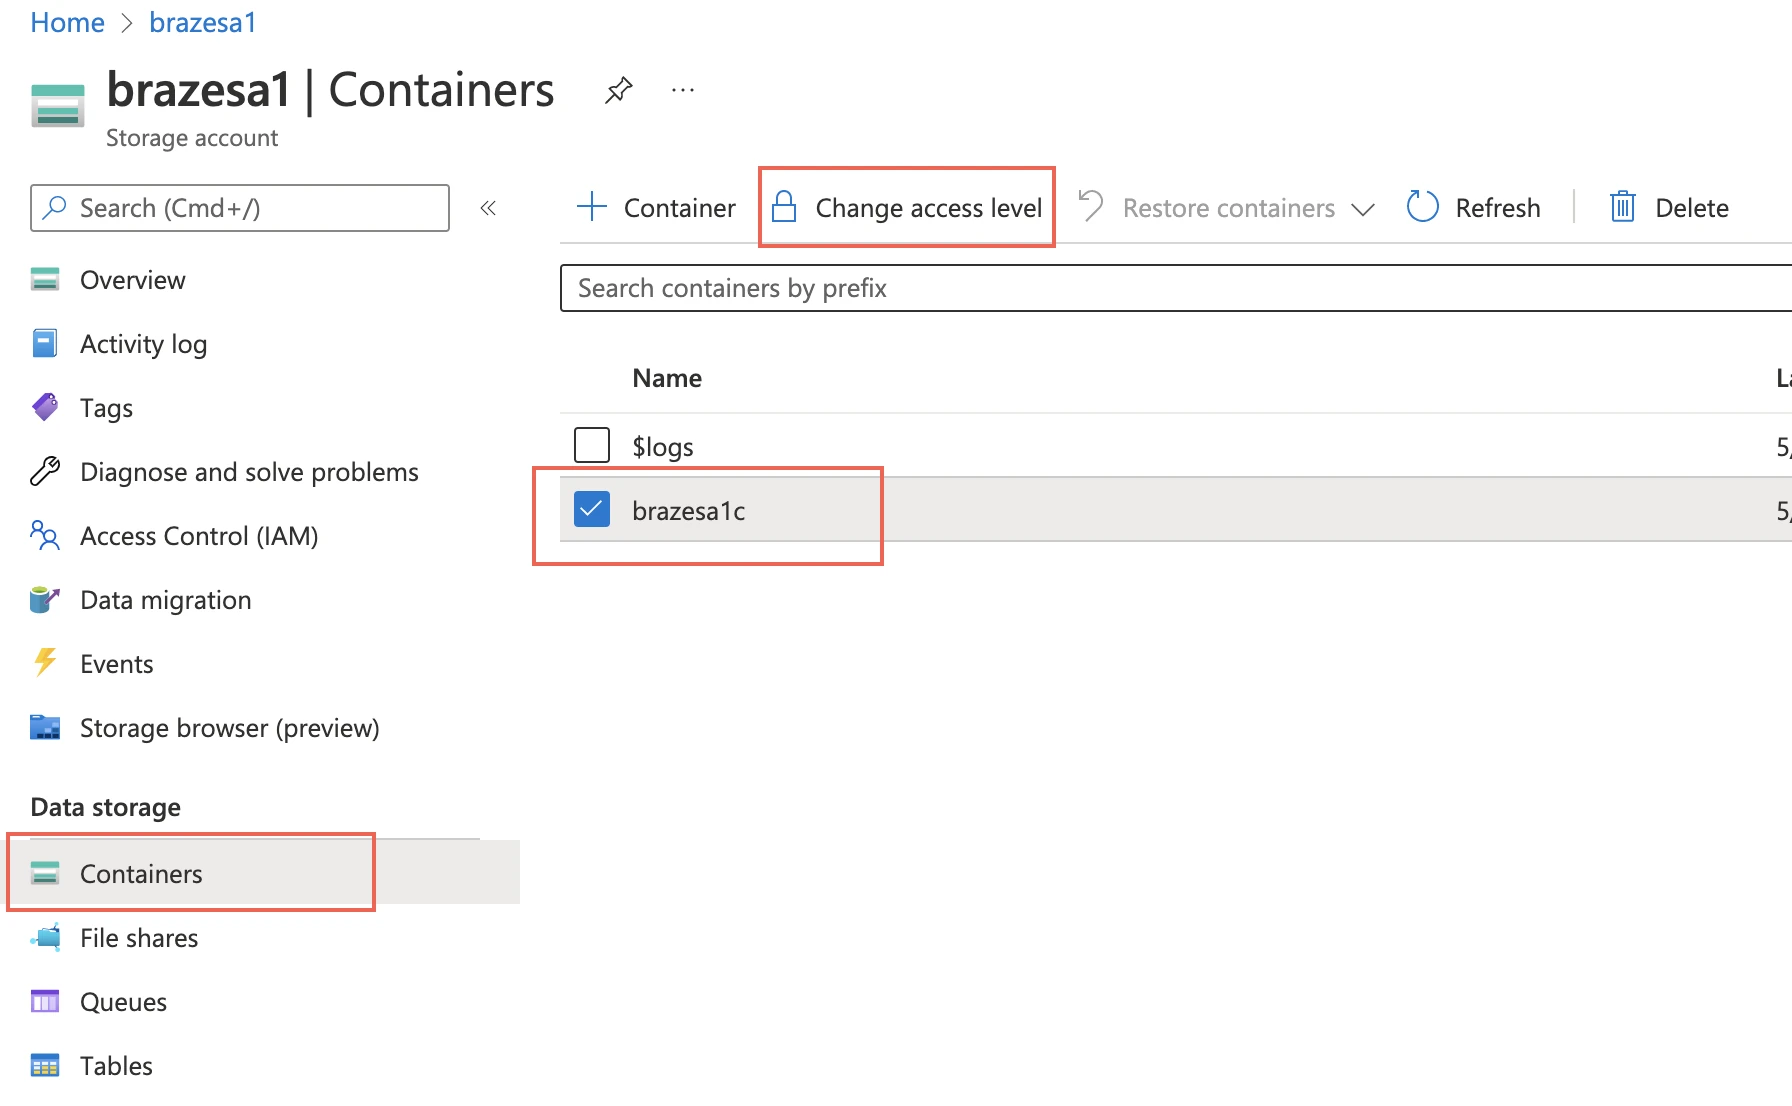
Select Containers. Select the container that you configured the Braze Current with. Click Change access level.
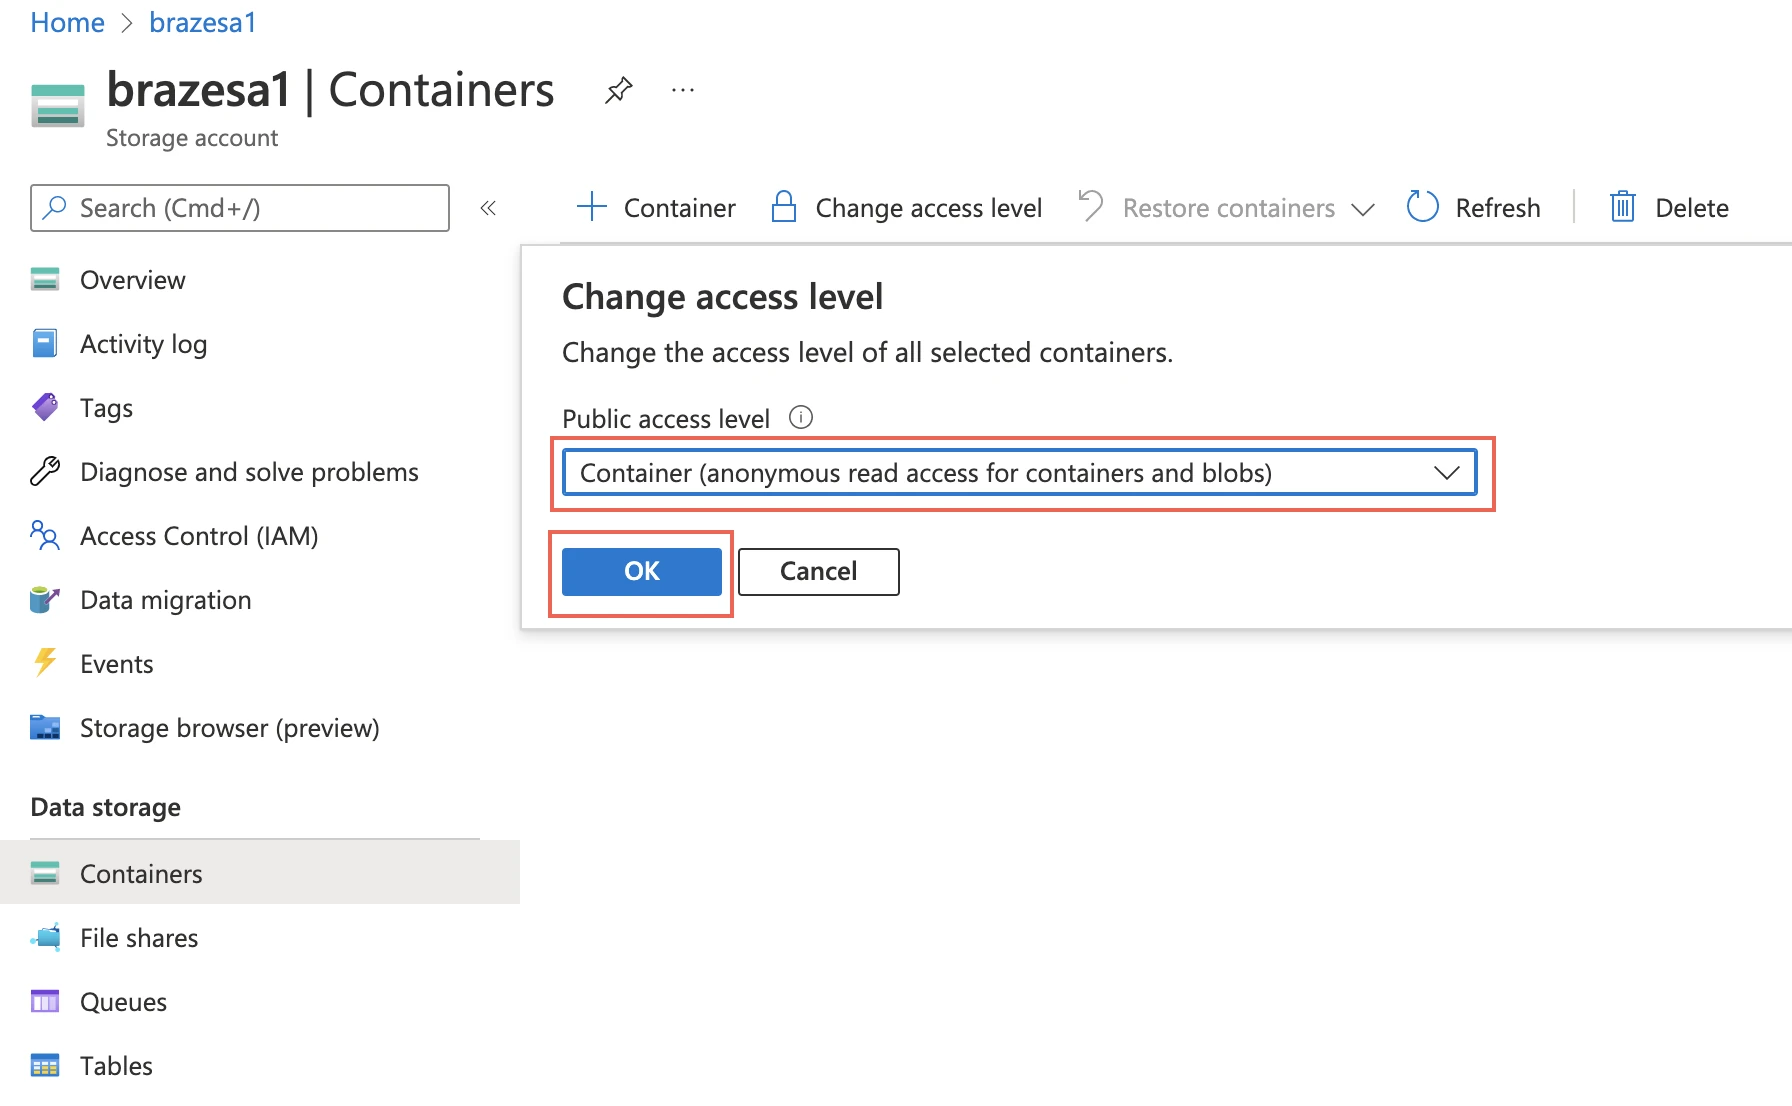
In the Public access level drop-down menu, select Container (anonymous read access for containers and blobs) and then click OK.
Finish Fivetran configuration
In the connection setup form, enter the Destination schema name of your choice.
Enter the API URL and API Key you created.
(Optional) In the Historical Sync Time Frame drop-down menu, select the range of historical data you want to include in your initial sync.
Enter the Connection String that you found.
Enter the Container Name that you configured. You can also find the Container name in your Braze dashboard (Go to Integration > Current > your-current-name > Container Name).
Enter the Prefix. You can find the prefix in your Braze dashboard (Go to Integration > Current > your-current-name > Prefix).
Click Save & Test. Fivetran will take it from here and sync your data from your Braze account.