Salesforce Setup Guide
Follow our setup guide to connect Salesforce to Fivetran.
Prerequisites
To connect Salesforce to Fivetran, you need:
- An active Salesforce account with the necessary permissions to create External Client Apps. For more information, see our create external client app documentation.
- A Salesforce Enterprise level account plan or higher, or purchased Salesforce API calls
You may make up to four connections using one set of Salesforce account credentials. That’s because Salesforce limits the number of connections made using OAuth2 to four per account per application. If you attempt to authenticate more than four connections using one set of Salesforce account credentials, the earliest connection you authenticated with those credentials will lose its authentication.
If you need more than four Salesforce connections, you must use additional Salesforce account credentials or use a different external client app for Fivetran.
Supported authentication methods
You can choose between the following authentication methods to connect your Salesforce account to Fivetran:
OAuth2.0 (recommended) : This method uses 1-way TLS (Transport Layer Security) with OAuth2.0 (client-credentials flow) authorization.
mTLS: This method adds a layer of security by using mutual TLS (mTLS authentication) with OAuth2.0 (client-credential flow) authorization. See our Mutual Authentication documentation for detailed instructions to enable this option.
mTLS authentication mode requires additional configuration in your Salesforce account, and is not recommended for most users, the default authentication method is OAuth2.0. Also, mTLS is not supported when using the Private Link connection method.
Setup instructions
Disable session IP locking
Go to the Session Settings page and uncheck the Lock sessions to the IP address from which they originated box.
It is very rare that this setting needs to be updated (<1% of cases), as it is disabled by default for the majority of users.
You may encounter the INVALID_SESSION_ID error when Session IP Locking is turned on.
Create an external client app
To connect your Salesforce account to Fivetran, you need to create an External Client App in your Salesforce account. Follow the instructions provided in our create external client app documentation to create the app.
Advanced configuration
Advanced configuration provides additional setup options that help you get more granular control over the permissions, data access, and security for your Salesforce connection.
Expand for instructions
Enable field history tracking
Read the Salesforce documentation to learn how to enable field history tracking.
Configure Salesforce account
Create new user and profile in Salesforce
Expand for instructions
To set up a Salesforce connection, you can use any Salesforce user within your organization that has permission to read data from Salesforce's APIs. However, we recommend creating a dedicated user and limit data access for this user only to data you want to sync. You can limit data access for a user by creating a profile in Salesforce and assigning it to the user.
To create a new user and profile in Salesforce, do the following:
Log in to Salesforce. You must have administrative privileges to create a user.
Go to Setup in the top right corner of your screen.
Under the Administration tab on the left side of the screen, click on the Profiles tab.
Click New Profile.
Select Read Only from the Existing Profile drop-down menu.
Enter a memorable name in the Profile Name field. For example,
Fivetran User Read Only.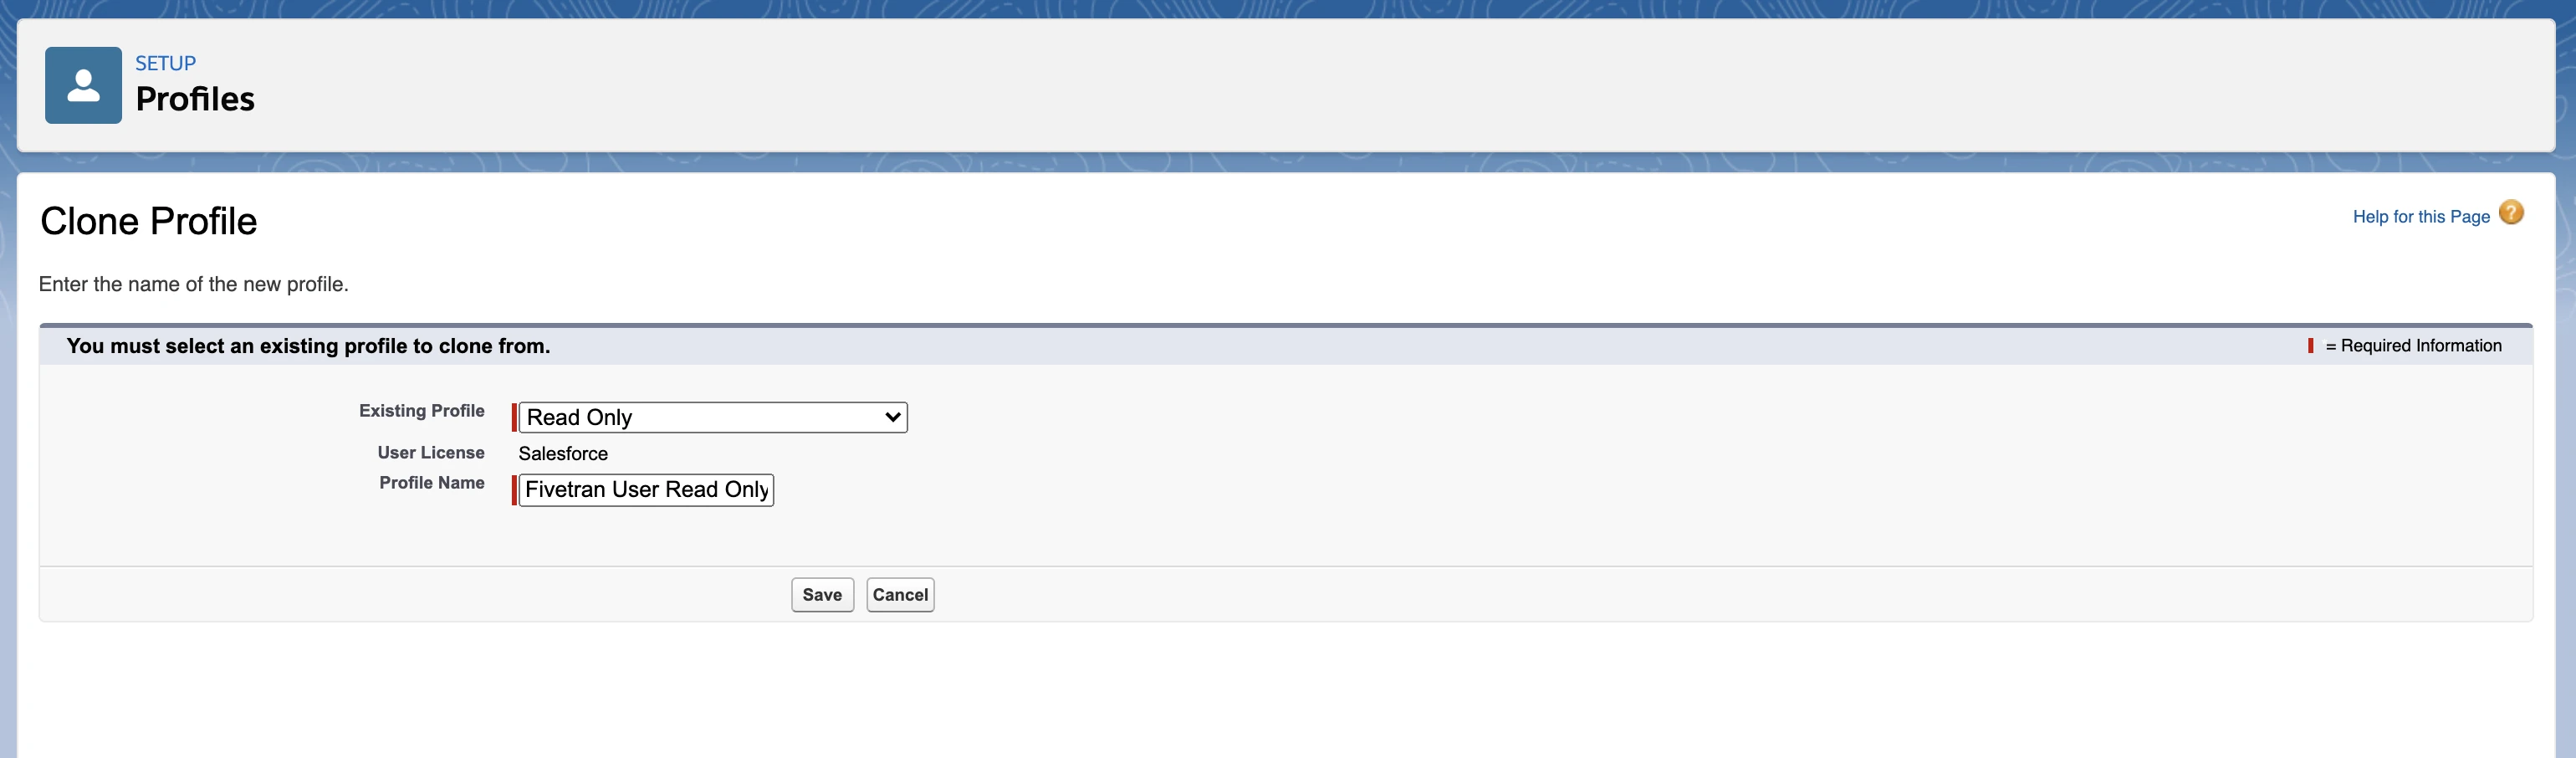
Click Save. The Profile page will open.
Click Edit in the Profile Detail section.
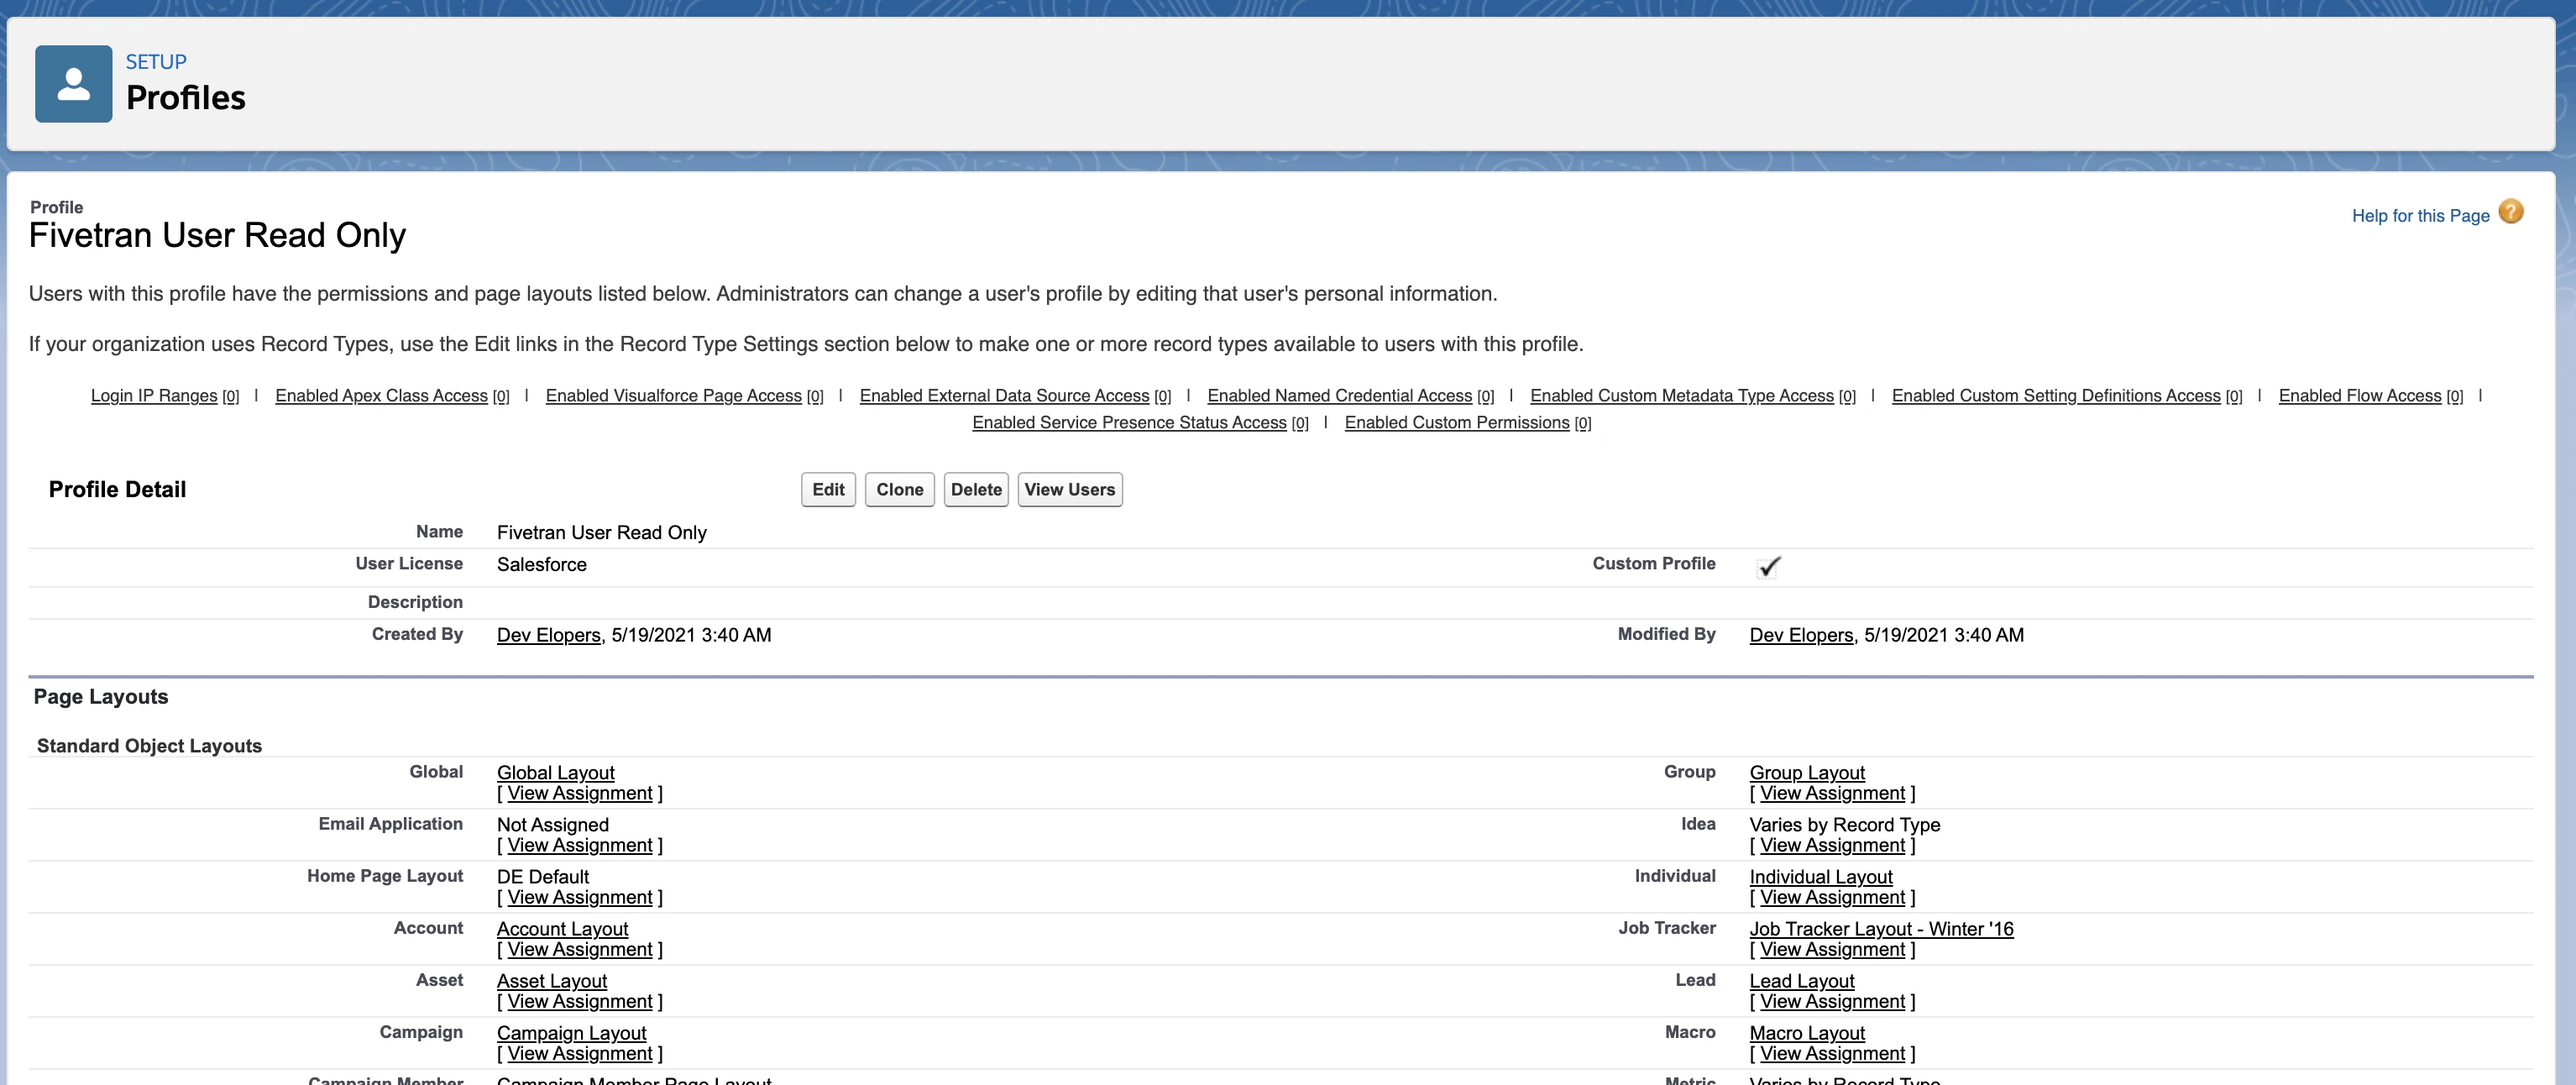
Scroll down to the Standard Object Permissions section and set the Read permission for the objects that you want sync.
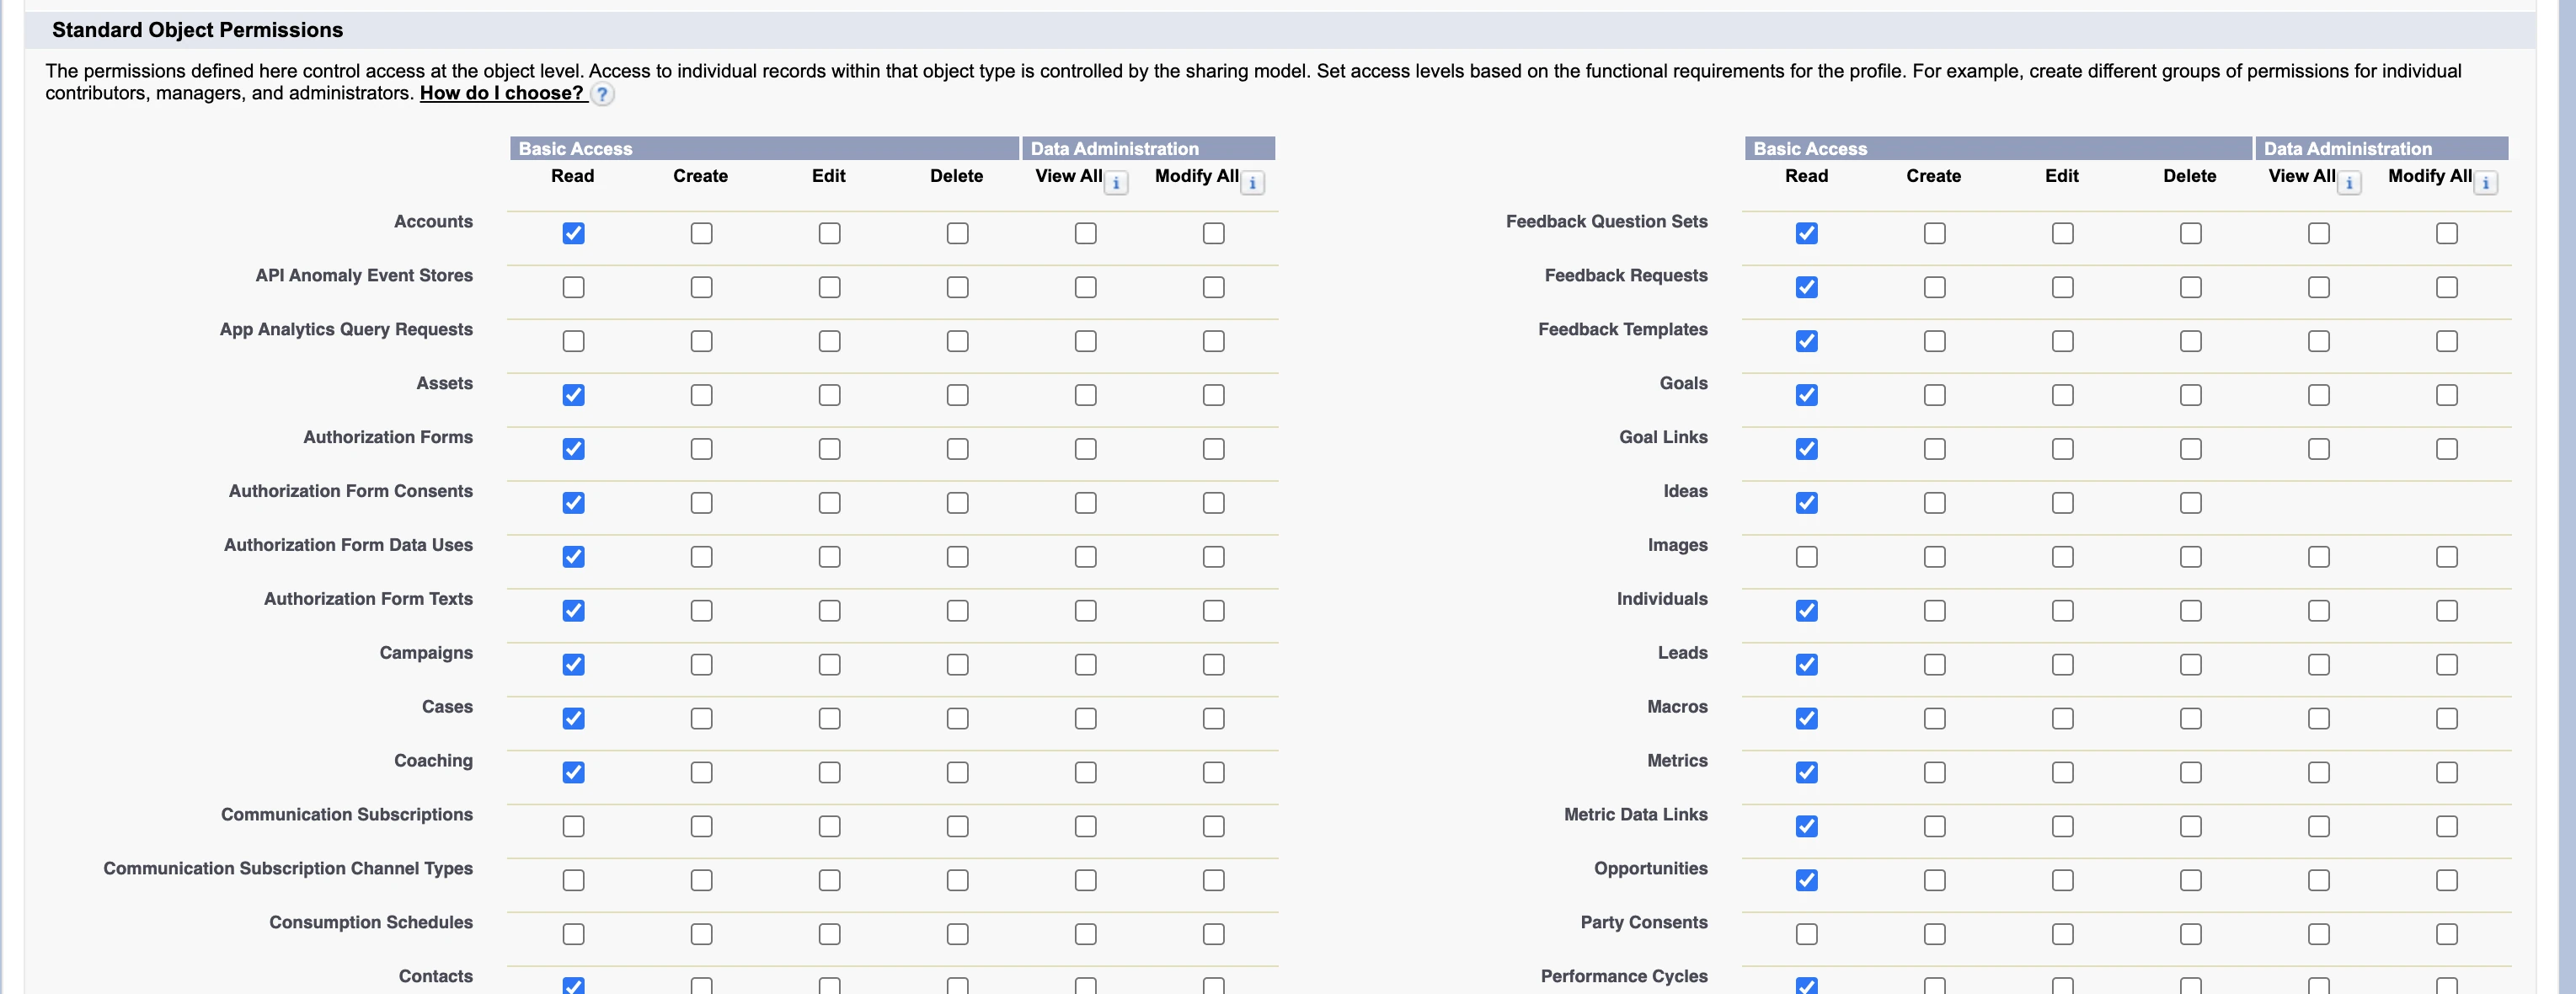
Scroll down to the Custom Object Permissions section and grant the Read permission for the objects that you want to sync.
Click Save.
Under the Administration tab on the left side of the screen, click the Users tab.
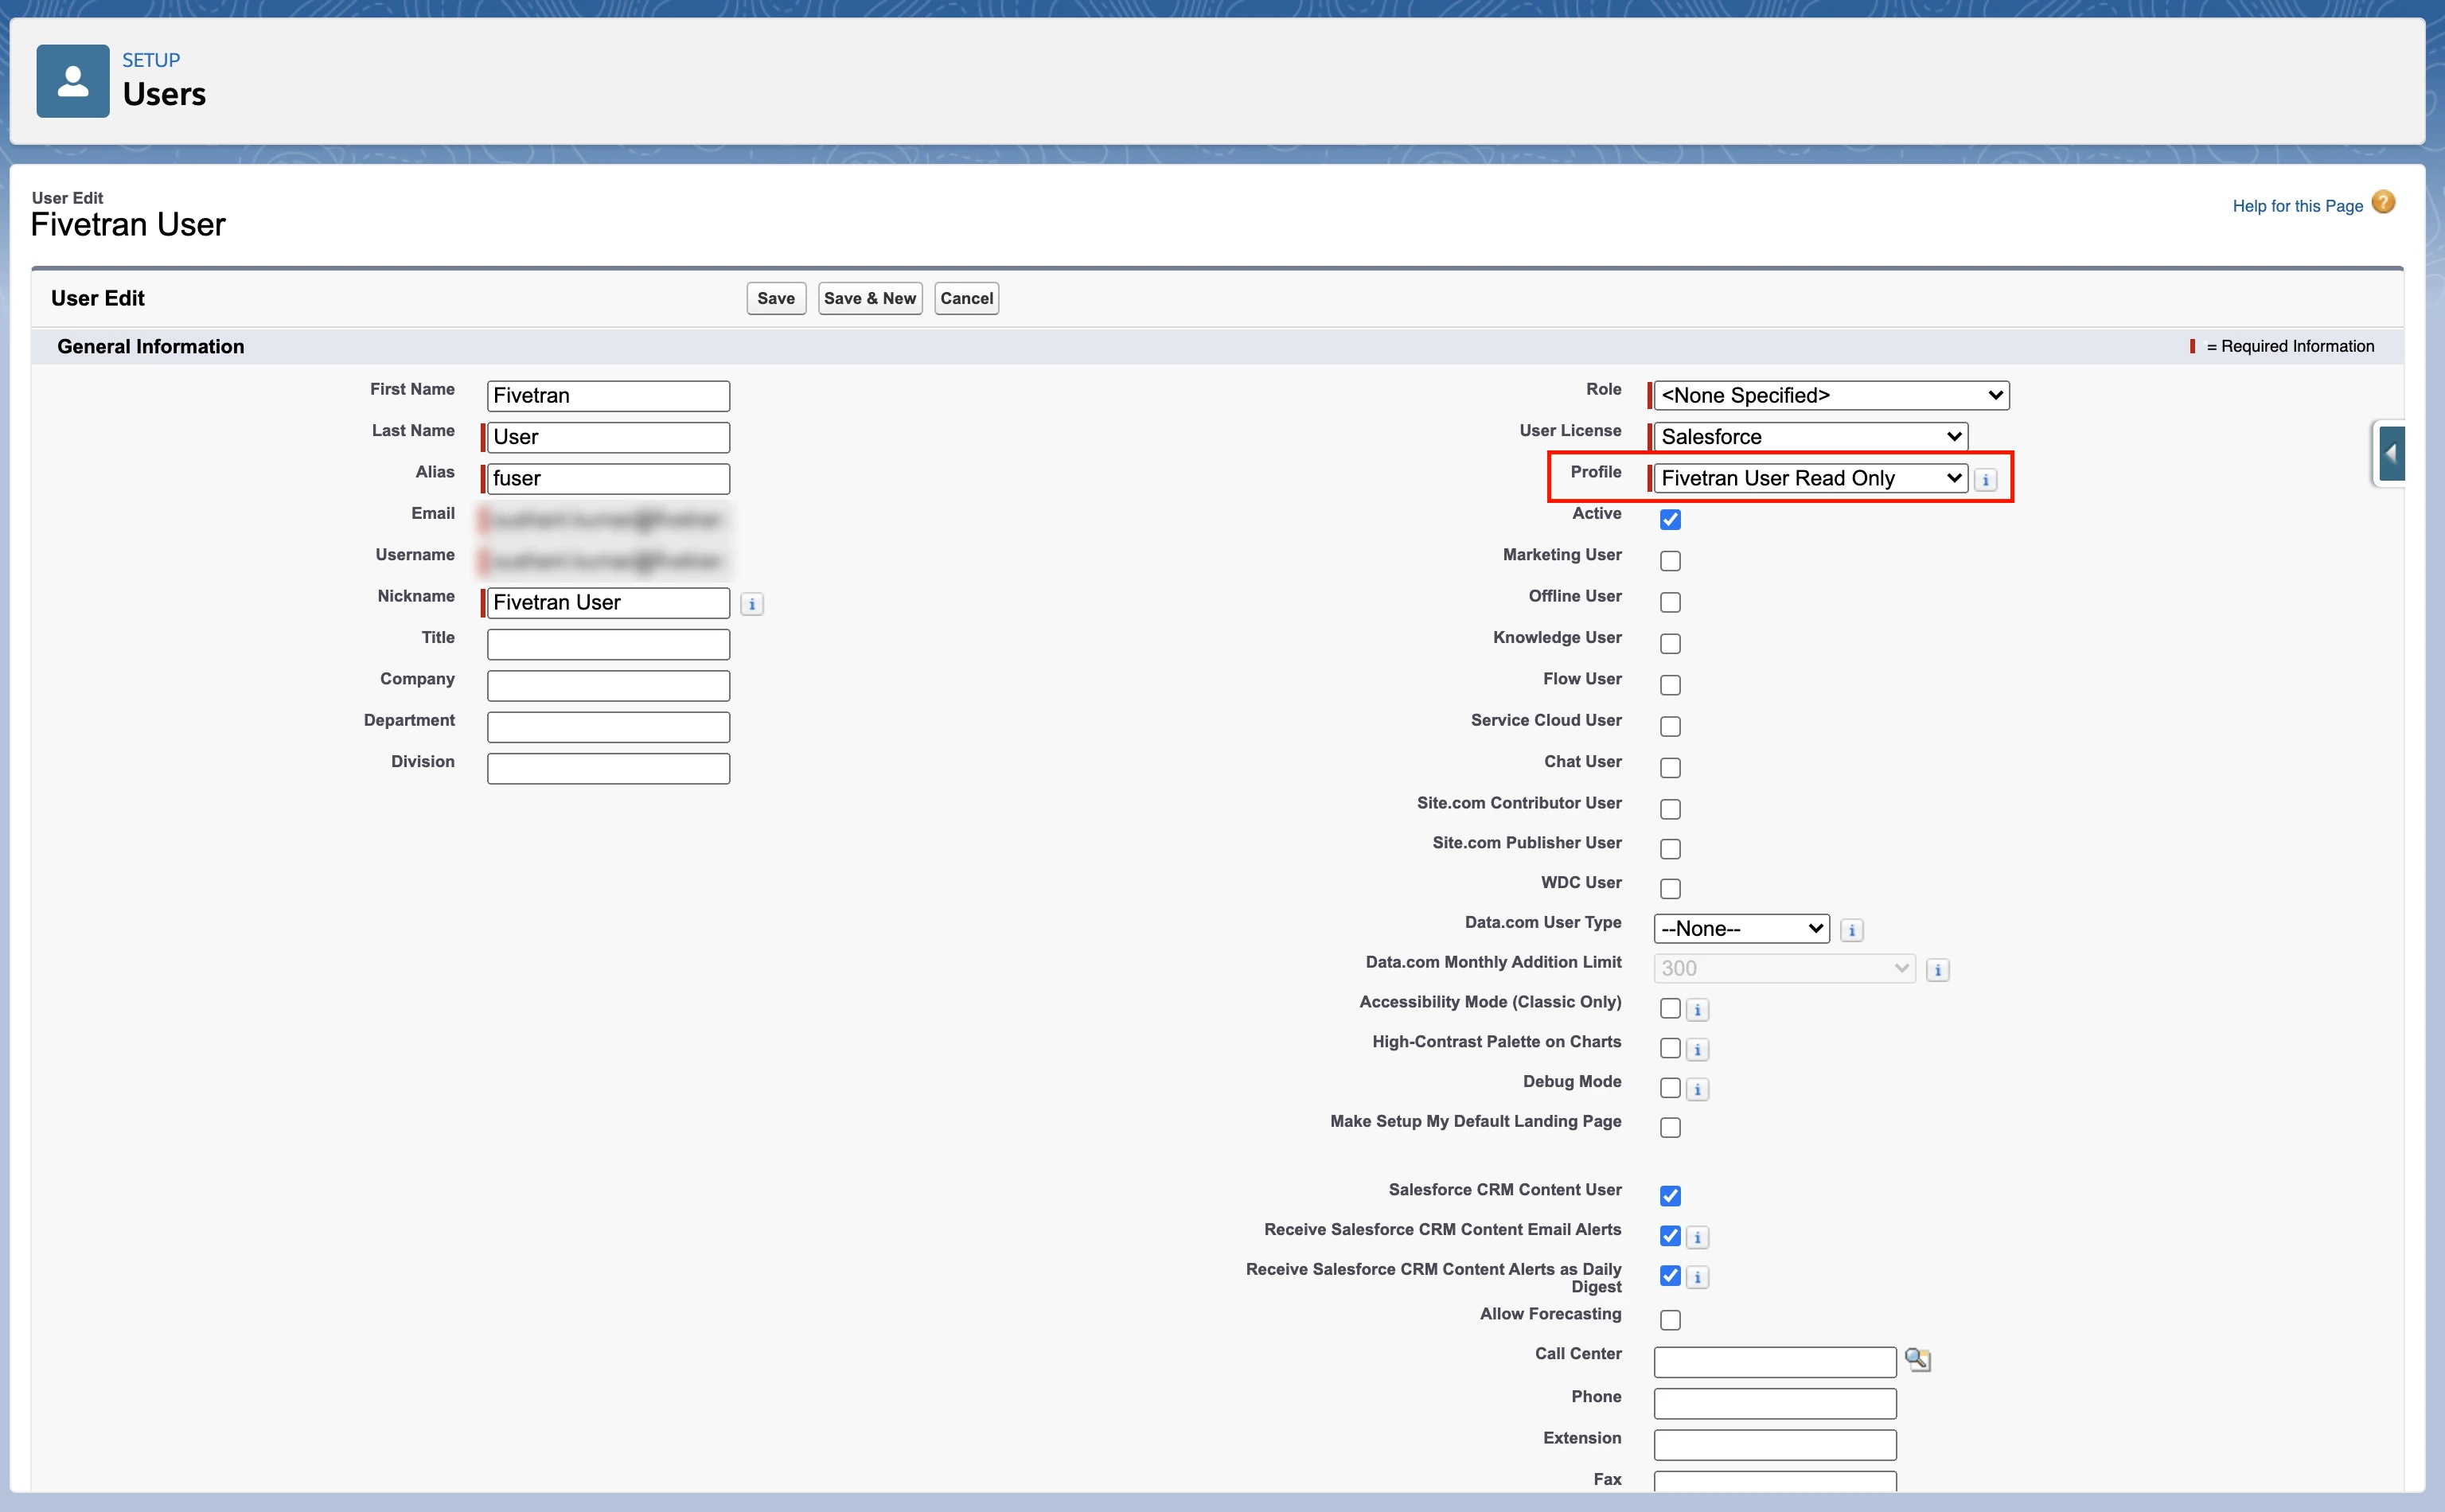
Click New User.
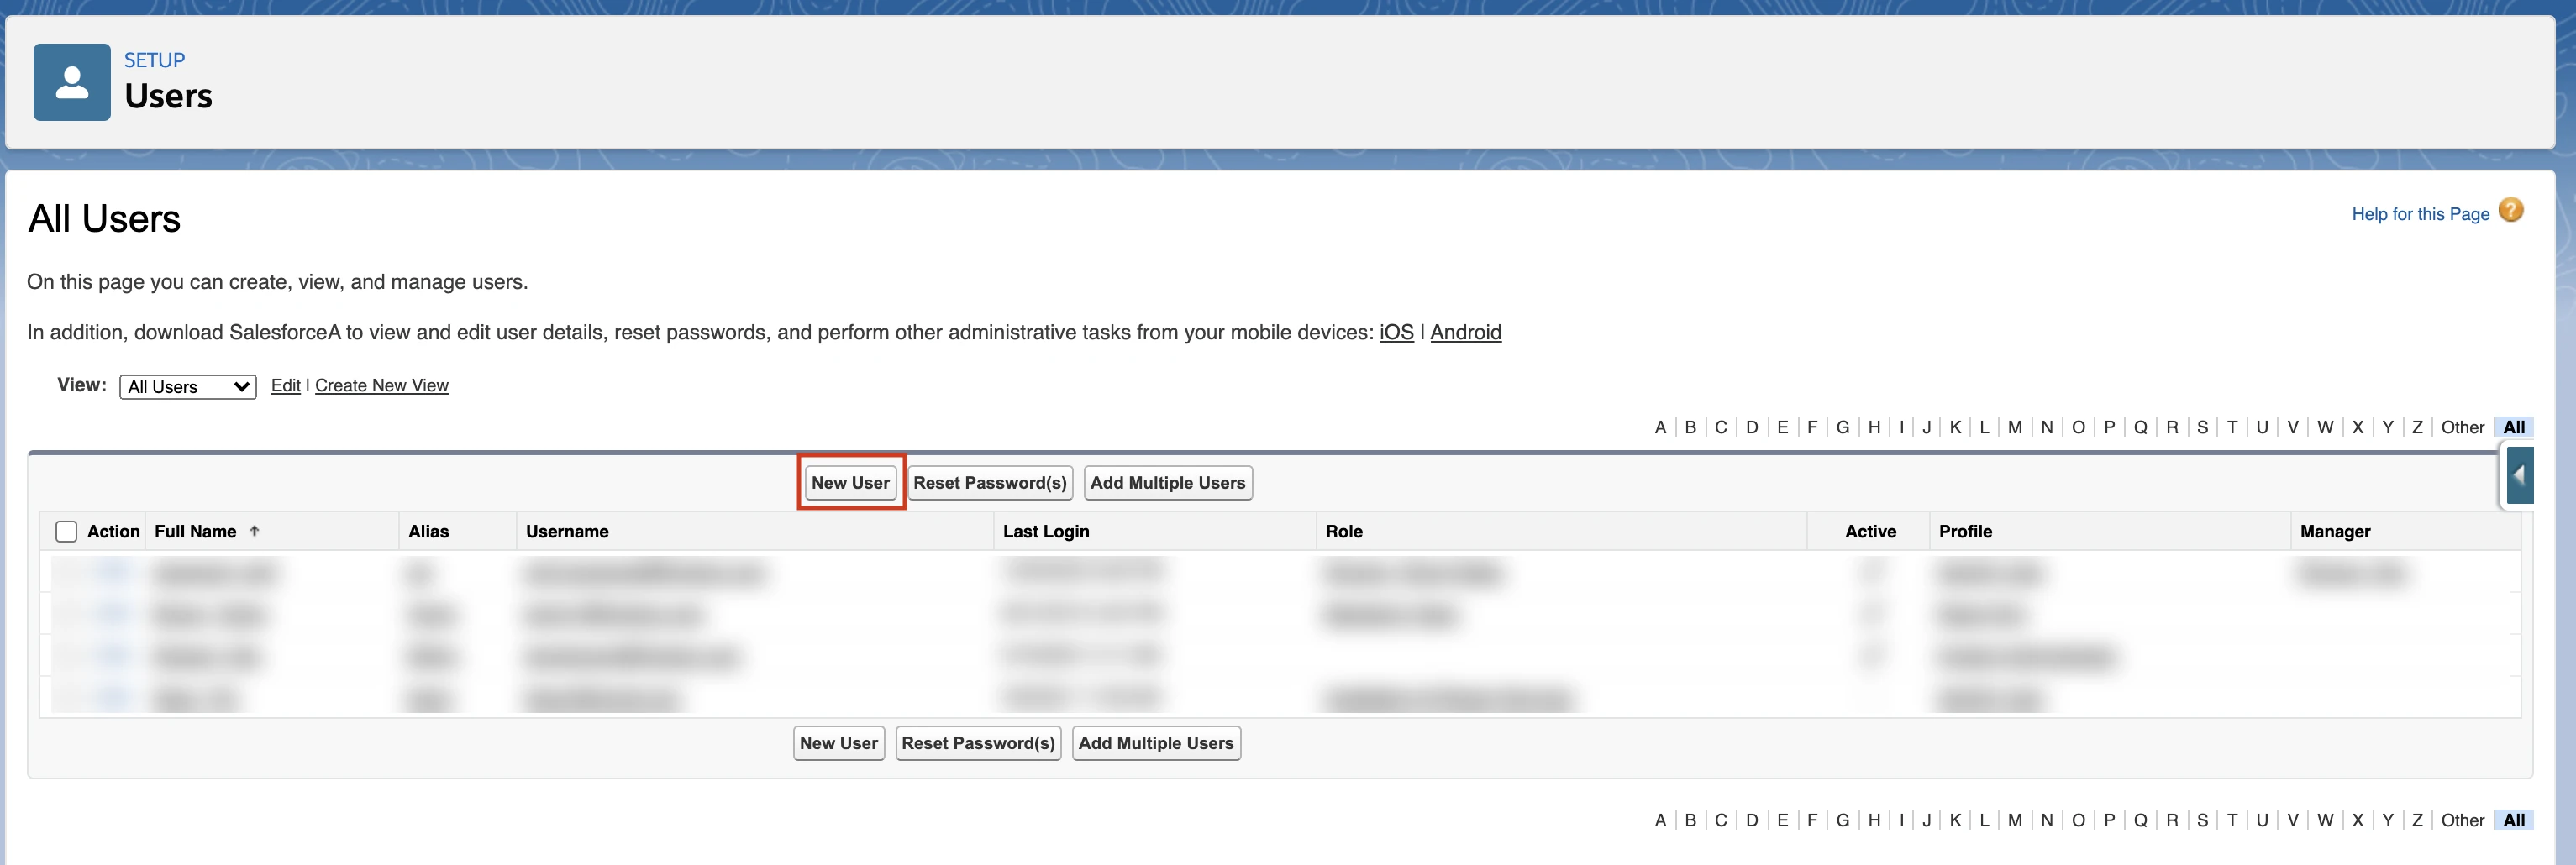
Fill in all the required details.
In Profile, select the user profile you created (Fivetran User Read Only).
You can follow the steps mentioned in the Option 2. Limit the connecting user in Salesforce documentation section to grant permission on field levels using permission sets.
Limit permissions to tables or columns
Expand for instructions
We sync the data that we have access to based on the viewing permissions of the connected user. If you don't want us to sync a certain type of data to into your destination, limit the permissions of the connecting user.
There are two ways to limit the data that we extract from your Salesforce account:
Disable tables in the Fivetran dashboard
To disable tables:In your Fivetran dashboard, navigate to the Salesforce connection details page.
Go to the Schema tab and exclude the tables and columns that you do not want to sync.
If you are concerned about unintentionally syncing sensitive data to your destination, click the gear icon to open the Schema Change Settings menu, then select Allow columns.
Limit the connecting user in Salesforce
Fivetran connects to your Salesforce instance through the credentials of the connecting user, so to limit our access to the data, limit that user's access. You can do this in Salesforce through Permission Sets.
It's best to limit the connecting user's access before you initially connect the user through our setup form. Otherwise, you may have some dead objects in Salesforce that will no longer be updated after you've restricted the user's permissions.
To limit user access:
Log in to Salesforce. You must have Administrative privileges to set permissions.
Click Setup.
Under the Administer tab, click on the arrow next to Manage Users.
You should see a drop-down menu below the arrow. Select Permission Sets in the drop-down menu.
(Recommended) Create a new set of permissions specifically for the user that you will use to connect to Fivetran. For example, 'Fivetran Permissions'.
Users can have multiple sets of permissions assigned to them. If you'd like to be certain of what data we have access to, assign only one set of permissions to the connecting user.
Press New > Enter in Label > Choose Appropriate User License Type. You'll see the settings for the new permission set (for example, 'Fivetran Permissions').
Select Object Settings.
Select which fields you would like this connecting user, and therefore Fivetran, to have access to. The default setting is No Access.
The only permissions relevant to Fivetran are that we can read the data, though the user themselves may need to be able to do more. Read permission grants access to view records that are created by that user or are shared using rules, roles, or manual sharing. View All permission grants access to all records of that type (for example, the Account type).
To enable the user to access all the files in the org, provide the user with the Query All Files permission. Fivetran can not sync all the records from the ContentNote, ContentDocument, ContentDocumentLink, and ContentVersion objects without the Query All Files permission.
Set the View Setup and Configuration permission to enable the Limits resource, which allows us to access different limits using API to optimize data sync.
Go to Administer > Manage Users > Users and select the user account that you will use to log in through Fivetran.
Scroll down to Permission Set Assignments and click Edit Assignments.
Move Fivetran Permissions from Available Permission Sets to Enabled Permission Sets.
Click Save.
Configure AWS PrivateLink
Prerequisites
To set up AWS PrivateLink, you need:
- a Business Critical plan.
- A Fivetran instance configured to run in the mentioned AWS regions.
- A Salesforce Private Connect license
Set up AWS PrivateLink
Expand for instructions
To set up AWS PrivateLink, do the following:
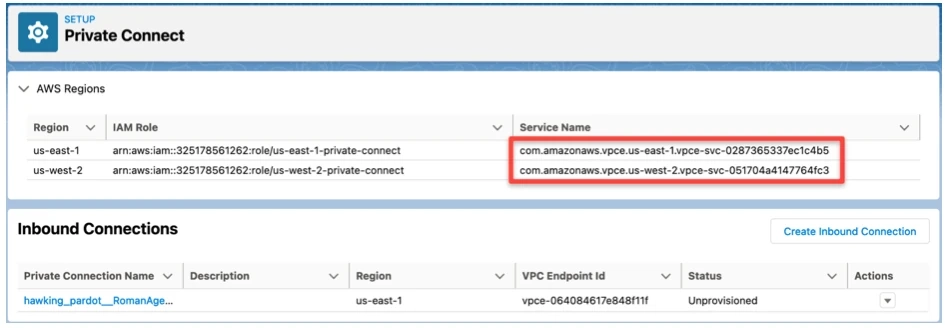
Log in to your Salesforce Private Connect service.
Send your Service Name to our support team. Fivetran uses that service name to configure the Interface Endpoint.
Service names are the same across all Salesforce accounts.
We provision our AWS infrastructure for the Inbound connection. The infrastructure looks similar to any other Private Link client and consists of an Interface Endpoint, Security Group, and Route53 CNAME in the corresponding region. We use the provided Private Connect service name to configure the Interface Endpoint.
We provide you with the Interface Endpoint ID. Use that ID to create an Inbound connection in your Salesforce dashboard.
Salesforce may charge you extra for this new connection.
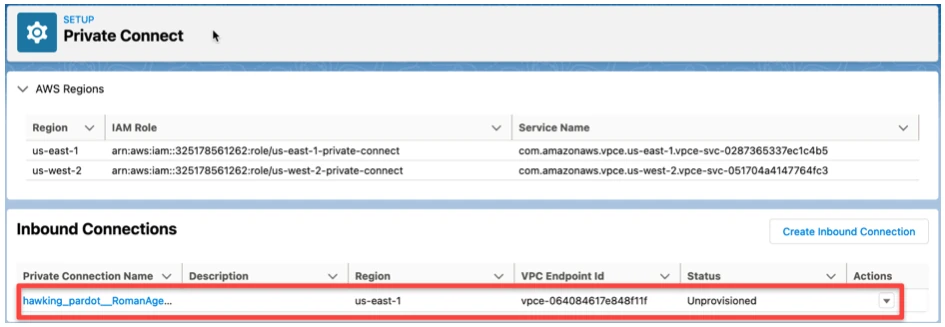
Select Actions > Sync to verify that the inbound connection is configured properly.
Select Actions > Provision to provision the connection.
Send your Domain Name to our support team. We use that domain name in the provisioned Route53 CNAME record, which maps the name to our Interface Endpoint URL.
You can find your domain name on the My Domain Settings page of your Salesforce dashboard.
Finish setting up your Salesforce connection as usual. The My Domain name will automatically map to the Interface Endpoint URL.
Finish Fivetran configuration
Fivetran has two separate services for Salesforce. Choose the connector for the environment you'd like to use:
- Production environment
- Sandbox environment
In the connection setup form, enter the Destination schema name of your choice.
(Hybrid Deployment only) If your destination is configured for Hybrid Deployment, the Hybrid Deployment Agent associated with your destination is pre-selected for the connection. To assign a different agent, click Replace agent, select the agent you want to use, and click Use Agent.
Select your Authentication Method:
For OAuth2.0 authentication, provide credentials:
(Optional, Private Preview only) If you want to manage your credentials outside of Fivetran, enable the Use External Secrets Manager toggle. For some connectors and destinations, this toggle only appears after you select a credential-based authentication method. See the External Secret Managers documentation for more information.
- If you have already configured External Secret Managers for your account, select one from the drop-down menu. Note that the list is filtered by the deployment model of the destination: if the destination uses SaaS Deployment, External Secret Managers configured for Hybrid Deployment won't be available, and vice versa.
- To edit the details of the selected External Secret Manager, click Edit manager details in Account Settings.
- To set up a new External Secret Manager, click Configure a new secrets manager. See the Create New External Secret Manager documentation for prerequisites and setup instructions.
- You can manage all your External Secret Managers at any time under Account Settings. See the External Secret Managers documentation for more information.
- When ESM is enabled, credential fields are replaced by ESM key fields. In each ESM key field, enter the name of the secret stored in your external secrets manager that corresponds to that credential — not the credential value itself. For more information, see External Secret Managers.
If you chose to not use External Secret Manager:
a. In the Client ID field, enter the consumer key for your configured External Client App.
b. In the Client secret field, enter the consumer secret for your configured External Client App.
For mTLS authentication, provide credentials, certificate, and private key:
i. Provide credentials:
(Optional, Private Preview only) If you want to manage your credentials outside of Fivetran, enable the Use External Secrets Manager toggle. For some connectors and destinations, this toggle only appears after you select a credential-based authentication method. See the External Secret Managers documentation for more information.
- If you have already configured External Secret Managers for your account, select one from the drop-down menu. Note that the list is filtered by the deployment model of the destination: if the destination uses SaaS Deployment, External Secret Managers configured for Hybrid Deployment won't be available, and vice versa.
- To edit the details of the selected External Secret Manager, click Edit manager details in Account Settings.
- To set up a new External Secret Manager, click Configure a new secrets manager. See the Create New External Secret Manager documentation for prerequisites and setup instructions.
- You can manage all your External Secret Managers at any time under Account Settings. See the External Secret Managers documentation for more information.
- When ESM is enabled, credential fields are replaced by ESM key fields. In each ESM key field, enter the name of the secret stored in your external secrets manager that corresponds to that credential — not the credential value itself. For more information, see External Secret Managers.
If you chose to not use External Secret Manager:
a. In the Client ID field, enter the consumer key for your configured External Client App.
b. In the Client secret field, enter the consumer secret for your configured External Client App.
ii. In the CA-signed Certificate or Public Key field, upload the CA-signed certificate file you generated.
iii. In the Private key field, upload the private key you generated.
Enter the My Domain URL for your organization.
If you want to sync formula fields directly (not recommended), set the Sync formula fields directly toggle to ON.
(Private Preview only) If you want to sync Salesforce Files, set the Sync Salesforce Files to your destination's object storage toggle to ON.
- This feature is available only for connections that are set up for destinations supporting unstructured file replication.
- File syncing is not supported for connections using Hybrid Deployment.
(Optional) In the Max Salesforce API usage field, enter a percentage value to specify how much of your Salesforce API quota the connection consumes during syncs.
Click Save & Test. Fivetran will take it from here and sync your data from your Salesforce account.
Fivetran tests and validates the Salesforce connection. On successful completion of the setup tests, you can sync your Salesforce data to your destination.
Setup tests
Fivetran performs the following Salesforce connection tests:
The Verifying the input
My DomainURL test validates that the My Domain URL you entered useshttpsat the beginning and ends withmy.salesforce.comwith no additional path.The Validating Private Connectivity test checks that the My Domain URL resolves to a private IP address, confirming your PrivateLink connection is correctly configured. We perform this test only when using the Connect via Private Link connection method. We skip this test for direct connections.
The Validating REST API call limit test verifies that the value you entered in the Max Salesforce API usage field is between 50% and 90%.
The Connecting to API test establishes a connection to the Salesforce API and validates your credentials.
For Salesforce Sandbox connections, the test establishes a connection to the Salesforce Sandbox API and validates your credentials.
The tests may take a couple of minutes to finish running.