Workday HCM Setup Guide
Follow our setup guide to connect Workday HCM to Fivetran.
Prerequisites
To connect Workday HCM to Fivetran, you need a Workday Integration System User account that has read permissions for human resources domain objects in Workday.
You can use a Workday user instead of a Integration System User. However, we recommend that you use a Workday Integration System User.
Setup instructions
Create integration system user
- Log in to your Workday application using an Administrator account.
- In the application's search box, search for 'create user' and then select Create Integration System User.
- Enter a User Name and Password.
- Leave the Require New Password at Next Sign In checkbox clear.
- If you want to use the Basic authentication mode in the Fivetran setup form, select the Do Not Allow UI Sessions checkbox.
If you select the OAuth authentication mode in the Fivetran setup form, do not select the Do Not Allow UI Sessions checkbox. OAuth requires UI sessions.
- Click OK and then click Done.
Create integration security group
- In the search box, search for 'create security group' and then select Create Security Group.
- In the Type of Tenanted Security Group drop-down menu, select Integration System Security Group (Unconstrained).
- Enter a Security Group Name and click OK.
- In the Edit Integration System Security Group (Unconstrained) window, add the integration system user you created in Step 1 to this security group.
- Click OK.
Add integration security group to the authentication policy
- In the search box, search for 'manage authentication policies' and then select Manage Authentication Policies.
- Click Add Authentication Policy.
- In the Restricted to Environments field, select the environments you need access to, and then select the Authentication Policy Enabled checkbox.
- In the Authentication Allowlist section, enter the Authentication Rule Name.
- Select the Security Group you created.
- Enter the Authentication Condition Name and then select the Authentication Conditions.
- In the Allowed Authentication Types section:
- If you use OAuth, select Any.
- If you don't use OAuth, in the Specific field, select User Name Password.
- Click OK.
- In the search box, search for 'Activate All Pending Authentication Policy Changes' and then select the corresponding task.
- In the Comment text box, enter 'I approve the changes' and then click OK.
- Select the Confirm checkbox and then click OK.
Add domain security policies
In the search box, search for 'security group membership and access' and then select the report link.
Select the security group you created in Step 2 and click OK.
Click the ... symbol next to the security group name.
Select Security Group > Maintain Domain Permissions for Security Group.
In the Integration Permissions section, in the Domain Security Policies permitting Get access field, search and select the security domains.
The above lists of security domains are not comprehensive, and some tables may require additional permissions to sync. To identify the permissions, search for the table name in the View Security for Securable Item task. Click View Security and look for the GET requests for the object. Find the security domains and then configure these domains in the Workday tenant.
You will see an alert. You must activate the security policy changes.
Click OK and then click Done.
Activate security policy changes
- In the search box, search for 'Activate Pending Security Policy Changes'.
- Select Activate Pending Security Policy Changes.
- In the comment box, enter 'I approve the changes' and then click OK.
- Select the Confirm checkbox and then click OK.
Create integration transaction log service
Perform this step only if you want to use the Integration Transaction Log Service for History Mode. Skip to the next step if this does not apply to you.
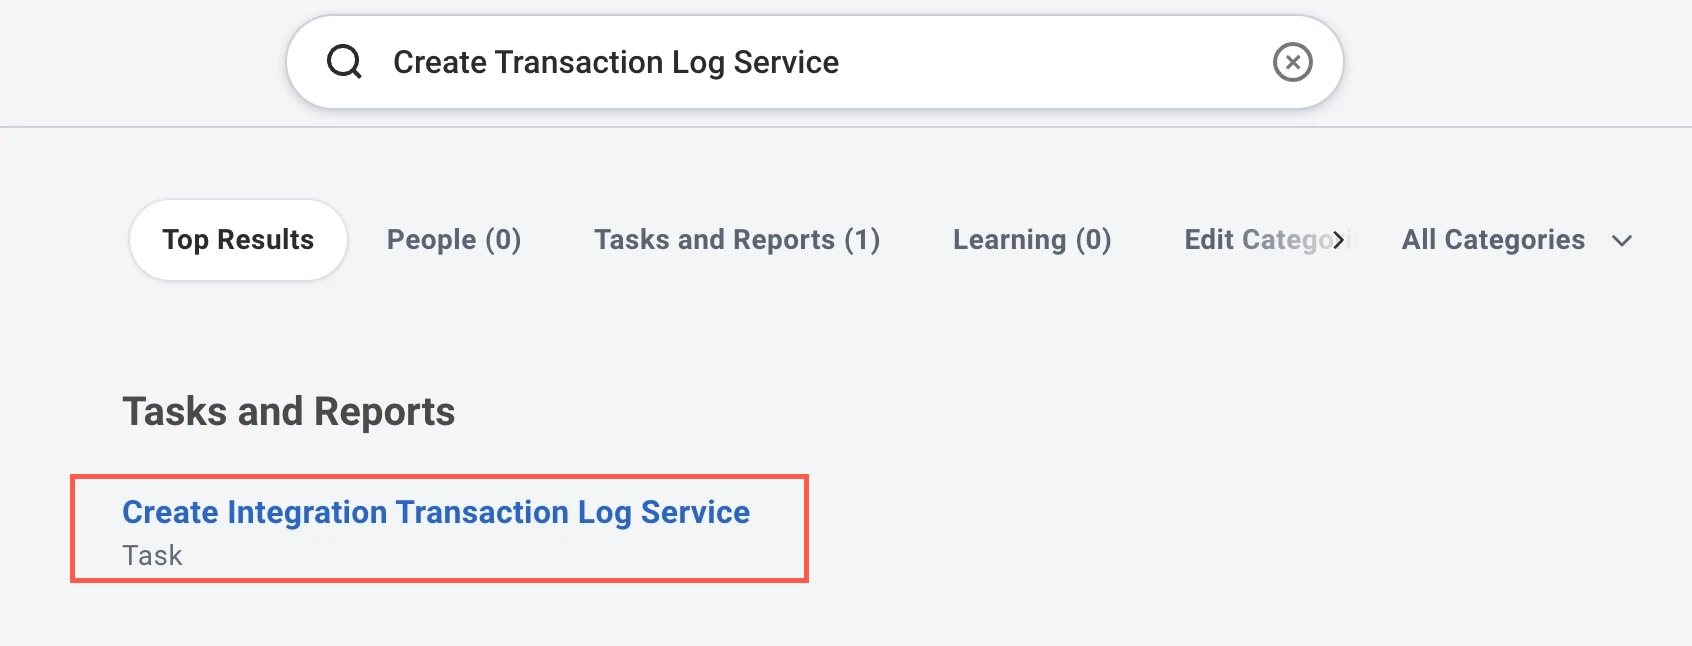
In the search box, search for Create Transaction Log Service and click Create Integration Transaction Log Service.
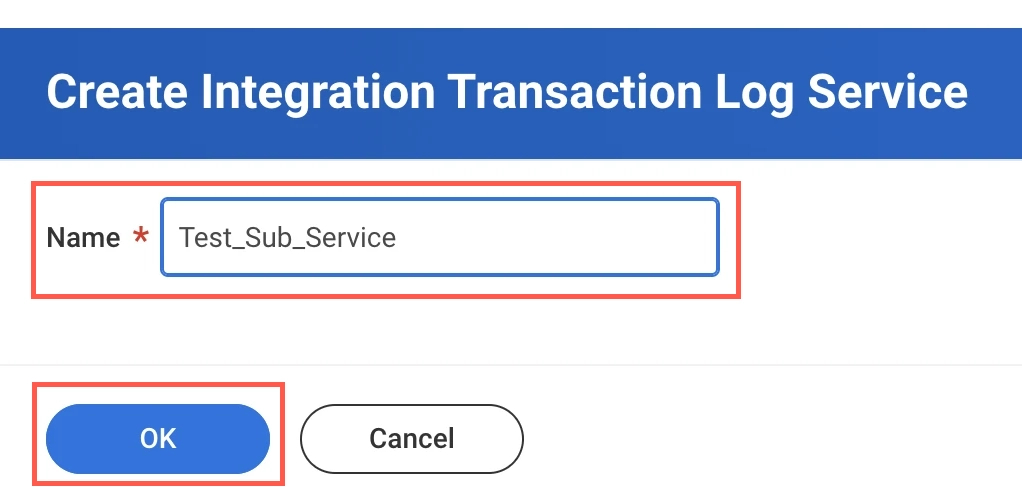
Enter a Name for the service and click OK.
On the Integration Transaction Log Service page, click the ... (Actions) button next to the service name, hover over Integration Transaction..., and then click Configure Integration Transaction Log.

On the Configure Integration Transaction Log for Transaction Log Service page, select the subscription option that you want and click OK.
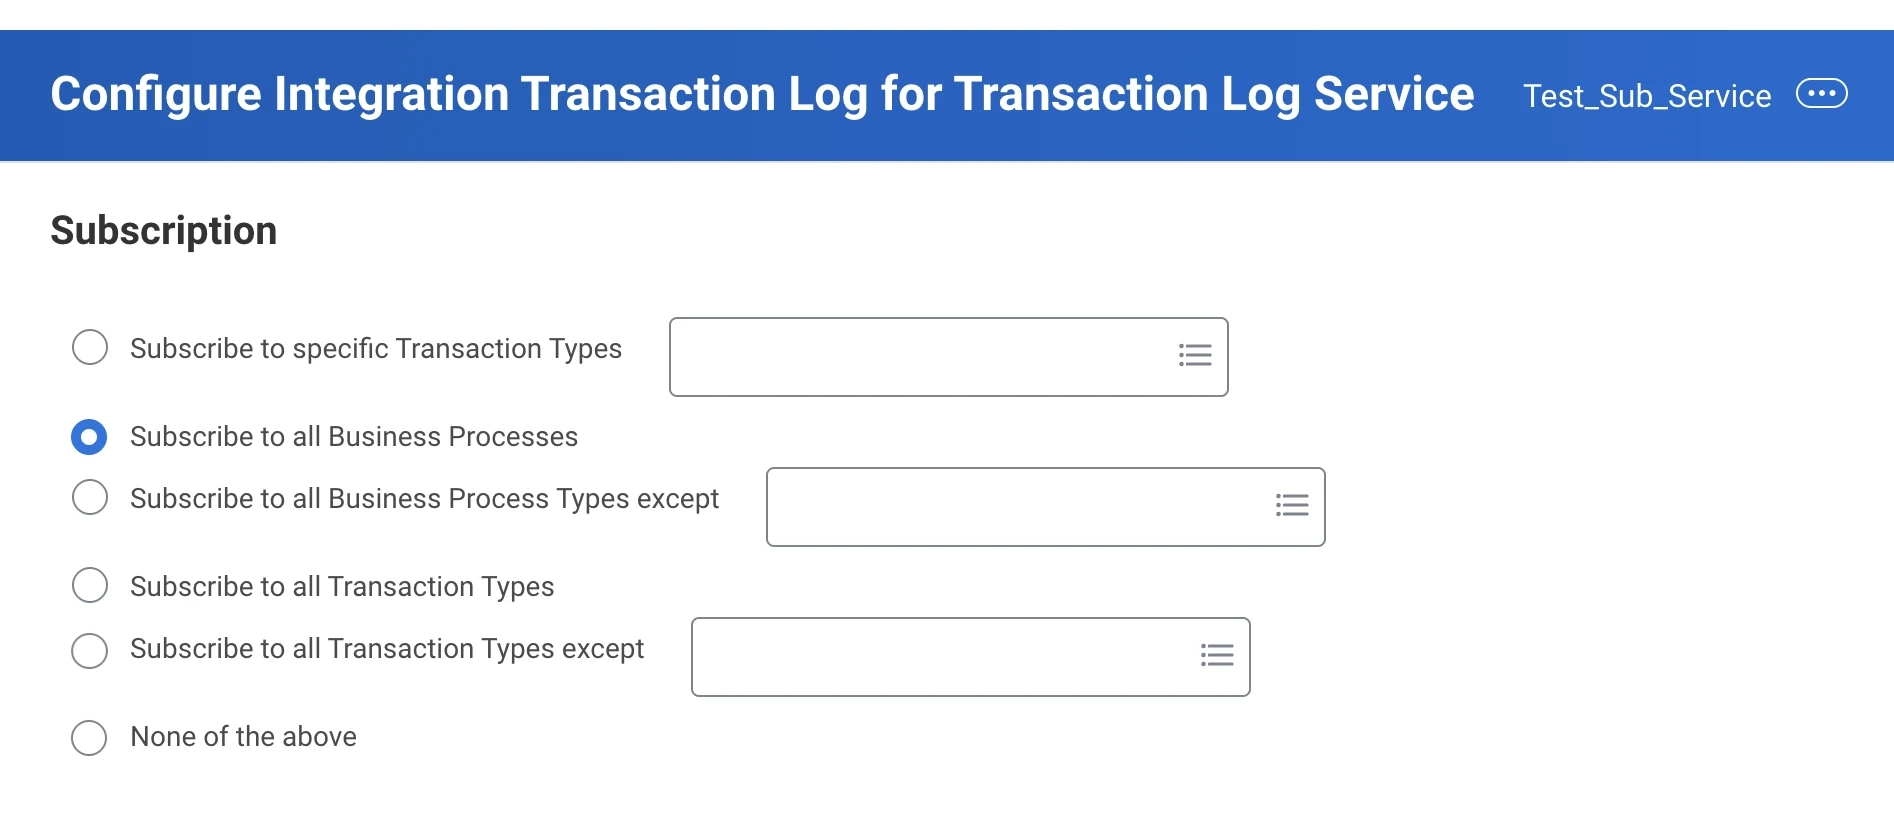
Despite its name, the None of the above option does not disable the subscription. When it is selected and no subscriber reference is configured on the Workday side, the Integration Transaction Log Service returns all transaction types — behaving identically to Subscribe to all Transaction Types. This may significantly increase your data volume. This behavior is controlled by Workday and cannot be changed by Fivetran. To limit the transaction types you sync, select one of the specific subscription options.
Click the ... (Actions) button, hover over Integration IDs, and then click View IDs.
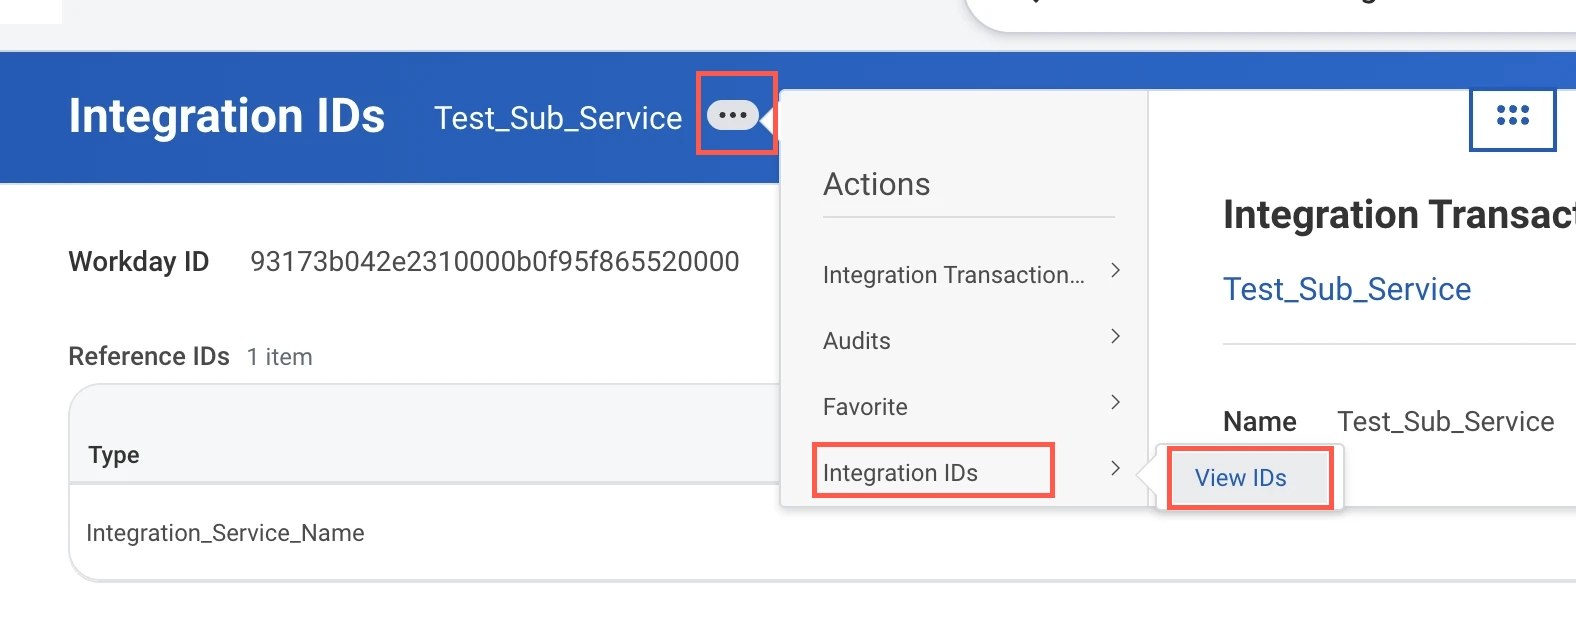
Make a note the Workday ID value.

Connect using OAuth
Perform this step only if you want to authenticate the connection using OAuth. Skip to the next step if you want to use Basic authentication for your connection. The API client for integrations uses non-expiring refresh token to set up the connection and thus does not require you to manually authorize the client.
In the search box, search for Register API Client for Integrations.
In the Client Name field, enter your custom app name.
(Optional) Select the Refresh Token Timeout (in days). You can select a value between 1 and 365 days. The default value is 30 days. To prevent the refresh token from timing out, Workday automatically selects the Non-Expiring Refresh Tokens check box.
If you select a timeout period for the refresh token, you need to re-authorize your connection on the Edit connection details tab of the connection details page after the token expires.
In the Scope (Functional Areas) drop-down menu, select the scopes you need access to.
To identify the required Scopes (Functional Areas), search for the table name in the View Security for Securable Item task. Click View Security and look for the GET requests for the object. Find the required Scope (Functional Area) in the All Functional Areas column.
Do not select the Include Workday Owned Scope and Locked Out due to Excessive Failed Signon Attempts checkboxes.
Click OK.
Make a note of the Client ID and Client Secret. You will need them to configure Fivetran.
Click the Related Actions menu and select API Client > Manage Refresh Tokens for Integrations.
In the Workday Account field, search and select your workday account. This Workday Account should also have the necessary security domains.
Select the Generate New Refresh Token checkbox.
Click OK.
Make a note of the Refresh Token. You will need it to configure Fivetran.
Finish Fivetran configuration
In the connection setup form, enter the Destination schema name of your choice.
(Hybrid Deployment only) If your destination is configured for Hybrid Deployment, the Hybrid Deployment Agent associated with your destination is pre-selected for the connection. To assign a different agent, click Replace agent, select the agent you want to use, and click Use Agent.
Select the authentication mode: Basic or OAuth.
(Optional, Private Preview only) If you want to manage your credentials outside of Fivetran, enable the Use External Secrets Manager toggle. For some connectors and destinations, this toggle only appears after you select a credential-based authentication method. See the External Secret Managers documentation for more information.
- If you have already configured External Secret Managers for your account, select one from the drop-down menu. Note that the list is filtered by the deployment model of the destination: if the destination uses SaaS Deployment, External Secret Managers configured for Hybrid Deployment won't be available, and vice versa.
- To edit the details of the selected External Secret Manager, click Edit manager details in Account Settings.
- To set up a new External Secret Manager, click Configure a new secrets manager. See the Create New External Secret Manager documentation for prerequisites and setup instructions.
- You can manage all your External Secret Managers at any time under Account Settings. See the External Secret Managers documentation for more information.
- When ESM is enabled, credential fields are replaced by ESM key fields. In each ESM key field, enter the name of the secret stored in your external secrets manager that corresponds to that credential — not the credential value itself. For more information, see External Secret Managers.
(Optional) If you chose Basic as the authentication mode, do the following:
i. Enter your Workday Username.
ii. Enter your Workday Tenant. You can find the tenant in your Workday Web Services URL. For example, if your Workday Web Services URL is
https://impl-services1.wd<instance>.myworkday.com/ccx/service/<fivetran>/..., then your tenant is<fivetran>.iii. Enter your Workday Password.
iv. Enter your Workday Hostname. You can find the Workday Hostname in your Workday Web Services URL. For example, if your Workday Web Services URL is
https://impl-services1.wd<instance>.myworkday.com/ccx/service/<tenant>/..., then your hostname isimpl-services1.wd<instance>.myworkday.com.The hostname must include the services endpoint suffix (typically
-services1, but may be-services2,-services3, etc., depending on your Workday configuration). For example:impl-services1.wd<instance>.myworkday.com. Do not useimpl.wd<instance>.myworkday.comas this is the web UI endpoint and will not work for API integrations.(Optional) If you chose OAuth as the authentication mode, do the following:
i. Enter your Workday Tenant. You can find the tenant in your Workday Web Services URL. For example, if your Workday Web Services URL is
https://impl-services1.wd<instance>.myworkday.com/ccx/service/<fivetran>/..., then your tenant is<fivetran>.ii. Enter the Client ID you created.
iii. Enter the Client Secret you created.
iv. Enter your Workday Hostname. You can find the Workday Hostname in your Workday Web Services URL. For example, if your Workday Web Services URL is
https://impl-services1.wd<instance>.myworkday.com/ccx/service/<tenant>/..., then your hostname isimpl-services1.wd<instance>.myworkday.com.The hostname must include the services endpoint suffix (typically
-services1, but may be-services2,-services3, etc., depending on your Workday configuration). For example:impl-services1.wd<instance>.myworkday.com. Do not useimpl.wd<instance>.myworkday.comas this is the web UI endpoint and will not work for API integrations.v. Enter the Refresh Token you generated.
(Optional) To sync custom or calculated fields, set the Sync Custom and Calculated fields toggle to ON and then enter the Workday Integration System ID you found.
(Optional) To use the Integration Transaction Log Service for History Mode, set the Use Integration Transaction Log Service toggle to ON and enter the WID of the Integration Transaction Log Service you created.
Click Save & Test. Fivetran will take it from here and sync your Workday HCM data.
Fivetran tests and validates the Workday HCM connection. On successful completion of the setup tests, you can sync your Workday HCM data to your destination.
Setup tests
Fivetran performs the following Workday HCM connection tests:
- The Checking inputs test verifies that all required credential fields are populated and that the Workday Integration System ID, if provided, contains no spaces or special characters.
- The Connecting to API test attempts a live connection to the Workday HCM API to verify that the credentials are valid, and confirms that Fivetran can access your Workday instance.
The tests may take a couple of minutes to finish running.